Re: Volvo Penta Raw Water Pump
Order of instructions:
Remove pump
Remove back of housing; remove impeller.
If ONLY replacing seal:
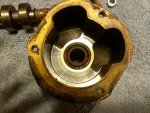
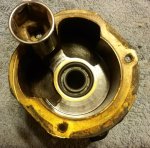
Look down shaft where impeller came out.
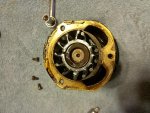
The lip seal is likely brown and nasty. It should be grey or black (see pic's above).
GENTLY figure a way to get this seal out. It looks like rubber, but it is hard as a rock (and so is the new one!).
You can use dental tools, small drill bits, etc... to get to the lip seal, pull the metal ring off, make holes in the lip seal body, and pry it out carefully.
Do NOT scrape anything against the metal shaft, because if you do, you can destroy the portion of the shaft where it meets the lip seal, and actually keeps the water out.
You can also get creative and find a way from the back side of the housing to push on the REAR edges of the lip seal, forcing it up the shaft. This will take TIME and PATIENCE as this is BRASS around the seal, and you do not want to damage any brass around the seal seat, or the steel shaft itself. A pair of needle nose pliers and a 3/8" long by 1/8" diameter bolt of piece of metal may help you push the seal out from the back side. Just push on it a bit, turn the housing 1/4 rotation, push, etc.....
Once the seal is out, you need to clean the gunk/corrosion/rust looking material off the shaft completely where it mates with the new seal. Be creative. You can cut up pieces of scotch brite pad, force them down where the seal was, and turn the pulley so the shaft self-cleans the crap off by scraping against the scotch brite. Do not use heavy sandpaper, anything metal, etc....as any damage to the shaft and you have just wasted your time and $, plus more $ for a whole new pump!
Once the shaft is clean, ensure all debris is remove from the lip seal seat and the shaft w/ a qtip, etc....and slide the new seal down the shaft. Once you get it to the bottom, this may be the fun part. I did mine with the whole assembly removed, but you can install a new seal by getting something SIMILAR to a deep well socket the seats INSIDE the seal, will bottom out against the inner edge of the seal, and not apply pressure to the outside or inside of the seal.
Basically you need something 19 to 20mm OUTSIDE diameter, and about 1 to 1.5mm thick, that can press the seal in place.
YOU need to verify that dimension, as I installed mine with the whole assembly out, and didn't have to deal with the shaft in place.
When you replace the impeller, it tells you to use glycerin. I was out. I used vegetable oil, and I am sure that utilizing light glycerin or vegetable oil on the shaft and seal when inserting the seal would be helpful.
Make sure it seats fully down against the seat, and does not protrude above the recess it goes into. Make sure it's in squarely.
If replacing seal AND BEARINGS:
Center punch shaft in exact center of pulley rotation.
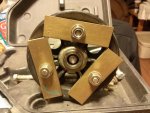
Drill hole w/ 1/8th inch drill bit to make something that the puller will rest on, if you have one with a hardened point. Otherwise, you'll have to ensure your puller shaft seats against something that is smaller in diameter than the hole in the pulley, so it will come off the shaft cleanly.
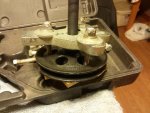
Install puller and ensure it is "square" to pulley by rotating pulley and adjusting puller "jaws" until puller is straight to shaft.
Place whole assembly in a vice that will clamp to the pulley (NOT THE PUMP--it's BRASS!)
Heat pulley w/ propane torch, but just enough to warm it up a bit (maybe 40 seconds near end of shaft).
Use 1/2" ratchet to get pulley removed. Ensure it is coming off straight during removal.
Remove retaining ring w/ snap ring pliers. Do not discard.
Invert pump/shaft assembly and place it over two blocks of wood in such a way that shaft can be forced down through the housing while using hammer and small chunk of wood, striking the end where the impeller would go. (This may go a bit easier if you heat oven to 200 degrees and place entire assembly in over for 20 minutes or so.) You are driving TWO bearings out of the brass assembly during this procedure, they are press fit, they are rather tight, and again this is BRASS! so drive everything squarely and take your time.)
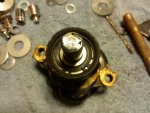
Once shaft is out (see pic above), remove and discard oring. (It will be replaced.)
This is the fun part--getting the bearings off. You can warm the assembly, but I recommend NOT melting the rubber seals on the bearings. You can get VERY creative and use a series of properly sized deep well sockets (I used 1" OD 1/8th wall aluminum tubing) to push the bearings off. They only go ONE WAY! The shaft is 15mm on one end, and 16mm on the other, so obviously the bearings should be pressed off in the direction of where the pulley was pulled from, NOT toward the keys cut for the impeller!)
OR, you can take this to a shop and have them press the bearings off. Discard the bearings. DO NOT DO NOT discard the stainless spacer between the bearings!
Assembly:
Clean shaft w/ scotch brite pad or ultra light sanding w/ 600 or so grit paper, on the bearing side.
GENTLY take a file and round the very end of the shaft where the bearings will go back on, then lightly sand/chamfer this corner, so there are no sharp lips for the new bearings/pulley to catch on during install.
On the other (dirty) side, use scotch brite pad to GENTLY remove rust/corrosion. You should see a bright ring around the shaft where the old seal was trying to hold water back. That's normal. If it's a groove, that's bad. This portion of the shaft IS YOUR WATER SEAL. If you have major scoring here from the old lip seal, or you gouge it or remove material, the shaft is useless and will LEAK! You can take a wire brush to clean all the crap out of the grooves where the impeller goes.
Bearings: Either figure a way to do this right and STRAIGHT, or take it to a shop w/ a press!
Use lots and lots of light oil here, and or heat shaft lightly to improve bearing installation. Too much heat WILL MELT THE GREASE inside the bearing, so you do not want too much heat!
Press first bearing on, absolutely ensuring pressure is only applied to the inner ring of the bearing where it meets the shaft. If you press on the seal of the bearing, the shield of the bearing, or the outer portion of the bearing, you WILL destroy it.
Seat first bearing completely down the shaft to the lip (you can easily see this "lip" as this is where shaft diameter changes from 15mm to 16mm and has a slighlt radius. It will stop on its own. Push the last 1/16" very carefully to prevent damage to the bearing.
Install spacer. It just slides on.
Press second bearing on, until it just touches the spacer enough so that the spacer doesn't easily turn w/ finger pressure. You don't need to slam this 2nd bearing down against the spacer very hard.
Install new seal into pump housing (see above).
Install new oring.
Now more fun....getting assembly back in.
You can warm the housing up a bit in the oven, or run a torch over it lightly for a few seconds to just heat it a bit.
Start insertion of the shaft into the housing, ensuring brass housing is sitting FIRMLY AND SQUARELY on a block of WOOD. If you set it on anything else, you will mar the brass surface.
Gently start insertion with a rubber mallet, and turn housing 1/4 turn after every 2-3 blows so bearing is going into housing squarely.
After first bearing is in about 3/16", you're pretty good from there, but keep turning the housing as you insert the shaft assembly just to make sure all is straight.
Watch your depth....as the 2nd bearing enters the housing, you only want to seat it far enough so the snap ring can go back into place, and NO further. So keep an eye out for the snap ring entry line, and again, be very gentle on the last 16th" of entry of the assembly.
Re-insert snap ring (aka retaining ring).
Now for the pulley:
Again you can SLIGHTLY warm pulley or end of shaft, but not too much heat or you'll melt bearing grease.
Place entire housing again on WOOD, and WOOD ONLY to keep from marring the brass. (It helps greatly to have someone holding the piece of wood so the whole assembly doesn't bounce back up, as this is useless and frustrating, and none of the energy is actually transferred into forcing the pulley onto the shaft)
Place pulley on end of shaft.
With rubber mallet and small piece of wood, strike pulley gently, turning 1/8th turn every 2nd stroke, to ensure pulley is going on straight. Once it's on about 1/8", then you can strike harder until pulley is fully seated, but still rotating pulley every few taps of mallet until end of shaft is even w/ front face of pulley.
Now you're done and can re-assembly pump just as if you were doing an impeller change.


