Thanks CT1762, will do!yeah nothing wrong with Permatex 3 other than it being really messy. 100% fine to use. i stocked up on cans of the original BRP gasket sealing compound once my local parts guy told me it was going to be discontinued. its now NLA as i'm sure you found out.
really any gasket stuff thats non-harneding and isn't silicon based should work there. it's only sealing out exhaust and some low-pressure water! i'd go over all of the gasket mating surfaces once more so they are grease free but should be fine after that.
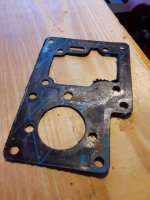
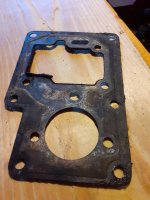
Searider, yes i removed the Powerhead from the Pan weeks ago when i opened this thread. The gasket was not dried, cracked, hardened or burned (see photos). There is some carbon buildup (visible in photos) that flakes off easily. The gasket can be flexed without cracking. It might be the original gasket (35 years old!) My guess is that if the gasket had been installed with Sealant then there would not have been any leak. I am currently installing a new gasket including Permatex #3 Sealant and hope to have tank testing completed within a week or so.To understand, assume the powerhead was already removed from pan ? If so, what was the gasket condition mentioned in post 37. Dried, cracked, hardened, burned ? If so, must install a new one and seal it with Permatex on both sides.
Happy Boating
Searider, yes i removed the Powerhead from the Pan weeks ago when i opened this thread. The gasket was not dried, cracked, hardened or burned (see photos). There is some carbon buildup (visible in photos) that flakes off easily. The gasket can be flexed without cracking. It might be the original gasket (35 years old!) My guess is that if the gasket had been installed with Sealant then there would not have been any leak. I am currently installing a new gasket including Permatex #3 Sealant and hope to have tank testing completed within a week or so.
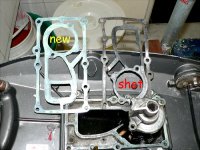
Yes the old gasket was definitely not completely flat, i.e. some compression had definitely occurred. I will do the retighten after 1 hour run time and then report back. Thanks to all for the input on "the Art and Science of Gaskets". BTW this is the second "head scratcher" I have had re: gaskets. I once had a leaking Thermostat Cover on a 1969 6hp Johnson 6R69M where i couldn't get a leakto stop until i used 2 gaskets "double thickness". Wierd...Yep, but that gasket could have compressed a bit due to exhaust heat building up on it and doesn't look plain flat as was when brand new. These pics speaks for themselves, motor developed same issue as yours. All pan gaskets in the long run will eventually loose water on to the pan, have years seeing such on many motors.
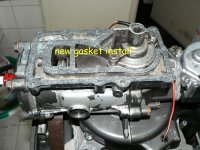
Take into account that all motor's gaskets must be re torqued soon after break end period ends or when buying second hand motors. For motors running in salt water that could be extremely difficult to achieve as the bolts threads may have been seized already and mission impossible to be re torqued. Install a new pan gasket, clean well both mating surfaces, seal with Permatex, if being aviation type much better, torque pan lower bolts hand tight with a wrench, re torque back after the motor has been run for at least one hour preferably at open water at speed. Report when possible if the problem was solved...
Happy Boating
i'd 100% agree with searyder... get a new gasket! the fibers get compacted, making it much less effective. it needs to be new, for sure.Yes the old gasket was definitely not completely flat, i.e. some compression had definitely occurred. I will do the retighten after 1 hour run time and then report back. Thanks to all for the input on "the Art and Science of Gaskets". BTW this is the second "head scratcher" I have had re: gaskets. I once had a leaking Thermostat Cover on a 1969 6hp Johnson 6R69M where i couldn't get a leakto stop until i used 2 gaskets "double thickness". Wierd...
CT1762, Yes the Retention Rod (#14 in diagram, p/n 311284 Rope Guide) is present and it is fully seated under the Head (#12 Bearing Head and Bushing )of the interlock. It appears the problem is that the #10 Cam Follower and Lever (p/n 394498 or 398682) is not being retracted properly because the Retainer and Link Assembly (#2 in the Magneto diagram, p/n 395883) is out of adjustment.glad you got it sorted! On the starter spool: is that retention rod there under the head of the interlock? ive seen them missing lots of times. if the interlock isn't retreating, the cam underneath can get worn and kinda sticks. hit it with some dry-lube and see if that helps.
I will keep your story in mind until i can get around to fixing this Interlock. Thanks!no problem! yea that interlock can be removed. the old ones didn't even have one, of course very dangerous. i had an 18hp fastwin (1970 model) on a light 14' grumman. shifter detent was very worn, as a result i unintentionally knocked it into forward, went to the beach with my cousin, came back and gave it a fistfull of throttle and it slammed to full power. almost threw me out of the boat if my cousin wasnt there to grab me. really scary. had to get 3 stitches on my leg, but could've been much worse!
I cannibalized from a Parts Motor part #10 Cam Follower and Lever (in the Recoil Starter diagram). In the motor i am fixing i found that the hexagonal mating surfaces between the black and white components were stripped/rounded-off in this Part #10. The interlock works now! The only problem that remains to be fixed on this long-neglected motor is the Kill Switch (see separate thread). Thanks to All for advice thus far.I will keep your story in mind until i can get around to fixing this Interlock. Thanks!