Uh oh..New Transom?

Status
Not open for further replies.

MonkeyBird747

Petty Officer 2nd Class
Joined
Aug 5, 2020
Messages
112
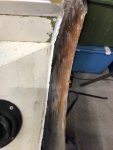
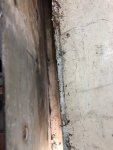
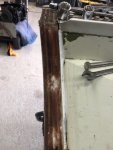
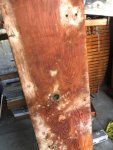
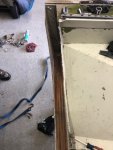
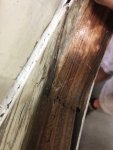
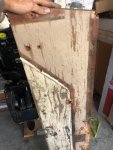
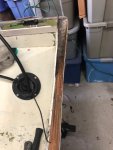
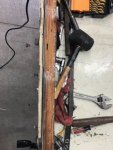
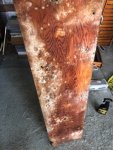
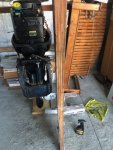
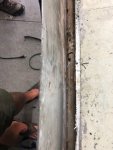
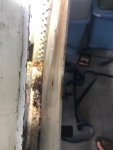
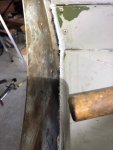
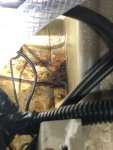
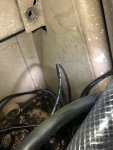
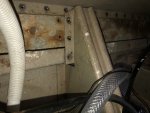
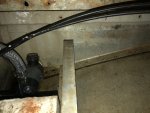
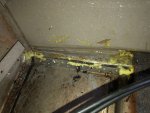
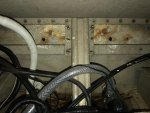
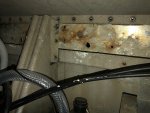
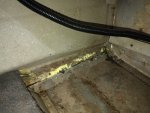
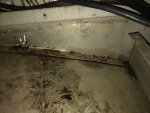
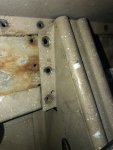
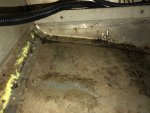
Installed a 75hp 2-stroke in the transom today with a 4” Jack plate. Transom flexes when I (170lbs) stand on the ventilation plate and bounce a little. Video attached. Is it time to rip it out and replace? The flex is along the line of rivets holding the lower transom brace. Also found a crack near the upper left corner, and some olive green paint. Now I’m wondering if the transom wood is original.

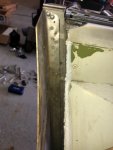
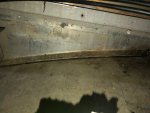
Did the hammer test from outside. Solid sound down low, but thuds in the upper middle area.

https://www.dropbox.com/s/5ddu7f1rq89a4ge/Video Aug 29, 10 49 56.mov?dl=0
 

MonkeyBird747

Petty Officer 2nd Class
Joined
Aug 5, 2020
Messages
112
At the time I thought it would make setting the engine height easier. I’m starting to wonder if I really need it though.
 

classiccat

"Captain" + Starmada Splash Of The Year 2020
Joined
Dec 20, 2010
Messages
3,412
+1... definitely time to replace. That's quite a bit of flex.
 

MonkeyBird747

Petty Officer 2nd Class
Joined
Aug 5, 2020
Messages
112
Ok, well the motor tuning day turned in to a transom removal day. It actually wasn’t too bad. I’ll get some pics up later this evening. I had to drill 6 rivets in total for the corner caps. Everything else was wood screws and a few bolts. I forgot about the two splash well drain sleeves. We could figure out why it wouldn’t budge 🤦🏻‍♂️.

I was not expecting the transom to be in three pieces. The top corner sections were made as separate pieces. Seems to me that is not the way it should be.

I know there have to be lots of transom replacement threads here. Can anyone point me to one where you think things were done particularly well?
 

MonkeyBird747

Petty Officer 2nd Class
Joined
Aug 5, 2020
Messages
112
photo338805.jpgClick image for larger version  Name:	 Views:	1 Size:	87.2 KB ID:	10924444
 

Attachments

  • photo338807.jpg
    photo338807.jpg
    81.2 KB · Views: 9
  • photo338808.jpg
    photo338808.jpg
    100.4 KB · Views: 10
  • photo338809.jpg
    photo338809.jpg
    100.5 KB · Views: 9
  • attach10924457.jpg
    attach10924457.jpg
    100.5 KB · Views: 10
  • photo338810.jpg
    photo338810.jpg
    113.8 KB · Views: 9
  • image_338811.jpg
    image_338811.jpg
    107.6 KB · Views: 9
  • photo338811.jpg
    photo338811.jpg
    107.6 KB · Views: 9
  • photo338812.jpg
    photo338812.jpg
    94.8 KB · Views: 9
  • photo338813.jpg
    photo338813.jpg
    117.5 KB · Views: 10
  • photo338815.jpg
    photo338815.jpg
    95.7 KB · Views: 10
  • photo338817.jpg
    photo338817.jpg
    110.8 KB · Views: 11
  • photo338818.jpg
    photo338818.jpg
    142.5 KB · Views: 10
  • photo338819.jpg
    photo338819.jpg
    135.4 KB · Views: 11
  • photo338835.jpg
    photo338835.jpg
    87.2 KB · Views: 9
  • photo338836.jpg
    photo338836.jpg
    98.5 KB · Views: 8
  • photo338837.jpg
    photo338837.jpg
    70.7 KB · Views: 8
  • photo338838.jpg
    photo338838.jpg
    89.2 KB · Views: 8

MonkeyBird747

Petty Officer 2nd Class
Joined
Aug 5, 2020
Messages
112
Ok, so I believe I have a plan. After reading lots of transom threads I'm going to use two 3/4" pieces of marine grade plywood for the transom. They will be epoxied together with 5:1 from TotalBoat (slow hardener). After cutting and dry fitting I'll coat all sides and edges with a few layers of epoxy, then top it off with some spar varnish. The outer transom wooden support plate (verbiage?) that goes on the outside of the aluminum is 1/2", and it will get basically the same treatment, and I'll seal it to the outer aluminum hull with 4200.

I have just a couple of questions at this point:
  1. Several of the threads/videos I saw used screws to clamp the two pieces of ply together while they cure. The part I'm not sure about is do you take these screws out afterward, or just leave them in as part of the transom? One method was to screw together just one edge, and use weights on the rest to hold them flush. Supposedly to prevent creating a void in the bond?
  2. Is there anything I could/should do to further brace the transom while I'm at it? Seems a flex point is just below the line of rivets that secure the lower transom channel bracket. Could this area be shored up from the inside? The flex I saw could have been because the old transom was not being supported at the corners because of the three piece design?
MB
 

BWR1953

Admiral
Joined
Jan 23, 2009
Messages
6,244
This is how we clamped the transom for our Kingfisher. No screws necessary. :D


2.jpg

We used long wood clamps to make sure that the two halves didn't wiggle while we were setting up.
4.jpg
 

Attachments

  • 3.jpg
    3.jpg
    616.6 KB · Views: 1

classiccat

"Captain" + Starmada Splash Of The Year 2020
Joined
Dec 20, 2010
Messages
3,412
You're off and running! You're making quick work of it and asking all of the right questions! :thumb:

what was the condition of the kneebrace? When transoms get that bad the tabs usually crack and require reinforcement.

I used epoxy on mine...also used glass b/c IMO epoxy without glass cloth is like pasta without the sauce. It adds even more strength but more importantly, it prevents grain checking which exposes untreated wood to the elements.

Folks add varnish afterwards if they aren't painting the epoxy for UV protection.

I also carefully mark ALL of the holes for 2 reasons.
1) create epoxy plugs for all holes
2) wood screw placement (i left mine in.)

One more tip, before laminating your PLY, check the bow/warpage...laminate the piecess so that they counter each other. Do this ( - ) or ) - (.

now would be a good time to clean-off all of the corrosion/alumina from the inner hull skin...it looks pretty grungy in there (alot easier with the splashwell removed.

Shot of my SS's transom before installing...you can see the epoxy plugs and wood screws.
ZLHZvnG.jpg
 

MonkeyBird747

Petty Officer 2nd Class
Joined
Aug 5, 2020
Messages
112
This is how we clamped the transom for our Kingfisher. No screws necessary. :D


We used long wood clamps to make sure that the two halves didn't wiggle while we were setting up.


Then we let it dry for a few days.

Love it! Thanks for the pics.
 

MonkeyBird747

Petty Officer 2nd Class
Joined
Aug 5, 2020
Messages
112
You're off and running! You're making quick work of it and asking all of the right questions! :thumb:

what was the condition of the kneebrace? When transoms get that bad the tabs usually crack and require reinforcement.

I used epoxy on mine...also used glass b/c IMO epoxy without glass cloth is like pasta without the sauce. It adds even more strength but more importantly, it prevents grain checking which exposes untreated wood to the elements.

Folks add varnish afterwards if they aren't painting the epoxy for UV protection.

I also carefully mark ALL of the holes for 2 reasons.
1) create epoxy plugs for all holes
2) wood screw placement (i left mine in.)

One more tip, before laminating your PLY, check the bow/warpage...laminate the piecess so that they counter each other. Do this ( - ) or ) - (.

now would be a good time to clean-off all of the corrosion/alumina from the inner hull skin...it looks pretty grungy in there (alot easier with the splashwell removed.

Shot of my SS's transom before installing...you can see the epoxy plugs and wood screws.
ZLHZvnG.jpg

Thanks for the encouragement! The days with the transom out are measured in missed fishing trips. But my dad and I enjoying the repair process.

I’ll get som pics of the knee brace. I didn’t notice anything that stood out when I was in there removing the 50 or so transom screws, but I don’t have a trained eye. Ordered a couple of stainless wire wheels to clean up the inner surface. Hoping not to remove splash well, but I can if necessary. Trying to avoid much river work, as I have never riveted anything before. I did pick up a rivet gun and an assortment of rivet sizes for the corner caps.

What do you mean when you say you marked holes carefully for epoxy plugs? Did you over drill, fill with epoxy, and then drill again to size?
 

MonkeyBird747

Petty Officer 2nd Class
Joined
Aug 5, 2020
Messages
112
This is the only pic I have of the knee brace so far. I’m going to remove a piece of the flooring back there anyway because the corners are rotten (I think PO re-decked over the old stuff). That will give me a better look.

3b2cd1f6-77d4-4791-bbd0-e8c1c3b5b363
 

classiccat

"Captain" + Starmada Splash Of The Year 2020
Joined
Dec 20, 2010
Messages
3,412
Thanks for the encouragement! The days with the transom out are measured in missed fishing trips. But my dad and I enjoying the repair process.

I’ll get som pics of the knee brace. I didn’t notice anything that stood out when I was in there removing the 50 or so transom screws, but I don’t have a trained eye. Ordered a couple of stainless wire wheels to clean up the inner surface. Hoping not to remove splash well, but I can if necessary. Trying to avoid much river work, as I have never riveted anything before. I did pick up a rivet gun and an assortment of rivet sizes for the corner caps.

What do you mean when you say you marked holes carefully for epoxy plugs? Did you over drill, fill with epoxy, and then drill again to size?

That's correct, I also chamfer the holes (a unibit works great) to lock the plugs in. You also add a filler to the epoxy to thicken it up and make it easier to sand. Colloidal silica is a popular choice.

qwnXfBO.jpg


once drilled, i put painters tape on 1 side then fill from the other.


AVadfhG.jpg


The kneebrace looks good from this angle. You may have dodged a bullet! Mine was cracked right at the 90-deg bend;
kAWebzr.jpg
 

GA_Boater

Honorary Moderator Emeritus
Joined
May 24, 2011
Messages
49,038
I was about to say knee braces usually crack at the transom mounting flange, but your pic took the words outta my mouth, CC. :smile:
 

MonkeyBird747

Petty Officer 2nd Class
Joined
Aug 5, 2020
Messages
112
Ok, cool. I know what to look for when I get back to the boat. Thanks everyone.

classicat, very helpful pic of your epoxy process for the holes. Would not have thought about the chamfer step.
 

MonkeyBird747

Petty Officer 2nd Class
Joined
Aug 5, 2020
Messages
112
Update a short questions. Classiccat, did you add filler just for the holes? And did you chamfer after drilling the epoxy, or before filling the holes?

I have a few unused holes in the back aluminum transom enclosure (bad terminology). I have some fluxless aluminum brazing rods and map torch. I was thinking of tackling those from the inside where the raw aluminum is, rather that more silicone plugs as it was when I got it. Is this advisable?

We ripped the 3/4" ply lengthwise and cut 2ft off the end. Perfect size for one transom sadwhich. I used half a quart of 5:1 epoxy, spread with a 5" putty knife, to glue the two sheets together. I hope that was enough. It seemed like a nice wet coat, but only a little squished out from the edges. I screwed it together with ss woodscrews after predrilling through the top sheet so as to pull it tight against the bottom one. I mimicked your screw pattern, though it doesn't look quite as polished as yours. It's been almost 24 hours, and I'll cut the transom out tomorrow. I traced the transom first before gluing so I could mark my wood screw holes in locations that wouldn't interfere with the cut and mounting holes later.

I was planning on putting the screw side facing the aluminum part of the transom so the screws will be hidden. Do you see this causing any issues, or should I put the screwed side facing the bow to avoid any metal/metal contact between screw heads and aluminum?

Finally, I removed some rotten flooring from the back corners which gave me a better view of whats going on back there. Some pesky water kept creeping in to my photos. Here is what the knee brace and back rivets look like. The bilge area looks nastier than it is because of the brackish water that has apparently been sitting there for a few weeks. It did not look like that when I first bought the boat.


Click image for larger version  Name:	 Views:	1 Size:	873.2 KB ID:	10926093Click image for larger version  Name:	 Views:	1 Size:	917.7 KB ID:	10926092Click image for larger version  Name:	 Views:	1 Size:	762.7 KB ID:	10926100Click image for larger version  Name:	 Views:	1 Size:	658.9 KB ID:	10926101
photo339080.jpg
 

Attachments

  • photo339062.jpg
    photo339062.jpg
    663.6 KB · Views: 5
  • photo339063.jpg
    photo339063.jpg
    700 KB · Views: 5
  • photo339064.jpg
    photo339064.jpg
    772.8 KB · Views: 5
  • photo339065.jpg
    photo339065.jpg
    825.9 KB · Views: 5
  • photo339066.jpg
    photo339066.jpg
    898.2 KB · Views: 5
  • photo339067.jpg
    photo339067.jpg
    917.7 KB · Views: 5
  • photo339068.jpg
    photo339068.jpg
    873.2 KB · Views: 5
  • photo339069.jpg
    photo339069.jpg
    865.6 KB · Views: 5
  • photo339070.jpg
    photo339070.jpg
    954.4 KB · Views: 4
  • photo339071.jpg
    photo339071.jpg
    957.2 KB · Views: 4
  • photo339072.jpg
    photo339072.jpg
    941 KB · Views: 4
  • photo339073.jpg
    photo339073.jpg
    1,000.3 KB · Views: 4
  • photo339074.jpg
    photo339074.jpg
    1 MB · Views: 5
  • photo339081.jpg
    photo339081.jpg
    1.2 MB · Views: 5
Last edited:

Watermann

Starmada Splash of the Year 2014
Joined
Jan 12, 2013
Messages
13,807
Yeah that was the original white washed 3 piece transom.

All that brown and white gunk on the inner AL transom skin is corrosion and needs to come off. Much easier with the SW off as well as getting the new transom wood back in without gouging it up.

I'm into protecting the AL transom skin to include priming and paiting it after cleaning and repairing.

My V5 SS inner transom skin before the transom wood was installed.

y4mocmmqvkoMDvjKjx4AuLS66pNF0567sGa3gn8D3avyEMENUfVX8T7CvEpFdCXqJx-JupgdTdp5BXImPAtUk1s1ILmfrUnX963GSiKoQLaYfJ3F3EjLuXguVKgu6QxQHugzNCLHaMf5rQXkUAlGa2pRYMuk8H8sOq_Hb1VAhFMIelQIaq_q-mIkgajbDGQqiul5CEr5IxMy_Vhjes6lrhzrg
 
Status
Not open for further replies.
Top