Transom repair

Tim Frank

Vice Admiral
Joined
Jul 29, 2008
Messages
5,346
I posted in a more "General Question" section of this board. I hope this does not qualify as the dreaded "double-post", but I have since seen similar questions and it is gently pointed out that all of this is covered by info in the "Restoration" section. So I started looking here.
I have searched through many posts and obtained a tremendous amount of pertinent info, and learned a lot. Many thanks.
I now have one last, and fairly specific, question.

I intend to make up the new wooden transom insert from a double layer of 3/4" marine ply. I will use Resorcinol glue and 1-1/4" S/S screws to laminate the two layers.
Is there any other coating anyone might suggest instead of epoxy?Especially on the edges.
There should be no U/V concerns since it will be completely covered by aluminum.
Any pros or cons that I might be missing?
Thanks,
Tim Frank

I have a 15 ft Orlando Clipper runabout, vintage c.1959/60.
Remarkable hull shape, quite rounded, and when planing has virtually no wake.
Currently powered by Nissan 40 HP after 30 years with a Johnson 55. Performance is about the same. Full speed ~ 40 MPH.

The transom is failing, it appears the layer between inner and outer aluminum skins is shot.
I am pretty good with tools and am prepared to have a shot at this repair.
Has anyone had any experience with this type of repair on Orlando Clippers?

My approace would be to take off the inner skin and remove the remnants of whatever was there....appears to be some sort of wood core, 1 - 1/2 " thick. I would laminate a new core from 3/4" marine plywood, coat it with epoxy resin, and refit.
I plan on adding a pair of diagonal braces from the upper motor securing bolts to the gunwales.
Seems reasonably straightforward.

Any comments, advice, or sources of information on these boats and their Manufacturer would be appreciated.
ID plate on the front says only "Orlando Clipper" , Orlando Boat Company a division of Southern Lighting Corp. and max HP of 50 HP.

Rgds,
Tim Frank
 

oops!

Supreme Mariner
Joined
Oct 18, 2007
Messages
12,932
Re: Transom repair

epoxy will be just fine....cover with a layer of fiberglass
 

oops!

Supreme Mariner
Joined
Oct 18, 2007
Messages
12,932
Re: Transom repair

make it as strong as steel and more resistant to water
 

Tim Frank
Vice Admiral
Joined
Jul 29, 2008
Messages
5,346
Re: Transom repair

OK. Do I use f/g both sides and edges?
Due to needing to keep to total thickness of 1-1/2 " , this may add too much. could I use 5/8" p/w x 2?
 

oops!

Supreme Mariner
Joined
Oct 18, 2007
Messages
12,932
Re: Transom repair

i did....and yes you can use 2 peices......but if you just use 1 peice a thin layer of cloth....your good.....your ysing epoxy...its really strong stuff....

see the hull ext in progress thread....it has detailed 2 peice transom replacement pictures

if you want to see a ob transom....read lunds proj in the compleated projects forum
 

Tim Frank
Vice Admiral
Joined
Jul 29, 2008
Messages
5,346
Re: Transom repair

I guess the better question to ask is if I use two thicknesses of 3/4" marine ply and glass/epoxy it all around, how much thickness will i end up with....i.e. what is the average thickness of 2 layers of f/g cloth?
 

oops!

Supreme Mariner
Joined
Oct 18, 2007
Messages
12,932
Re: Transom repair

depends on several factors.....amount of resin ....thickness of cloth....

avg between 1 16th to 1/8 th
 

Tim Frank
Vice Admiral
Joined
Jul 29, 2008
Messages
5,346
Re: Transom repair

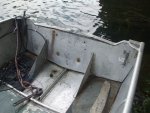
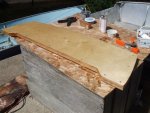
OK, finally underway.
After looking at a number of really major projects in here, it is almost embarassing to be discussing this fairly trivial event.

The old plywood was pretty far gone....I am lucky that I did not lose the back end c/w motor...:)
It was two thicknesses of very ordinary plywood and did not appear to have been treated or coated with anything.
But heck....it only lasted 50 years!!

From here after a good cleanup I will fabricate a new wood blank from two thicknesses of 3/4" marine PW using epoxy to bond the two pieces, and for "clamps" I will use three rows of 1 - 1/4" SS screws spaced ~ 12" apart.
On someone's advice, I think OOOOPS, I will glass the entire blank.

Then will reinstall and close up.

A couple of questions on which I would welcome suggestions/advice:

1) in this application, any reason not to save a few $$$ and use poly instead of epoxy?

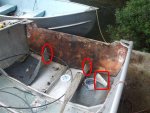
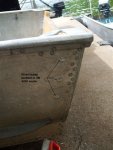
2) you can see in the pictures that I cut the two centre steady brackets that run from the floor to the lower transom. The bottom attachments are rivetted....the transom joint attaches with bolts. I did not have the "jam" to disturb a 50 year old rivetted joint. I am comfortable that I can splice the bracket back together readily and re-bolt.
The question is re: dissimilar metals and fasteners. Aluminum fasteners are not easy to get in many sizes and types. In practice, am I playing with fire if I use stainless steel bolts through the aluminum exterior skin to reattach the support brackets to the transom? Stainless is reputedly pretty inert, but....
This boat is used exclusively in fresh water.

3) There was a 1/16" aluminum cover/skin on the inside surface. I see no structural benefit from this, and in fact it may simply hide any problems that are going on.
Any reason not to leave this out of the mix and just paint the surface of the wood blank?
 

Attachments

  • Clipper 002.jpg
    Clipper 002.jpg
    66.3 KB · Views: 1
  • Clipper 003.jpg
    Clipper 003.jpg
    70.3 KB · Views: 1

Tim Frank

Vice Admiral
Joined
Jul 29, 2008
Messages
5,346
Re: Transom repair

Seem to be spending more time shopping and acquiring supplies than working on this.
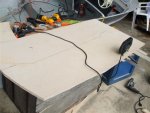
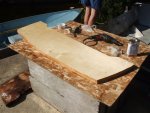
Have cut the two transom blanks and laminated with a glass mat core between.
Predrilled for screws and used these for clamping the two layers while resin dried.

I have a small problem with the exterior aluminum skin. There are two areas of pitting, the size of a quarter, and one of these actually is deep enough that there are a couple of pinholes right through the skin.
The remainder of the aluminum is near-perfect and there is no structural consideration wghatever.

Anyone have an opinion on the best way to fill these two small spots?
I have thought of simply using a high quality silicone seal like a drywall nail hole filler. or an epoxy "peanut-butter" mix the same way.
 

Attachments

  • Clipper 009.jpg
    Clipper 009.jpg
    60.7 KB · Views: 0
  • Clipper 010.jpg
    Clipper 010.jpg
    65.9 KB · Views: 0
  • Clipper 012.jpg
    Clipper 012.jpg
    65.9 KB · Views: 0
Last edited:

Labman

Petty Officer 2nd Class
Joined
Jun 30, 2008
Messages
117
Re: Transom repair

You could probably get away repairing it with any GOOD two part epoxy, JB weld perhaps. As I am a Tig welder, I would cover the WHOLE outside of the transom with some 1/4" alum. and call it done.
 

tmcalavy

Rear Admiral
Joined
Aug 29, 2001
Messages
4,005
Re: Transom repair

JB Weld or Marine Tex, maybe even 3M marine sealant if they're pin holes.
 

Tim Frank

Vice Admiral
Joined
Jul 29, 2008
Messages
5,346
Re: Transom repair

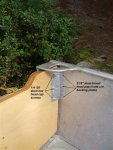
At the inside top of the transom on each side there were a couple of 6" high angle plates with legs ~ 1" and 2-1/2". They were bolted through the transom with 3/16 aluminum machine screws and rivetted on the sides.
I had trouble finding 3/16 " screws so upgraded to 1/4".
I have never worked with solid rivets and have none of the tools rquired, so I used pop-rivets.
I had an Aha moment yesterday (actually an Oh no moment) when I realised that there is no way that the pop rivets can be as strong.

Anyone have an opinion on whether the pop-rivets should be OK?
It is not a major stress point and I will be running two steady stays to the top centre of the transom.

I will definitely replace them this winter, but would like to get the boat back in the water for the few remaining weeks of summer here.
 

Attachments

  • Clipper 018A.JPG
    Clipper 018A.JPG
    45 KB · Views: 1
  • Clipper 017A.JPG
    Clipper 017A.JPG
    39.3 KB · Views: 1

Renny_D

Petty Officer 3rd Class
Joined
Jun 29, 2008
Messages
79
Re: Transom repair

Take a look at these rivets they are aircraft grade blind rivets and are both sealing and strong enough for your application. Regular pop rivets were designed to hold the soles of shoes on and are too soft for the type of application you've used them for. The regular pop rivet gun won't work either unless you have samson like forearms so you'll probably want to rent or buy an air rivet gun. The good news is that done right you'd never have to touch them again.

Good luck
Renny
 

Bob_VT

Moderator & Unofficial iBoats Historian
Staff member
Joined
May 19, 2001
Messages
26,049
Re: Transom repair

You are doing fine. You will not have any loss of integrity the way you have done it. I coat bolts and rivets in 5200 before I install them in aluminum... and I only use SS bolts.

Your project is looking good.
 

Tim Frank

Vice Admiral
Joined
Jul 29, 2008
Messages
5,346
Re: Transom repair

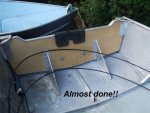
Project is almost complete.
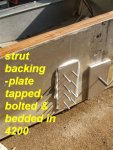
Transom lower support struts were very fussy to fit. I opted to use a new arrangement of a fitted piece of 3/16" alum plate and 1/8" alum angles bolted through the transom with 1/4-20 alum hex head cap screws into a drilled and threaded piece of 1/4" plate ~ this on both sides.
I chose to be careful and mark, drill, and tap one hole at a time in case anything went wrong. The first two were diagonally opposite corners of the 4x2 bolt pattern and then I could use the tapped holes to hold the plate and mark through the transom with a transfer scribe.
I used a hardwood block drilled with #7 drill (tap drill for 1/4-20) and also 1/4" drill on a drill press as a guide for drilling and tapping since I was at a cabin on a lake and that was the most practical approach.
The 1/4 " plate I coated with a thick layer of 4200 which oozed out nicely all around when it was drawn in as the bolts were tightened. The 8 screws per plate were tightened to a torque of "just enough" on my "Armstrong" torque meter ~ not stripped, but as tight as Aluminum cap screws would go without stripping.
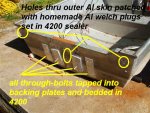
The other below water-line penetration is the lower motor bolts, and here I used 3/8" plates drilled and tapped for the 1/2-13 bolts that hold the motor. These plates were also bedded in an excess of 4200.

My rationale for this approach is that sealing a bolt that runs through thread is a lot easier than trying to seal a plain round hole. It is almost like sealing roof penetrations with pitch pockets when something has to go through the roof membrane. But maybe belt and braces?

There were a few small holes through the outer aluminum skin, some that had been used for attaching pulleys for the original steering cable and pullety system which i have replaced with whatever the single cable type is called, and some that were for some other reason....no longer required, but unfortunately at or near the water line. I have a small punch press and made some aluminum cupped caps that are almost like welch plugs in a carb.
I placed a dab of 4200 on the hole and capped with these homemade pieces.
I may be taking a chance witrh that one, but i tried to pry one off and after exertingt WAYYYY more leverage than they will ever be subjected to, it hadn't budged. So I figure I will let them ride and see what happens.

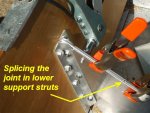
Finally, I spliced the lower struts back together with a sandwich of .080 aluminum strips on each side around the joint and pop-riveted the whole thing.

A couple of small items to tidy up ~ 1-2 hours and I can throw the motor back on. Had to wait for the weekend.

I was convinced that the control cables were way too long and after finding out that shortening them is probably not possible and definitely not a DIY job, I was going to order what I thought were the correct length.
Did a search in here and found the topic covered...no surprise!....and that in fact you need some surplus in the cable. In short they may be a bit long...but not as excessive as i had thought. So if it ain't really broke, ....etc. etc.

Will post a final shot of the completed project next week.
I notice that OOOOPS advised someone else that their transom R&R would take 50 hours and cost ~ $300-
Mine will check in within 5% ....amazing.

Thanks for all the miscellaneous tips, suggestions, and encouragement.
 

Attachments

  • Clipper 025.jpg
    Clipper 025.jpg
    51.5 KB · Views: 1
  • Clipper 031.jpg
    Clipper 031.jpg
    88.9 KB · Views: 1
  • Clipper 033.jpg
    Clipper 033.jpg
    60.5 KB · Views: 1
  • Clipper 035.jpg
    Clipper 035.jpg
    56.9 KB · Views: 1

Tim Frank

Vice Admiral
Joined
Jul 29, 2008
Messages
5,346
Beware of hidden transom deterioration!!!

Beware of hidden transom deterioration!!!

All done and the motor back on late Sunday night.
Will have to wait until next w/e to take it out on the water.

I attach an ominous heads-up to anyone who is the least bit suspicious of their transom's condition, or has never done any kind of assessment/inspection.
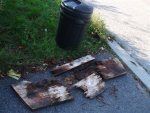
I took the old transom plywood blank out to the garbage this morning and accidentally dropped it from less than waist-height. They say a picture is worth a thousand words ~ that would be one for each piece that this shattered into when it hit the ground :)

I knew it was far gone, but did not realise how far gone.
I was extremely lucky not to have suffered a catastrophic failure and lose the motor, possibly the boat,....and maybe me.

Caveat boater....check that transom!
 

Attachments

  • Clipper 038.jpg
    Clipper 038.jpg
    81.9 KB · Views: 2

Tim Frank

Vice Admiral
Joined
Jul 29, 2008
Messages
5,346
Re: Transom repair ~ final questions

Re: Transom repair ~ final questions

The motor (40 HP Nissan) is back on the boat, but there are two things that I still am wondering about.
1) This motor was bolted with two pairs of through-transom bolts. One pair at the water line, the other pair about three inches from the top of the transom. The lower ones are in place and i believe as watertight as possible.
My question is : since this motor has "traditional" transom clamps at the top, do I really need to drill holes and install the upper bolts?
Are the motor's clamps not sufficient attachment at the top since the lower bolts are in place?
I would obviously like the fewest possible holes through the transom
2) I read somewhere that you should have rubber vibration cushioning. There was none before, but I had a rubber transom pad on the shelf that I now have under the transom clamp pads. Should I put rubber between the outer transom and the motor as well or is the rubber under the clamps sufficient?
Because of the way that I have installed the bolts at the waterline, I am worried about any movement of the motor transfrerring to the bolts. I would rather leave it clamped firmly by the bolts against the aluminum.
Any thoughts?
 

CATransplant

Admiral
Joined
Feb 26, 2005
Messages
6,319
Re: Transom repair

You can probably get away with just the clamps on the top, as long as you make sure to check them on a regular basis. Transom clamps have a nasty habit of loosening up.

However, since you already have the through bolts in the lower holes, I'd go ahead and bolt the thing up on top as well. I'm not sure what you used to seal the bottom bolts, near the water line, but I like to use 3M 4200, since it makes disassembly easier, and outboard do need to be removed from time to time.

I use stainless steel bolts and stainless steel nylon insert nuts, with washers, as appropriate, and I don't worry about the corrosion issue, since I only boat in fresh water. In salt water, I suppose some other material would make more sense, but there's no salt water anywhere near me.

As far as the transfer of forces goes, it's a pretty smooth deal, as long as you have the top and bottom fastened, with bolts or the clamps. The stiffness of the plywood in the transom pretty much distributes any forces evenly.
 

CATransplant

Admiral
Joined
Feb 26, 2005
Messages
6,319
Re: Transom repair

I went back and looked at those photos. I'm sure your rather elaborate method for dealing with the through bolt problem will work just fine. Personally, I think it's probably overkill, but there's more than one way to skin an eelpout, I guess.

It's always interesting to see how folks engineer stuff, and I always end up with new ideas for other problems from seeing such solutions. That's the beauty of aluminum boats. They're pretty easy to fiddle around with, and pretty forgiving of such fiddling.
 
Top