Transom Assembly Woo's

wil7483

Petty Officer 1st Class
Joined
Jan 19, 2007
Messages
377
Re: Transom Assembly Woo's

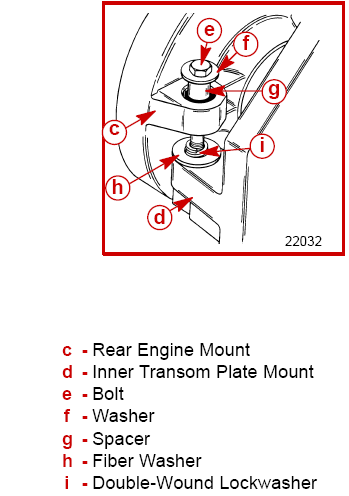
Someone else can double check me but i think the mounting bolt is assembled wrong looking at the pic.. Isn`t it spacer,washer, bolt?

Which picture are you refering to?

Also, does the jaw puller come with the slide hammer?
 

Bt Doctur

Supreme Mariner
Joined
Aug 29, 2004
Messages
19,123
Re: Transom Assembly Woo's

on page 1,shows the motor mounted and bolted in. washer and spacer should be reversed.
 

burroak

Senior Chief Petty Officer
Joined
Mar 29, 2007
Messages
651
Re: Transom Assembly Woo's

Yeah, real cute. But seriously, why would anyone pay $99.99 for a part that they can buy themselves for $49.99. A 20-30% mark up is reasonable but a 100% mark up is ridiculous and that is why people buy their own parts.

I'm as much of a conserver as the next guy, but when you go out to dinner and have a Del Monaco and pay $26 for it, would you ever think of taking a steak in with you and pay the chef for just grilling it?

As I said, I come from a long line of frugal folk, some say cheap. My father is credited with inventing the limbo when he first went to NYC and saw his first pay toilet. (rim shot). I have found that I can avoid the 100% mark up on the parts and all of the labor by lurking on forums such as this. This is a generous, informed, and most times patient resource.
 

SuperNova

Lieutenant
Joined
Mar 16, 2007
Messages
1,455
Re: Transom Assembly Woo's

You know, Ive done a heck of a lot of bellows and gimbals on alphas and I have never taken the yoke assembly apart to do it. I remove the lower unit only if I'm doing the driveshaft bellows, gimbal or shiftcable bellows; the exhaust bellows and the water hoses I do without any disassembly. In this forum it seems like it's not done that way.

--
Stan
 

wil7483

Petty Officer 1st Class
Joined
Jan 19, 2007
Messages
377
Mr

Mr

You know, Ive done a heck of a lot of bellows and gimbals on alphas and I have never taken the yoke assembly apart to do it. I remove the lower unit only if I'm doing the driveshaft bellows, gimbal or shiftcable bellows; the exhaust bellows and the water hoses I do without any disassembly. In this forum it seems like it's not done that way.

Well this is my 1st attempt at this and I am quite nervous as to make sure that I am doing it right. I am well aware that the boat may sink if this repair fails while I am out on the water. If it weren't for this forum I really wouldn't even be trying this myself. I would've ultimately given in and paid someone an outrageously inflated price to have it done correctly.
 

SuperNova

Lieutenant
Joined
Mar 16, 2007
Messages
1,455
Re: Transom Assembly Woo's

I'm not criticizing you, I've seen a lot of people talk about how hard it is to get the pivot pins out when doing the bellows. So I know at least a few people completely disassemble the transom to do the job. I thought maybe I was missing the boat(pun intended) on my procedure.
--
Stan
 

HT32BSX115

Supreme Mariner
Joined
Dec 8, 2005
Messages
10,083
Re: Transom Assembly Woo's

Hey Dione,

You're doing a great job. Looks like you're gonna beat me to the water!


Cheers,


Rick
 

wil7483

Petty Officer 1st Class
Joined
Jan 19, 2007
Messages
377
Re: Transom Assembly Woo's

Thanks Rick, it's still slow going however. Waiting to receive trim position sender in the mail and then i should have everything I need to get this thing back together and ready for the maiden voyage.
 

wil7483

Petty Officer 1st Class
Joined
Jan 19, 2007
Messages
377
Re: Transom Assembly Woo's

Can some of you experts take a look at the pictures on the 1st page and tell me if I have the engine mounted incorrectly. Does the washer go over the spacer or is it correct as it is?

Thanks BT for bringing that to my attention.
 

Reel Poor

Vice Admiral
Joined
Jan 29, 2005
Messages
5,522
Re: Transom Assembly Woo's

They are not right in your pic. Here is a diagram of the rear mount.

Merc20rear20mounts.png
 

xltier

Chief Petty Officer
Joined
May 20, 2004
Messages
636
Re: Transom Assembly Woo's

So IYHO should I go ahead and install it onto the boat and torque the transom back plate as suggested in the manual and then just go ahead and attempt this myself. I can do that and wait until I can get my hands on an expansion tool.

Using a scale of 1 (easy) to 10 (experts only) how would you rate the difficulty in doing it. What should I look for in the way of giving me the most trouble. Worst case scenario, what can I do to really mess this up and wind up having to spend way more fixing what I destroy?

pay the shipping to maine and ill do for 250.00.i do the whjole job with parts for 500.
 

delsol

Senior Chief Petty Officer
Joined
May 27, 2002
Messages
749
Re: Transom Assembly Woo's

i am having an engine installed in my boat at dealer ..forget about mark up o the parts . if they get parts its on them if i get the wrong intake i did. i mess up the flow of things. they tell me to get the parts if its a high$$$ part carb. intake oil pan as i can get it much cheaper.
starter-coupler-f/p alt/ motor mounts his prices were very fair
bob
 

wil7483

Petty Officer 1st Class
Joined
Jan 19, 2007
Messages
377
Re: Transom Assembly Woo's

I got up early this morning and bagged some leaves and then headed to the Wellcraft. 1st on the agenda was to install the new gimbal bearing. Went to Autozone and borrowed a slide hammer/3 jaw puller. Had to pay $80.00 deposit but that was okay with me as long as it did the job. Got back home and went to work. Took a few attempts before I got the hang of what the heck I was doing. Finally, old gimbal bearing was laying on the ground. I took a moment to stand there with my chest out feeling all proud before I then cleaned up the gimbal housing and prepared it for the new bearing.

post-2-12641-0704270002__Large_.JPG


So, after getting the gimbal housing all cleaned, I then set forth with installing the new bearing. This really wasn't what I had in store for my morning. I made really slow progress at first but then it came to me that I could use the slide hammer to install it. I reversed the clamp on it and that made it sit perfectly inside the bearing opening. Four good wacks with the slide and it was perfectly seated. My neighbor then came outside and said that I could place the bearing in the freezer for about two hours and then it would go right in. A little for that! After shooting about 40 squirts of oil into it I was sure that it was well lubricated and I could then proceed to something else.

Now it was time to install the new trim position sender and trim limit switches. I finally got the wires situated correctly in the opening and tightened the screws back and was ready for something else.

post-2-13209-0704270007__Large_.JPG


Next on the agenda was to install the new shifter assembly and shift cable. This took me a minute to do but once I got the idea of how everything was supposed to go it actually turned out pretty easy.

post-2-13373-0704270004__Large_.JPG


Getting the new cable to thread correctly was a pain in the behind but otherwise it all went fairly well.

post-2-13494-0704270005__Large_.JPG


Lastly, I started installing my new bellows. Spent about an hour sanding and cleaning the surfaces to insure a good bond. The shift cable bellows was a little troublesome at first but then it became a cakewalk. I plan on letting the adhesive dry overnight before attaching the bellhousing. Besides, I was expecting to receive the new water intake tube but it didn't come today. If it arrives tomorrow then I will finish up the installation. If not I will drive to Destin and buy one locally.

post-2-13820-0704270008__Large_.JPG


So this is where we stand until tomorrow I guess.

post-2-13947-0704270009__Large_.JPG


So since this my 1st attempt at this I am sure I made some mistakes. Please feel free to point out whatever you see that may be wrong so I will know what I need to fix before finishing up tomorrow.
 

bosavy

Petty Officer 2nd Class
Joined
Jul 25, 2005
Messages
130
Re: Transom Assembly Woo's

i just did mine don;t forget the water hose . mine was a bravo 2 i just went by the book
 

SuperNova

Lieutenant
Joined
Mar 16, 2007
Messages
1,455
Re: Transom Assembly Woo's

If you want to make life a lot easier when it comes time to tighten those clamps up, go to sears and buy a 5/16" or 8mm swivel socket in 1/4" drive and an 18" 1/4 drive extension. I've found they help with access.
--
Stan
 

wil7483

Petty Officer 1st Class
Joined
Jan 19, 2007
Messages
377
Re: Transom Assembly Woo's

If you want to make life a lot easier when it comes time to tighten those clamps up, go to sears and buy a 5/16" or 8mm swivel socket in 1/4" drive and an 18" 1/4 drive extension. I've found they help with access.
--
Stan

Believe it or not, I didn't have much of a problem with them. I made sure that I positioned them so that I could reach them from beneath. The hardest part was getting the water intake hose onto the fitting after I'd already placed the u-joint bellow in place. I did a little finagling and finally got it on and clamped down. The exhaust bellow was probably the easiest. I hear so many stories of how hard it is but mine slipped right on. After the adhesive had dried for about an hour it was no problem getting the clamp tightened and in place. I had fashioned my own bellows expander tool out of two dull butter knifes but I really didn't even need it.

So it's finished now and I can finally breath a sigh of relief. It wasn't as hard as I imagined it would be but none-the-less I think the next time I will pay someone else. Thanks everyone for the advise and assistance.

post-2-01476-0704280007__Large_.JPG
 

Reel Poor

Vice Admiral
Joined
Jan 29, 2005
Messages
5,522
Re: Transom Assembly Woo's

Don't forget to check and readjust engine alignment. It's probably off due to the incorrect rear mounting bolt instalation.
 

wil7483

Petty Officer 1st Class
Joined
Jan 19, 2007
Messages
377
Re: Transom Assembly Woo's

I have finally gottent he engine perfectly aligned. The tool slides in and out just like butter with no effort or binding. My latest problem is getting the outdrive to go on. It goes within 1" or so and then stops. I have tried everthing but it will not go past this point. The problem isn't because of it not being in forward gear. The two couplers are still about 1/4" from even touching each other. I have rotated the prop to try to align the splines but it still will not slide any further into the hole. I am at my wits end at this point and about to just give up and sell the stupid boat.

Could it be that the outdrive won't mate with this assembly? It is a 1988 Alpha One Gen I assembly and a 1982 Alpha outdrive. Can anyone help me figure this out?

post-2-96349-0705190002__Large_.JPG
 

Reel Poor

Vice Admiral
Joined
Jan 29, 2005
Messages
5,522
Re: Transom Assembly Woo's

Its probably stopping at the orings on the input shaft. Be sure you haven't put too much grease in the coupler as it can cause a hydrolock (prevent air from escaping as the shaft tries to penetrate the coupler) and be sure you greased the o-rings on the input shaft well. With the help of an assistant and some persuasive force it should go, assuming the alignment is correct.
 

wil7483

Petty Officer 1st Class
Joined
Jan 19, 2007
Messages
377
Re: Transom Assembly Woo's

With the help of an assistant and some persuasive force it should go, assuming the alignment is correct.

How much "persuasive force" do you think is enough? Kicking doesn't work, thats for sure. Scratching and pulling my hair hasn't seemed to have had any effect on it either up until now. Although, I haven't tried a battering ram yet.
 
Top