Transducer Install on Fibreglass Bowrider

gear1975

Cadet
Joined
Apr 12, 2011
Messages
9
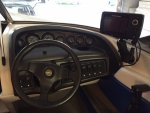
I have a 1994 Starcraft 1810ss. I just got it from a local previous owner who had no locator electronics installed on it whatsoever.

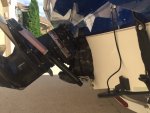
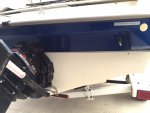
I purchased a Humminbird Helix 5 DI. I'm not sure how I can get the transducer wiring thru the transom in the best/cleanest way? As you can see in the pics, there's no previous install, and no "hole" or access to the engine bay to run the wire. It's completely solid transom, except for the drain plug and where the outdrive is.

How would you do this install in this situation? Just looking for suggestions.

Thanks!
Transom_Left.jpg Transom_Right.jpg
 

Attachments

  • Transom_Right.jpg
    Transom_Right.jpg
    95.1 KB · Views: 2
  • Transom_Right.jpg
    Transom_Right.jpg
    95.1 KB · Views: 2

JASinIL2006

Vice Admiral
Joined
Feb 10, 2012
Messages
5,609
I installed my transom mounted transducer on the starboard side. On your boat, it would be right about where that trailer bracket is. I drilled a hole in the transom to feed thru the cable. On yours, I think your best options would be to either put the hole in the blue section above the transducer (in line with the two transom tie-down eyes) or in the bumpout above that location. I'd be a little concerned about getting the cable to follow the contours of the bumpout, so I'd just put it in the lower part of the blue section.

Most transducers come with a clamshell to put over the hole to protect the cable. I'd probably oversize the hole through the transom, fill it with either marine epoxy or thickened resin, then when that's hardened, I'd drill the size hole I need for the cable. Then, run the cable in, fill the hole with 3M 5200 sealant (which you should also use on the transducer mounting screws and cable guide screws, and call it a day.

You can also just drill the size hole you need, run the cable through and seal with 5200. That would most likely be fine, too. The procedure above is just a little extra insurance to keep water away from the wood.

One warning: you will have to drill what seems like a ridiculously large hole to pass thru the connector on the end of the transducer cable. Don't worry about that, just be sure to seal up everything well.

Good luck!
 

gear1975

Cadet
Joined
Apr 12, 2011
Messages
9
Hi JASinIL2006,

Thanks for the very thorough response! I knew I would need to drill a hole thru, but wasn't sure at what point to place the hole to guide the wires. So, to confirm what you mention, I've updated the photo to indicate where I see it being done. The hole (not to scale obviously), wire path, and transducer location. Look ok? Probably do this in the next week or so.

Transducer_Location.jpg
 

JASinIL2006

Vice Admiral
Joined
Feb 10, 2012
Messages
5,609
Yeah, that looks pretty good. I might try to cheat it over a bit to port so you're not too close to the strake (which can cause turbulence that messes up the accuracy of the transducer). But you're probably good there, too. You don't want to get too close to the outdrive, either.
 

mlaajanen

Seaman
Joined
Apr 18, 2016
Messages
68
Or you could glue it on the inside using epoxi, very simple and quick work.

I myself have never liked drilling holes in boats unless really necessary.
 

David Young

Chief Petty Officer
Joined
Jul 12, 2015
Messages
485
I would change out the phillips head screws with socket head screws, if that's what came with yours. I changed mine out and made life a lot easier. I got my stainless steel socket head screws from my local hardware store :)
 

GA_Boater

Honorary Moderator Emeritus
Joined
May 24, 2011
Messages
49,038
Or you could glue it on the inside using epoxi, very simple and quick work.

I myself have never liked drilling holes in boats unless really necessary.

Gear is installing a down image xducer and epoxying to the inside of the hull is not an option.

Humminbird has 3 ways to install a DI xducer. Trolling motor mount, transom mount or a thru-hull mount. Only a TM mount will avoid some form of hole in your boat.

Using a transducer mounting plate like some of these will minimize holes in the transom and will allow for future installations with no new holes.
 

Alumarine

Captain
Joined
Feb 22, 2005
Messages
3,718
That transducer mounting plate that GA recommended is the way to go.
It also allows for fine tuning the placement of your transducer without drilling extra holes in the transom.

As far as not drilling holes in a boat, sometimes you just gotta. There's already a bunch of holes anyway.
 

David Young

Chief Petty Officer
Joined
Jul 12, 2015
Messages
485
I was going to mount my transducer with a mounting plate i found on line that was 1 inch thick. After looking at it, i was going to have to drill two holes in my boat for the plate. In the end I decided to just drill the two holes to mount the transducer to the boat and not fool with the mounting plate.

I know you can glue the mounting plates on but i don't trust my gluing jobs :)
 

GA_Boater

Honorary Moderator Emeritus
Joined
May 24, 2011
Messages
49,038
My boat is 50 years old, The thing has many different transducers installed over the years and poorly patched holes from them, it's enough to make you sick. Two holes to mount the plate is so much less heartache!
 

gear1975

Cadet
Joined
Apr 12, 2011
Messages
9
No Title

So, to circle back on this post from last month...

Did the installation of the transducer as mentioned in the thread above, and it worked out great. A few learnings:
  • Mask the area well if you're going to use 3M 5200. It goes in like toothpaste, but becomes very runny shortly afterwards. After 24hrs of "pre-curing", and 5 days to fully cure, it's very, very, very difficult to remove if at all. (see pic).
  • Running the wire went well, but after drilling the pilot hole above the water line, i progressively used a larger bit to get it large enough to run the cable connector thru. Only after it was done (7/16"?), I noticed that I was about 1/8" away from drilling into some wiring on the inside that were running along the transom. Missed them but oh, so close!
Helix 5 DI is performing as expected. Works well, and is nice and bright. Mounted it to a Ram Mount at the helm.
 

Attachments

  • photo246530.JPG
    photo246530.JPG
    88.4 KB · Views: 6
  • photo246531.JPG
    photo246531.JPG
    104.3 KB · Views: 11

blamtro

Petty Officer 2nd Class
Joined
Jun 14, 2011
Messages
145
I just did this very same thing. Go buy a stern saver. Expoxies the hull so the only holes go into the hull above the water line. Seal the one hole with 3M 5200 and youre good to go.

I picked this spot by marking with duct tape, took a trip to the lake and tubed behind the boat and watched for the least amount of turbulence and spray that was at least 15" away from the prop before mounting. Didnt want to have to move it. Had to cut about 1" off the bunk with a small hand saw so the bunk didn't hit when trailering.

http://www.sternsaver.com
 
Last edited:

blamtro

Petty Officer 2nd Class
Joined
Jun 14, 2011
Messages
145
No Title
 

Attachments

  • photo246572.png
    photo246572.png
    828.1 KB · Views: 7
  • image.png
    image.png
    828.1 KB · Views: 7
Top