Modification to Motorwell and Adding Fishing Platform:
In restoring my 16' Jupiter I wanted to build-in a raised fishing platform at the stern that would house the gas tank and batteries, mount a pedestal seat, and provide a more convenient "step-down" for getting into the boat - something my wife will appreciate.
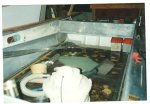
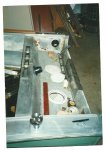
To do this I first needed to increase the height of the existing motorwell and create a flat square surface on which to attach the platform support framing, high enough to enclose the battery boxes I would be using, and to give a more finished and "modern" look to the back of the boat. I didn't remove any of the original sheetmetal, just added a fabricated "box section" over the top of the rounded portion at the front. This was made from two pieces of 5052 marine grade aluminum, fastened in place with pop rivets. The couple of inches of inside space this formed I filled with 2-part polyurethane foam, to give structural support, as well as just a bit extra flotation up near gunnel level.
Also, in the original motorwell I cut two round holes in the bottom to add a 6" wide access port over each of the bilge pump positions. And on each side, where the old steering cables (removed) came thru two round holes, I made oblong openings I could reach thru to be able to install bilge pump discharge ports to the outside. These openings were covered with removable panels made from more aluminum plate. Underneath the motorwell I secured two 6-gal air tight poly drums for additional floatation at the stern.
I'll attempt to attach some photos so you can see how this turned out. (I'll do another post behind this one to show the fishing platform).
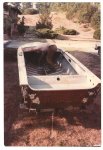
The 1st pic is of the original 16' Starcraft Jupiter - after the new transom had been installed - but before any work was done on the motorwell. Here I'm doing some preliminary water testing to see if there are any leaky rivets -not a one!
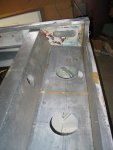
The following thumbnails are of the modifications described above. The last pic shows the completed metal work and the motorwell with two coats of 2-part polyurethane primer, ready for the first of three top coats - which has to be applied within 24 hrs of the primer. (The new ski tow rings bolted thru the transom are useful for hoisting with a sling. I left the lifting handles (new ones) in place also but bolted them thru too using 1/4 ss bolts and lock nuts. I hate it when a lifting handle comes off when you are trying to move a boat around).
In restoring my 16' Jupiter I wanted to build-in a raised fishing platform at the stern that would house the gas tank and batteries, mount a pedestal seat, and provide a more convenient "step-down" for getting into the boat - something my wife will appreciate.
To do this I first needed to increase the height of the existing motorwell and create a flat square surface on which to attach the platform support framing, high enough to enclose the battery boxes I would be using, and to give a more finished and "modern" look to the back of the boat. I didn't remove any of the original sheetmetal, just added a fabricated "box section" over the top of the rounded portion at the front. This was made from two pieces of 5052 marine grade aluminum, fastened in place with pop rivets. The couple of inches of inside space this formed I filled with 2-part polyurethane foam, to give structural support, as well as just a bit extra flotation up near gunnel level.
Also, in the original motorwell I cut two round holes in the bottom to add a 6" wide access port over each of the bilge pump positions. And on each side, where the old steering cables (removed) came thru two round holes, I made oblong openings I could reach thru to be able to install bilge pump discharge ports to the outside. These openings were covered with removable panels made from more aluminum plate. Underneath the motorwell I secured two 6-gal air tight poly drums for additional floatation at the stern.
I'll attempt to attach some photos so you can see how this turned out. (I'll do another post behind this one to show the fishing platform).
The 1st pic is of the original 16' Starcraft Jupiter - after the new transom had been installed - but before any work was done on the motorwell. Here I'm doing some preliminary water testing to see if there are any leaky rivets -not a one!
The following thumbnails are of the modifications described above. The last pic shows the completed metal work and the motorwell with two coats of 2-part polyurethane primer, ready for the first of three top coats - which has to be applied within 24 hrs of the primer. (The new ski tow rings bolted thru the transom are useful for hoisting with a sling. I left the lifting handles (new ones) in place also but bolted them thru too using 1/4 ss bolts and lock nuts. I hate it when a lifting handle comes off when you are trying to move a boat around).