Tips, Hints and Other Ideas

gm280

Supreme Mariner
Joined
Jun 26, 2011
Messages
14,595
Okay I asked about making such a thread for everyone to contribute to, to offer ideas that could help others doing boating or other shop projects. If the "MODS" think this is okay, then here it is, if not well that's okay too.

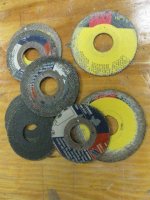
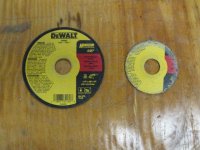
First, I am reasonably sure everyone has angle grinders and probably die grinders. I mean most folks that are reburnishing fiberglass most certainly does. Well seems cut-off angle grinder disc only last so long. Then they get discarded. BUT, there is still a lot of cut-off life in those discarded disc! But since it is too small in diameter to do the job on the angle grinder, off it comes and a new one installed. Well don't throw those too small cutting disc away. You can use them on your die grinder to do lots more cutting. Here are a few pictures to tell the story. You can see the difference in sizes between the two grinders.IMG_0001.JPG
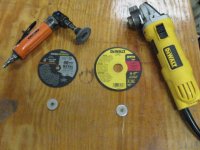
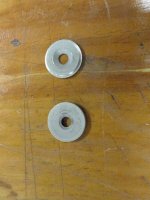
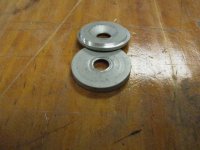
Obviously the center holes are very different. But you can make a simple adapter to use the angle grinder discs for the die grinder by taking an aluminum washer or whatever you have available, and cutting it down to size.
IMG_0002.JPG
IMG_0003.JPG
IMG_0004.JPG
IMG_0005.JPG
As long as the center hole is ~1/4" and the washer you select to cut down is wider then the center hole for the old angle grinder disc, then the old used angle grinder discs will work. So you get plenty of cut-off abilities to use.

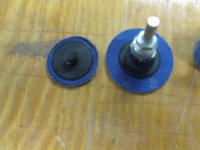
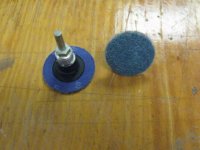
Next, And if you do have a die grinder and use the 2" Roloc 3M type sanding disc, you also know that once the disc gets used up on the edges, it doesn't work very well anymore. Well cut those disc off some and you have new edges to use again.
IMG_0009.JPG
IMG_0010.JPG
I usually use my bench grinder from the back side to trim them down. More use from them as well.
I am pretty sure most everyone mixes both paint and epoxies or polyester resins. And the catalyst has to be measured to make the paint cure and epoxies and polyester get hard. Well don't try to use the typical bathroom mouthwash type cups. They WILL dissolve and quickly. However, if you have and typical liguid medicine (Nyquil, Dayquil, Tylenol liquid etc.) type cups, they work perfect. And some are marked so you can use the appropriate amounts of catalyst.
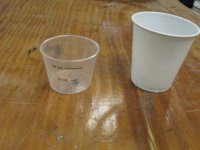
IMG_0012.JPG

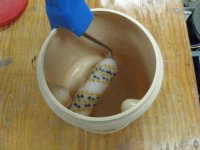
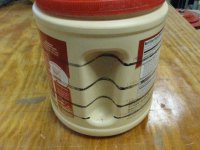
And that brings me to another household item you can reuse. If you do mix epoxies and/or paint and polyester resins, reuse those plastic type containers (coffee creamers and coffee and such) to mix the ingrediencies in. I even marked the amounts on the side of the containers so I know how much I am mixing. And if you use those 4" rollers, they fit without issues.
IMG_0014.JPG
IMG_0015.JPG
And lastly, for now, When you us those wire brushes and they get all splayed out of usefulness, don't throw them away. Take them to your bench grinder and use the wire wheel on the grinder to straighten the splayed wire brushes back into shape. You will be amazed how well it straightens out those wire brushes. Just push the wire brush against the spinning wire wheel on the bench grinder with the wires facing downward and it straightens them like magic. Lots more usage from those wire brushes...
That's all for now... Hope you like this!
 

gm280

Supreme Mariner
Joined
Jun 26, 2011
Messages
14,595
Here is an idea that I was wondering about and have the answer now. I was building two drawers to go under the bench. But I didn't want them to be flush with the front of the bench where I sit and do lots of things. I mean I like my knees without hitting them with drawer corners. So I was going to recess them back away from the front. But I also wanted to get into them and not have to reach back into the drawer under the bench to get things from them. So I looked for over extension drawer slides. I found all types of full extension and a few over extensions types. And I thought my idea wasn't going to work out. Then I thought what if I bought longer length slides then the actual drawers and installed them with the drawer slides even with the back of the draw. That way I could full extend the draws and have them open up out from the bench front. Well that is exactly what I did. I bought 22" full extension slides for a 18" drawer. So I can mount the drawers 4" back from the front of the bench and still have them open fully from the bench to access everything in the drawers. Some times you have to thing about ways to accomplish what you want.
 

Bob_VT

Moderator & Unofficial iBoats Historian
Staff member
Joined
May 19, 2001
Messages
26,022
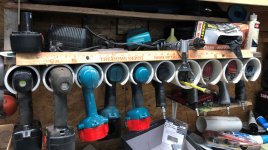
Love the tips....... I have some storage tips - I made storage cubbies by using 3" PVC and 4" PVC pipe to store and hold my electric drills, impact drivers, and air guns. I keep the battery chargers, air tool oil and gloves stored on a small shelf above it. Those holders make for quick storage IMG_5185.jpg
 

gm280

Supreme Mariner
Joined
Jun 26, 2011
Messages
14,595
Love the tips....... I have some storage tips - I made storage cubbies by using 3" PVC and 4" PVC pipe to store and hold my electric drills, impact drivers, and air guns. I keep the battery chargers, air tool oil and gloves stored on a small shelf above it. Those holders make for quick storage View attachment 329090
Wait a second, I don't see any yellow there... lol

Glad to see someone else respond with cleaver ideas. Who doesn't like ideas?
 

PITBoat

Petty Officer 1st Class
Joined
Jul 26, 2018
Messages
286
My dad was good with that kind of stuff. I like the wirebrush fix; I've tried a few wraps of elec tape around the bristle bases. And a little snipping action on the really wayward ones, heh. Ok, but not perfect.

Here's a very boating specific one that just came to me - a small valve at the PS cooler drain port (instead of a screw). Don't know how many I/Os have something similar to mine though, in that department.

I've winterized/unwinterized once already this month (I only drain the water; no A/F), and it's not bad really, but that screw is hard to get to. It's brass and I can barely get it started with one hand (then hope it's not cross threaded).
 

gm280

Supreme Mariner
Joined
Jun 26, 2011
Messages
14,595
Here is maybe a helpful tip that I stumble across yesterday when looking for a small ball bearing.
I had my Dotco die grinder (10LF201-36) lock up on me this past week after years of usage. And that is because I use that one harder then all the others combined. So I thought I would disassembly it and see what had it locked. Not an easy job for sure. I had to work and think on it for a couple days because I didn't want to damage any part of it. Dotco parts are amazingly costly. But then so is the actual die grinder too!
I managed to get it apart and found the rear bearing come apart. And the front bearing felt like they used square balls in it. So both bearing had to be replaced. Okay, they are bearing. No big deal...yeah right!
Like I said Dotco parts are outrageously costly. The front bearing ~$40 dollar or more, plus shipping and tax. The rear bearing is even more costly then that. But I knew that if there was a part number on the bearing, I could cross them and buy them at a better cost. Well just so happens I had 6 of the front bearing that I bought some time ago, so one down. However, the rear bearing was only available via Cotco and Dotco, no numbers on the shield that was mangled up. So I got this crazy idea to mic the bearing and find one that way. I mic'ed it out in metric sizes since most bearing are listed that way. However I couldn't find one anywhere with my measurement and was about to order their costly version that was going to take until the end of January to receive, their statement. But in my looking for a 12.7mm OD bearing, I noticed that converted to .5" in decimal size. So I converted all the metric sizes I measured to decimal and WALA they are everywhere for a song. So the tip is, if you are looking for certain items and measure them in metric, try converting them to decimal and visa versa. Who knows you may find the item a lot cheaper that way. Hope this helps someone.
 

gm280

Supreme Mariner
Joined
Jun 26, 2011
Messages
14,595
I know a lot of boater use spray guns of all sizes and types whether they are gravity feed or syphon feed types. And one of the worst thing you have to do is clean the gun after painting with it. Well here is a much easier way to do that and always have a "like brand new" spray gun ready for the next project. Just after spraying your project and before removing any PPE equipment, take the gun and remove the cup/bottle off it and use a can of carb cleaner on that gun. I spray carb cleaner directly into the hole where the cup spins on and spray the carb cleaner directly into the opening until the gun sprays clean. Takes only a very few second. Then I do the same to the cup to clean it out until it is spotless as well. But I go even further then that by removing the nozzle tip and spray them with carb cleaner and then compressed air to clean those parts too. I usually can completely clean the entire gun with less then half a can of carb cleaner fluid and that gun is spotless. I usually spray some on a clothe and wipe the gun of all materials and finger smudges. And there you have it. I totally completely cleaned spray gun that will be ready for the next project. And virtually any carb cleaner works too. I have a nice assortment of quality spray guns that look absolutely brand new and have used them for years and years now. Try it, it sure works quickly and cleans them perfectly too...
 

sphelps

Supreme Mariner
Joined
Nov 16, 2011
Messages
11,435
Never thought of carb cleaner .. Probably cheaper than acetone ...
 

gm280

Supreme Mariner
Joined
Jun 26, 2011
Messages
14,595
Never thought of carb cleaner .. Probably cheaper than acetone ...
Yes Sam it is quick and easy. And I forgot to say that brake cleaner works too. So I buy whatever is on sale and usually can get it around $2 a can or even less sometimes. I got tired of disassembling the gun and pouring a container with either lacquer thinner or Acetone and cleaning the guns.
 

WIMUSKY

Moderator
Staff member
Joined
Sep 26, 2009
Messages
19,800
Nice right ups jm. Great idea.
Ps. I have lots of yellow....šŸ˜Ž
 

Scott Danforth

Grumpy Vintage Moderator still playing with boats
Staff member
Joined
Jul 23, 2011
Messages
47,581
Use "shop vac" brand shop vacs or their clones. Use the canister bags when grinding fiberglass

To remove foam, use a cup brush on the angle grinder or the end of a 2' drill extension and the chordless drill
 

GA_Boater

Honorary Moderator Emeritus
Joined
May 24, 2011
Messages
49,038
Have you ever had a nut way down somewhere and you took it off with a socket and extension, but you can't get your hand in there to start the nut and it falls out of the socket when trying to get it started?

I use a small piece of paper towel to the wedge the nut in the socket and it doesn't fall out.

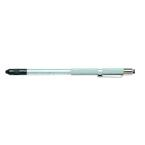
A similar idea for screws - A screw starter with a twist and hold feature for both slotted and phillips screws. Some have a magnet on one end for dropsies, some are combos for both types of screws. Here is a phillips one with a magnet;

1606350938899.png
 
Last edited:

dingbat

Supreme Mariner
Joined
Nov 20, 2001
Messages
15,512
Old farmers trick.... a tubeless tire comes off the rim. A can of starting fluid and matches is all you need.

Remove wheel and lay on ground. Spray starting fluid inside tire around circumference of rim. Donā€™t need a lot.

Then quickly light the fumes. I use the strike (match) and toss method. Same as when using gasoline to start a fire.

The resulting explosion sets the bead and inflates the tire at the same time.

Got me back on the road more than once
 

Bob_VT

Moderator & Unofficial iBoats Historian
Staff member
Joined
May 19, 2001
Messages
26,022
Carb cleaner reminded me that when I work on a small carb or part I also like to have a can of Spray Air/Duster to blow out the tiny parts with accuracy. I do that to my gun parts, boat carbs and motorcycle parts too.
 

gm280

Supreme Mariner
Joined
Jun 26, 2011
Messages
14,595
Here is another useless...I mean useful tip... lol

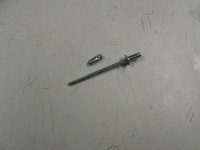
Ever need a small pop rivet and all you have around the shop are long ones. Here is an idea that I've used way more then once and it works great.

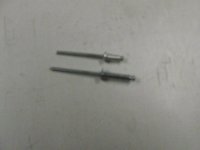
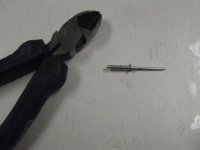
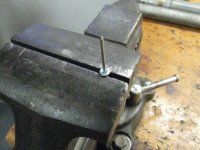
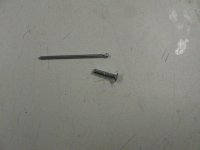
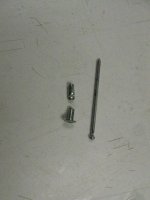
Take a long reach pop rivet and figure out what actual length you need. Then take that rivet and a wire cutter and mark a cut line around the long rivet for the size you actually need with the wire cutter. You can squeeze pretty hard doing the marking and that helps for the next step too. Now that you have the cut line marked pretty deep, take the rivet to a vice or any other method of holding the rivet. Tap the center pop pin out of the rivet. Snap off the cut marked portion. Tap the pin back in and now you have a short rivet for your needs. Easy peasy and it works very well. Just use you pop rivet tool and pop away.
HTI (1).JPG
Not the clearest picture...sorry.
HTI (2).JPG
Cutter marked rivet to the size you need.
HTI (3).JPG
Set in the vice loosely to tap the center pin out
HTI (4).JPG
Pin removed ready to snap off the marked portion.
HTI (5).JPG
Portion snapped off ready to reinstall the pop pin back in.
HTI (6).JPG
Finished sized rivet ready to use...
 
Top