Timing Tips?

LaqueRatt

Chief Petty Officer
Joined
Jun 27, 2022
Messages
444
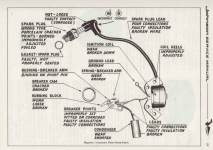
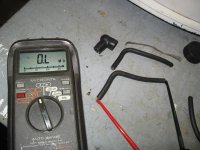
I set the points on my old OMCs using a feeler gauge. Been using one for years, pretty sure am doing it right. Motors always seem to run well, but I've been reading that for best idle and easy starting the points should be timed so that they fire exactly 180 degs apart. I see some are using a multimeter which think I understand, but some are using a fixture. A thin bar with a hole for the flywheel and a pointer. Do I need to buy a fixture to dial these in better or can I just use a multimeter? Can I make a fixture? They look pretty simple.

Motor I'm currently working on is a 76 6 HP Johnny.
 

Crosbyman

Vice Admiral
Joined
Nov 5, 2006
Messages
5,350
meter is fine points must OPEN when the single top timing bar if between the 2 bottom ones see video... gap is less critical if they open at the proper time.

the pointing bar makes things easier but is not necessary

.020 at the top of the lobe is fine to ....if it works don't fix it !


Attachments

  • Timing pointy tool method.pdf
    745.1 KB · Views: 3
Last edited:

racerone

Supreme Mariner
Joined
Dec 28, 2013
Messages
37,496
The timing fixture is nothing but a " dummy flywheel " -----You can use the flywheel on your motor to set points to OPEN at the precise time for maximum spark intensity.
 

LaqueRatt

Chief Petty Officer
Joined
Jun 27, 2022
Messages
444
Thank you gentlemen. That's what I needed to know. Flywheel has no hole to adjust points though, so guess I'll just have to keep pulling it off. I do see the appeal of that dummy flywheel. I'm guessing one size does not fit all?
 

Crosbyman

Vice Admiral
Joined
Nov 5, 2006
Messages
5,350
just remove the condenser itself (not needed for the test) via the freed up condenser mounting screw hole pass and connect a small wire to each point where the condenser itself was connected

just check that each wires is grounded solid via cleaned points .. very clean

install the FW back on and turn clockwise

then when the points open up at TDC and you loose the ground reading on the VOM the single bar should be lined up between the pair of bars.
do the same with the other wire ... use small bell wire or 22ga stuff

just lift the FW to make small adjustments on the points off-set screw
 

racerone

Supreme Mariner
Joined
Dec 28, 2013
Messages
37,496
You lock the magneto plate in position.----Full throttle or idle does not matter.----Remove wire from coil to ground.-----Make sure lock down screw on points is TIGHT .----Turn flywheel till timing mark is between the 2 marks on magneto plate ----Lift the flywheel off.----Use meter ( ohm scale ) on ground wire and one lead to ground.----Use cam screw to set points to open.-----Install coil ground wire.----Repeat for other set of points.-----Test for spark.-----Job is done.
 

LaqueRatt

Chief Petty Officer
Joined
Jun 27, 2022
Messages
444
Had to read that a couple time, but think I got it. Thanks R1
 

racerone

Supreme Mariner
Joined
Dec 28, 2013
Messages
37,496
It is an elegantly simple procedure.----Points open at the correct time to produce maximum spark intensity.
 

LaqueRatt

Chief Petty Officer
Joined
Jun 27, 2022
Messages
444
Timed it per R1s directions. Quick and painless. Couldn't judge how well it worked though, because the motor still isn't making spark on either cylinder, although I could have sworn I did see one little flash. Last time went down this rabbit hole ended up changing both coils.

I've tested the coils, condensors, and the caps and wires somewhat when pulling ohms on the coils and all seems good, although the resistance on the coils is a little high, outside of specs, but just a little. Going to clean the points with lacquer thinner just for the heck of it, but other than that at a bit of a loss what to do. Seems odd that both coils would die at the same time doesn't it?

Guess next think to do might be to remove the timing plate and pull the wires completely off to make sure the connectors are seated well. I'd change the wires, but seem hard to find. Checked with NAPA and they told me I had to buy a roll of the stuff.
 

Crosbyman

Vice Admiral
Joined
Nov 5, 2006
Messages
5,350
Timed it per R1s directions. Quick and painless. Couldn't judge how well it worked though, because the motor still isn't making spark on either cylinder, although I could have sworn I did see one little flash. Last time went down this rabbit hole ended up changing both coils.

I've tested the coils, condensors, and the caps and wires somewhat when pulling ohms on the coils and all seems good, although the resistance on the coils is a little high, outside of specs, but just a little. Going to clean the points with lacquer thinner just for the heck of it, but other than that at a bit of a loss what to do. Seems odd that both coils would die at the same time doesn't it?

Guess next think to do might be to remove the timing plate and pull the wires completely off to make sure the connectors are seated well. I'd change the wires, but seem hard to find. Checked with NAPA and they told me I had to buy a roll of the stuff.
tell napa where to go.... your local bike or small motor shops can probabaly sell you 4 feet

what ohms do you get on secondaties HV and engine frame
 

LaqueRatt

Chief Petty Officer
Joined
Jun 27, 2022
Messages
444
Think they were around 4.3 ohms, the good range is supposed to be 3-4.
 

Crosbyman

Vice Admiral
Joined
Nov 5, 2006
Messages
5,350
Kilo ohms hopefully HV secondaries can range from 3-4 up to 10 Kohms primary to primary is usually less than 1.5homs

if you have 4.4kohms coils lilely ok clean the points again and check the condensers. no coil wires rubbing the main shaft !!

front coil to top plug!!
 

LaqueRatt

Chief Petty Officer
Joined
Jun 27, 2022
Messages
444
Weird, but after cleaning the points with lacquer thinner I found that the top cylinder is sparking good, but only 1 out of about every 10 pulls. The bottom cylinder remains dead. Going to recheck the windings on the coils, but then guess nothing left but to check the plug wires out. Seems like if they were bad though I'd not be able to measure the secondary winding resistance.
 

Crosbyman

Vice Admiral
Joined
Nov 5, 2006
Messages
5,350
condensers may be bad ... must be tested for leak on HV apparatus or test box.
measure HV to boots while flexing wires .... they sometimes break in bends under the mag plate
may aswell put in new 7mm solid core plug wires and be done with it as a suspect
post your resistance measurements of primaries and HV secondaries .
 

Attachments

  • Ignition bugs.PNG
    Ignition bugs.PNG
    340.8 KB · Views: 5
  • cracked wires.JPG
    cracked wires.JPG
    1.4 MB · Views: 5

LaqueRatt

Chief Petty Officer
Joined
Jun 27, 2022
Messages
444
Rechecked the coils and they ohmed out at
Top: 4.5K high side, 2 ohms on low
Bottom: 4.15K, 2 ohms
Flexing the wires didn't seem to have any effect.
Guess all can do now is remove plug wires to check the terminal connections and maybe replace them. Really can't believe this thing isn't sparking better.
 

LaqueRatt

Chief Petty Officer
Joined
Jun 27, 2022
Messages
444
Many thanks for all the help. The timing was definitely worth the small amount of time it took. She's idling as smooth as any I've ever had.

 
Top