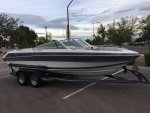
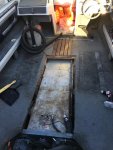
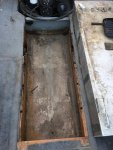
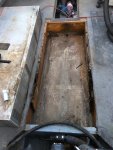
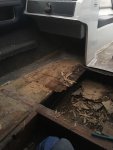
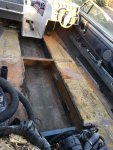
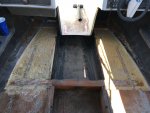
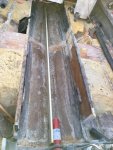
The Project Begins!!!

Helibob1966

Seaman Apprentice
Joined
Sep 13, 2016
Messages
42
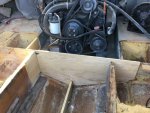
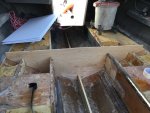
Finally got my boat home and have started the the rebuild of the supporting structure and decking. Sure wish the previous owner didn't leave so much fuel in the tank. I will post pictures throughout the process.
Comments and tips are welcome.
 

Attachments

  • photo252853.jpg
    photo252853.jpg
    168.2 KB · Views: 0
  • photo252854.jpg
    photo252854.jpg
    182.8 KB · Views: 0
  • photo252855.jpg
    photo252855.jpg
    177.4 KB · Views: 0
  • photo252856.jpg
    photo252856.jpg
    182.7 KB · Views: 0

Scott Danforth

Grumpy Vintage Moderator still playing with boats
Staff member
Joined
Jul 23, 2011
Messages
49,833
why didnt you drain the fuel first? pull the sender, drop in an electric fuel pump suction line, the other end to a catch bucket.
 

Corjen1

Lieutenant Junior Grade
Joined
Aug 24, 2013
Messages
1,237
Welcome to Iboats Sir. What helios and where in AZ?? Cool boat and there a re a bunch of folks that will chime when you ask the questions. Great group here, lots of knowledge!! Take lots of pix... for 3 reasons....1st, you will need them, 2nd, its not true with out pix and 3rd, we love boat porn!!!!
 

gm280

Supreme Mariner
Joined
Jun 26, 2011
Messages
14,605
Hillibod1966, are you sure it is fuel in the tank? If it set for any length of time, it could be most any concoction in there now. I would think that a simple primer bulb and fuel line would allow you to start it flowing into some other fuel container sitting a little lower then the boat tank to empty it. JMHO
 

Helibob1966

Seaman Apprentice
Joined
Sep 13, 2016
Messages
42
Welcome to Iboats Sir. What helios and where in AZ?? Cool boat and there a re a bunch of folks that will chime when you ask the questions. Great group here, lots of knowledge!! Take lots of pix... for 3 reasons....1st, you will need them, 2nd, its not true with out pix and 3rd, we love boat porn!!!!
I live in Tucson and work at our local sheriff's dept at the air unit. We operate 1 Cessna 310, 2 Soloy Cessna 206s with Rolls Royce 250 turbo prop conversions, and my baby, a Eurocopter AS350B3e.
I am taking plenty of pictures with measurements and cataloging them too.
 

Helibob1966

Seaman Apprentice
Joined
Sep 13, 2016
Messages
42
Hillibod1966, are you sure it is fuel in the tank? If it set for any length of time, it could be most any concoction in there now. I would think that a simple primer bulb and fuel line would allow you to start it flowing into some other fuel container sitting a little lower then the boat tank to empty it. JMHO
I am taking the tank to our local drag strip friday night, they have a large waste oil container
 

Helibob1966

Seaman Apprentice
Joined
Sep 13, 2016
Messages
42
I am a bit surprised at the construction of the stringersI would thought that the stringers would be a continuous piece from bow to stern, but not the case. The front section terminates at the bulkhead at the rear of the ski locker. It also appears to be made of solid pine, not ply.
Here is a progress pic for the day. Will be spending all weekend on it hoping to finish the deconstruction process.
 

Baylinerchuck

Commander
Joined
Jul 29, 2016
Messages
2,726
Nice looking boat, I'll be following along. Getting ready to start tearing into my Chaparral. I love this stuff!!
 

gm280

Supreme Mariner
Joined
Jun 26, 2011
Messages
14,605

Oh yes, demolition. If it is any consolation, everybody has nearly the exact same pictures when they start. Old, decayed rotted wood that has to be removed. Make sure you take lots of pictures along the way. They certainly will be used later on. As far as the stringer layout. It seems every boat manufacture design their boats per their own ideas and there is no telling how stringers are laid out in some boats. JMHO
 

Helibob1966

Seaman Apprentice
Joined
Sep 13, 2016
Messages
42
It is a nice boat!!! The gel coating is in excellent condition, just needs a cut and buff. The interior is in great condition, the only is one quarter size tear on one of the bow seat covers. With only 94 hours on the meter, the engine and outdrive are super clean. Will need to replace the usual maintenance items.
 

Corjen1

Lieutenant Junior Grade
Joined
Aug 24, 2013
Messages
1,237
I live in Tucson and work at our local sheriff's dept at the air unit. We operate 1 Cessna 310, 2 Soloy Cessna 206s with Rolls Royce 250 turbo prop conversions, and my baby, a Eurocopter AS350B3e.
I am taking plenty of pictures with measurements and cataloging them too.

Cool, I started my A&P career in the Grand Canyon on Bell 206's. Messed with a few AS350's. Good luck on your project!!
 

Helibob1966

Seaman Apprentice
Joined
Sep 13, 2016
Messages
42
No Title

Today's progress. The forward section ply is removed as is the right side. Tomorrow is the left side and the bulkhead removals.
 

Attachments

  • photo253011.JPG
    photo253011.JPG
    304.2 KB · Views: 0
  • photo253012.JPG
    photo253012.JPG
    376 KB · Views: 0

Helibob1966

Seaman Apprentice
Joined
Sep 13, 2016
Messages
42
No Title

Finally finished with the deconstruction!!! Layed down a new keel stringer using peanut butter, up next bulkheads, then comes fiberglass.
 

Attachments

  • photo253502.JPG
    photo253502.JPG
    295.1 KB · Views: 0

ezmobee

Supreme Mariner
Joined
Mar 26, 2007
Messages
23,767
Count your blessings! It's very rare for the entire substructure to not be trashed under a soft deck. You really lucked out. Nice looking boat, well worth the effort to fix up.
 

Helibob1966

Seaman Apprentice
Joined
Sep 13, 2016
Messages
42
Count your blessings! It's very rare for the entire substructure to not be trashed under a soft deck. You really lucked out. Nice looking boat, well worth the effort to fix up.
It was localized in the center of the boat, the previous owner had a cover, but it draped and allowed the water to puddle. With the hot dry climate, the rot was limited. The keel stringer was water logged from fron to back. Standing water was visible under the stringer. Not going to happen any longer, no gap under stringer and I sealed the end grain on both ends.
 

Helibob1966

Seaman Apprentice
Joined
Sep 13, 2016
Messages
42
No Title

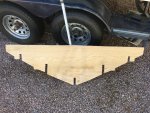
Major progress today!!! Making the templates was tedious but the result was worth it. Hope to have the structure bedded on Sunday.
 

Attachments

  • photo253558.JPG
    photo253558.JPG
    122.8 KB · Views: 0
  • photo253559.JPG
    photo253559.JPG
    243.5 KB · Views: 0
  • photo253560.JPG
    photo253560.JPG
    348.2 KB · Views: 0

Baylinerchuck

Commander
Joined
Jul 29, 2016
Messages
2,726
Its great seeing all the work you are doing, with the engine in place. I have the same project coming up with my Chaparral and I really don't have the space to remove the engine. One question, are you putting in drainage pipe in the bottom center of the bulkheads? I used short pieces of 3/4" pvc and glassed them in on my Capri. I was concerned about trapping water between the bulkheads, but then again I had a ski locker. Looking good!! Nice update
 
Top