Steering arm issue.

DunbarLtd

Petty Officer 1st Class
Joined
Nov 8, 2016
Messages
335
'88 Bayliner 17ft 85HP force.

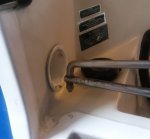
This steering part(bottom side of the bolt thread is hitting the plastic cup and tearing it up. Its maybe 1/2" too low but havent measurerd it. If I pull on on the arm manually I can get it to clear the cup but it sugs when under normal use.

There is wood under the cup thats part of the transom and I dont want water getting through. I noticed yesterday the plastic was cracked off and i could see wood. I put some marine tex on there in the meantime and placed a small piece of rubber over the bolt thread.

But Id like to know why it is hitting there? The motor is mounted as high as it can go. It has through bolts that go through the transom and it doesnt look like I can jack the motor up any but maybe there is enough play in the bolt holes to at least get a little clearance for this cup or theres something wrong with the steering arm there.

And whats the spring do thats on the bolt? Thanks for any help!
 

DunbarLtd

Petty Officer 1st Class
Joined
Nov 8, 2016
Messages
335
[No message]
 

Attachments

  • photo321569.jpg
    photo321569.jpg
    532.9 KB · Views: 0

jerryjerry05

Supreme Mariner
Joined
May 7, 2008
Messages
17,923
Spring really does nothing.
It's a locking nut.
Remove spring and washer and tighten nut all the way and back out 1/2 turn.
Then cut the extra off.
 

Jiggz

Captain
Joined
Oct 23, 2009
Messages
3,817
That is the original configuration of that steering arm, i.e. spring and nylon lock nut. The only reason it is now hitting is probably the slack on the mounting bolt holes (unless the transom itself is already sagging). The steering rod is mounted across the two stern brackets and almost impossible to sag and will only move up or down with the brackets.

Check the transom for sag. If none, then you will need to raise the stern brackets by loosening the mounting bolts and jacking it up. To prevent it from happening again, you might want to place shims between the top of the transom and the arch of the brackets.
 

DunbarLtd

Petty Officer 1st Class
Joined
Nov 8, 2016
Messages
335
Okay thanks guys.

One more thing I noticed...

The transom hex bolt clamps that tighten the upper bracket to the transom. They are on the inside of the splash well. Not the through bolts at the bottom. Manual said 30ft/lbs. Mine were pretty loose but when i cranked it down to 30ft/lb i feared cracking the gel coat.

Any idea what I could use to protect the gel coat there and to give a better backing for those clamps to crank down onto?? I could 5200 the pieces onto the transom there so they dont wiggle loose over time.

Any thoughts???
 
Last edited:

Jiggz

Captain
Joined
Oct 23, 2009
Messages
3,817
For the clamp screw, upper part of the bracket, there's supposed to be a "foot" for the clamp screw which is nothing but a thick washer with a smaller hole. This is to spread the load from the clamp screw and prevent damaging the transom gel. You can of course also use a rubber gasket between this "foot" and the transom.
 

DunbarLtd

Petty Officer 1st Class
Joined
Nov 8, 2016
Messages
335
For the clamp screw, upper part of the bracket, there's supposed to be a "foot" for the clamp screw which is nothing but a thick washer with a smaller hole. This is to spread the load from the clamp screw and prevent damaging the transom gel. You can of course also use a rubber gasket between this "foot" and the transom.

Correct. My setup has the washer "foot" that presses on the transom. That does help spread the load but I was curious if I could strengthen the area there. Good idea on the rubber gasket.

Also does it matter what side the spring is on. I found a diagram of the parts but it doesnt show if the spring goes on top or below the steering cable. I actually moved it to the top side and it had better clearance. From the sound of it Im ok because Jerry said the spring wasnt even necessary so by flipping it and putting it on top I guess its fine that way???
 
Last edited:

jerryjerry05

Supreme Mariner
Joined
May 7, 2008
Messages
17,923
The spring, the washer and then the nut.
They make "Transom Savers"
Or buy a 2 3X10" 1/4" or 3/16 thick aluminum plate.
Drill the holes and install using silicone.

If the holes have elongated? fill and re-drill.
 

DunbarLtd

Petty Officer 1st Class
Joined
Nov 8, 2016
Messages
335
The spring, the washer and then the nut.
They make "Transom Savers"
Or buy a 2 3X10" 1/4" or 3/16 thick aluminum plate.
Drill the holes and install using silicone.

If the holes have elongated? fill and re-drill.

Sorry you misunderstood. I meant what side of the steering arm does the spring go on. If you look at the picture it could be considered to be on the "bottom". I actually, after grinding the threads down, decided to try and put it on the "top", opposite how I have it in the pic and was wondering if it mattered.

I forgot to mention i changed the steering cable a while back so its possible i put it back together wrong and that was the reason for it hitting that cup. Its been a while and I cant remember how it was set up originally.

Also I cant find a single image online or anyone discussing this part. The parts diagram shows washer, spring, washer then nut but only shows the drag link. It doesnt show it actually connected to the steering cable arm. I doubt it matters but just making sure I suppose.

Thanks for the transom saver idea. Ill look into it.
 
Top