Stator electrical replacement question

Joined
Apr 29, 2022
Messages
10
Hi there,

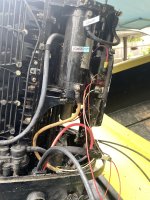
I am re-wiring my 1975 115 hp mercury Tower of power. I have a CDI electronics internal wiring harness replacement.
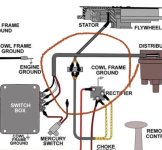
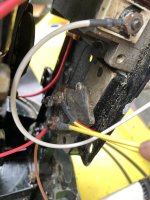
Both the wiring diagram that comes with this replacement harness and another I found online look like the red/yellow wires that go from the rectifier to the stator/flywheel are attached in the middle onto the side of the motor first then go on to the stator/flywheel.
My question is can they just go directly from the rectifier to the attachment at the stator? Or is splitting the wires and screwing them to that mount important?

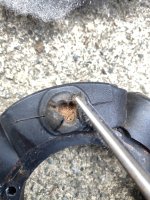
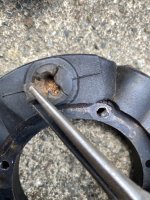
The attachment on the stage door is also brought it and I can’t tell how it is attached. Is it necessary to remove the fly wheel to access this attachment? Right now it is a rubber looking attachment With no obvious post to put a nut onto. My previous wires were right it so badly it’s fell apart with some wires still stuck in the rubber. See pics

Thanks!!65C190D1-B59B-4818-88C2-367C4ABBD65D.jpeg283BF204-C5E6-4F15-ABDD-2AD198AFE0B2.jpeg9B942330-F020-4629-BA3B-49CA3A71A510.jpeg1AF4E256-AC7A-4205-947A-AE4CF3982670.jpeg
 

Attachments

  • 57050DB2-5B6D-48F0-9F30-BB49ED11F283.jpeg
    57050DB2-5B6D-48F0-9F30-BB49ED11F283.jpeg
    2.1 MB · Views: 8

merc850

Commander
Joined
Jul 7, 2010
Messages
2,046
If the wires reach the rectifier hook them up, the terminal block was probably there to let them use a stator from the 4 cylinder models. Don't know what the "stage door" is?
 
Joined
Apr 29, 2022
Messages
10
If the wires reach the rectifier hook them up, the terminal block was probably there to let them use a stator from the 4 cylinder models. Don't know what the "stage door" is?

Oops sorry about that. The autocorrect got me! That should say “the attachment at the stator is rotted” it’s a rubberized channel I’m guessing? That goes inside which means I’ll have to take that apart?
 

Chris1956

Supreme Mariner
Joined
Mar 25, 2004
Messages
27,949
All IL6 motors had the terminal block where the stator wires were terminated. It was for convenience, and maybe allowed both 4 cylinder and 6 cylinder motors to use the same stator, at least for some years. If your stator wires reach the rectifier, connect them directly.
 
Joined
Apr 29, 2022
Messages
10
Thank you! They do! Now I just have to figure out the connection at the stator. I’ll remove the flywheel (making sure to mark it first).
 

merc850

Commander
Joined
Jul 7, 2010
Messages
2,046
What are those yel/red wires to/from?
You need a new stator or dig into the rubber grommet find the wires then solder or crimp connect them to new leads; pot them with epoxy or silicon seal. I've done it on a back-up part.
 
Joined
Apr 29, 2022
Messages
10
What are those yel/red wires to/from?
You need a new stator or dig into the rubber grommet find the wires then solder or crimp connect them to new leads; pot them with epoxy or silicon seal. I've done it on a back-up part.
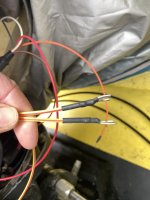
They are the replacement wires from the CDI electronics hardness. They reach all the way up to the stator but I can’t figure out that rubber grommet. The old wires are still in bedded in it. If I can figure out a way to put the new ones into it without removing the fly wheel that would be awesome! If I can dig out the old wires and just cut the ends off the new ones and thread them in there that would work? I’ve never taken apart a fly wheel and it sounds technical!
 
Joined
Apr 29, 2022
Messages
10
They are the replacement wires from the CDI electronics hardness. They reach all the way up to the stator but I can’t figure out that rubber grommet. The old wires are still in bedded in it. If I can figure out a way to put the new ones into it without removing the fly wheel that would be awesome! If I can dig out the old wires and just cut the ends off the new ones and thread them in there that would work? I’ve never taken apart a fly wheel and it sounds technical!
Edit, I think you’re meaning to connect the old wire to the new ones but the old wire was so rotted it literally fell apart and just left some in bedded wires stuck in the rubber.
 

merc850

Commander
Joined
Jul 7, 2010
Messages
2,046
Remove the flywheel and stator, pull off the rubber grommet and you'll see the wires. When you replace the stator use Loctite on the screws and if you are unbolting the bolts that hold the flywheel together use it on them. The best way is to use the puller that they make for it.
New ones are available from CDI.
 
Joined
Apr 29, 2022
Messages
10
Remove the flywheel and stator, pull off the rubber grommet and you'll see the wires. When you replace the stator use Loctite on the screws and if you are unbolting the bolts that hold the flywheel together use it on them. The best way is to use the puller that they make for it.
New ones are available from CDI.
Have any idea what the socket size is for the flywheel nut is? Or what the orig part is so I can buy a proper puller? I thought found it on a parts website but it doesn’t match any numbers listed on the “parts for replacing #’s_____”
 

Chris1956

Supreme Mariner
Joined
Mar 25, 2004
Messages
27,949
If I remember correctly, the outer flywheel removal will allow access to the stator. So remove 8 5/16 bolts. Set the motor to TDC to ease re-installation of the outer flywheel. Use some blue locktite on the flywheel bolts, as well as the distributor cover bolt.
 
Joined
Apr 29, 2022
Messages
10
I got it off but I’m not sure if there is enough wire left to even solder the new ones to. I’m guessing not? Don’t want to buy a new one but I guess I could.. any ideas anyone?5868A6CD-EC03-411C-B28F-4A19DF6A826A.jpeg
 

Attachments

  • EA66E236-DBFE-4333-8FF3-82894B73DC29.jpeg
    EA66E236-DBFE-4333-8FF3-82894B73DC29.jpeg
    1.8 MB · Views: 0

merc850

Commander
Joined
Jul 7, 2010
Messages
2,046
Since it is not usable as is take a Dremel tool and dig into the plastic until you find the windings and hook new wires to them, put a spacer between the connections then pot it with epoxy. The winding wires are solid so they should be easy to find.
 
Joined
Apr 29, 2022
Messages
10
Since it is not usable as is take a Dremel tool and dig into the plastic until you find the windings and hook new wires to them, put a spacer between the connections then pot it with epoxy. The winding wires are solid so they should be easy to find.
Bought a new one.. replaced the flywheel and tried starting it. The flywheel spins but won’t start
 

Chris1956

Supreme Mariner
Joined
Mar 25, 2004
Messages
27,949
Remember, on your motor, the stator has nothing to do with creating spark. it simply charges the battery, via the rectifier.

You must have +12VDC on both the red and adjacent white wires on the switchbox, to have spark. Also the distributor trigger must work.

there is an ignition trouble-shooting procedure for your ign system on this forum. Do a search on a former member named "clams canino". it tests coil, switchbox and wiring. If you then get spark, the distributor trigger is the prime suspect. CDI electronics should also have that test.
 
Joined
Apr 29, 2022
Messages
10
Remember, on your motor, the stator has nothing to do with creating spark. it simply charges the battery, via the rectifier.

You must have +12VDC on both the red and adjacent white wires on the switchbox, to have spark. Also the distributor trigger must work.

there is an ignition trouble-shooting procedure for your ign system on this forum. Do a search on a former member named "clams canino". it tests coil, switchbox and wiring. If you then get spark, the distributor trigger is the prime suspect. CDI electronics should also have that test.
Thank you! I will take a look.😃
 
Top