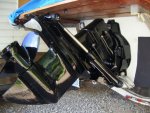
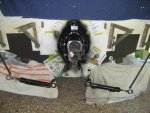
Should I paint my outdrive?

MikeDobbs

Petty Officer 1st Class
Joined
May 8, 2015
Messages
205
OK, so I'm deep into doing all the required maintenance items on my new boat (new to me that is, sat in a driveway for a year or two before that).

I puled the outdrive and separated the upper and lower units to inspect the water pump impeller (which I am now changing). And seeing all this stuff off the boat has got me wondering... should I think about repainting any of this?

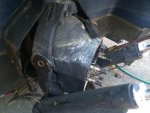
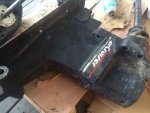
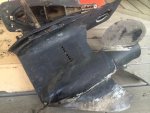
I don't have much experience with paint other than painting rooms in my house. I was planning on power-washing the outdrive to just give it a good overall cleaning, but is painting something I should do?

If so, how detailed do I need to get. Are we talking clean it off and hit it with a can of rustoleum? Or do I need to buy special prep materials and special paint, etc.

Finally, is this just cosmetic, or is there a good reason to consider painting the outdrive?

Thanks in advance : )
 

NHGuy

Captain
Joined
May 21, 2009
Messages
3,631
it's kind of involved. You sand out any imperfections, prime with zinc chromate, paint with Mercruiser Phantom black. I've tried others. The fakes and wannabe's are just a waste of time.
L primed alpha 1.jpg
Look I just primed my spare drive so I can sell it.
 

Attachments

  • primed alpha 1.jpg
    primed alpha 1.jpg
    29 KB · Views: 2
Last edited:

duped

Petty Officer 1st Class
Joined
Aug 26, 2009
Messages
307
Loaded question....what does it look like now? Do you plan to or has it been kept in the water over the summer?

If the majority of the original paint is intact it's best not to disturb it and just touch it up with Rustoleum. Roll it on with a fine foam roller and thin it just a bit. It will law down nice and smooth and glossy. If you aren't keeping it in water that will last forever.

If you're mooring the boat, forget it. Nothing will keep it from looking crappy for too long. Zinc chromate primer and Rustoleum or a bottom paint designed for aluminum drives can help but you'll still have to do it every season. I usually just blast the slime off, lightly sand, roll on some Rustoleum and repeat next year.
 

MikeDobbs

Petty Officer 1st Class
Joined
May 8, 2015
Messages
205
No Title

I will not be mooring the boat, I will be trailering it. I don't think it looks too bad, just kinda old. I'll post some pics for opinions.
 

Attachments

  • photo220745.jpg
    photo220745.jpg
    26.8 KB · Views: 8
  • photo220746.jpg
    photo220746.jpg
    28.9 KB · Views: 8
  • photo220747.jpg
    photo220747.jpg
    27.9 KB · Views: 10

tpenfield

Moderator
Staff member
Joined
Jul 18, 2011
Messages
18,094
Mostly cosmetic. Do some light prep work with sand paper or bronze wool. Use 'Primocon' on the bare spots. Then go for the Rustoleum Black, masking off the labels, etc. beforehand.

You might touch it up every year or so.

Also, put some new anodes on that thing that are suitable for the waters use boat in. Looks kind of powdery, which is possible sign of corrosion.
 
Last edited:

MikeDobbs

Petty Officer 1st Class
Joined
May 8, 2015
Messages
205
tpnefield- there are substantial anodes on the lower unit, as well as on the trim rams, but I had to remove them to separate the lower unit. I'll put them back during reassembly. I was under the impression that as long as the anode was still size-able and not eaten away too much, that it was still good. Is that correct? Or is there another indicator of them needing to be changed?
 

tpenfield

Moderator
Staff member
Joined
Jul 18, 2011
Messages
18,094
It won't hurt to put new ones on and if there are signs of corrosion, then it may be the thing to do. Make sure they are correct for the waters you frequent (fresh vs salt)

I just spent $800 in new bearing carriers for my outdrives because the previous owner thought the anodes 'looked' good.
 
Last edited:

Ike-110722

Chief Petty Officer
Joined
Sep 3, 2007
Messages
408
Take a good look at the anode. Is it actually corroding away (that's what it is supposed to do) or does it just look like it has some white crusty stuff on it? There is a lot of crap in the water that can cause it to look bad but if you gently brush it off and the anode still looks the way it did when you put it on then you are ok. I took mine off and showed it to the head mechanic at out local Mercury repair shop and he said that the white crap on it was from chemical fertilizers that run off peoples lawns. If it is actually getting smaller and pitted it is working properly and eroding away and you should probably replace it.
The following pic shows the anode. This is a couple of years old (two summers in the lake) and is normal.
IMG_3172_zps9c1c876e.jpg
 
Last edited:

MikeDobbs

Petty Officer 1st Class
Joined
May 8, 2015
Messages
205
I'd say my anodes look a lot like the one above- I can post some pics tomorrow. I didn't realize there were different anodes for fresh v salt water though. Should be the right anodes, since the boat has lived all its life in the salt water as far as I know.
 

gm280

Supreme Mariner
Joined
Jun 26, 2011
Messages
14,605
Mike, I would certainly refinish your outdrive unit after seeing it. But I would also do some good prep work as well. And that means sanding it so everything was perfectly smooth to the touch and transitions from old paint to bare metal. Then I would buy some Zinc Chromate primer and go over all the bare sections with that first, followed up with a very good primer. Then wet sand that primer with 400 or 600 wet/dry sand paper. And once you have that sanded smooth, use a good catalyzed paint of your choice for the top coat. I like PPG auto paints but there are tons of options that will give you a factory finish if you prepare the primer coat properly. And I also like using a clear coat on top of that. But that is just me. Others don't like clear coats. It is a total personal preference. But I think with such a small section to work on, you can do it pretty quick and be amazed how well it will turn out. The main thing to always remember, the final finish will always depend on how well you sanded and prepared the primer coat. In other words, the prep work is the answer to an amazing finish. The better you do the prep, the better the final finish will look. If you can feel any imperfection in the primer, the color coat will not cover it up... JMHO!
 

Evinrude Boater

Lieutenant Junior Grade
Joined
Jul 6, 2004
Messages
1,143
No Title

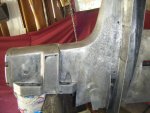
I struggled with painting my outdrive with the Mercruiser paint. I bought a ton of it in rattle cans and it would blister and pit every year. I thought my anodes weren't working and I went so far as to change the type and considered testing the corrosion protection system. Turns out the outdrive manual advises against using the rattle can spray paint. Below is the refinishing procedure recommended by Mercruiser. I striped my outdrive down to shiny bare aluminum and painted with this system a few years ago and it has stood up well. My boat sits in the water for at least 5 months and it doesn't corrode.
Refinishing procedure:

This procedure should be used in refinishing MerCruiser sterndrives and transom plates. This procedure will provide the most durable paint system available in the field. The listed materials should be purchased from a local DITZLER AUTOMOTIVE finish supply outlet. The minimum packaged quantity of each material shown is sufficient to refinish several sterndrives and transom assemblies.

1 QT. DX-533 Alumiprep #33 metal preparation
1 QT. DX-503 Alodine #1201 conversion coating
1 QT. DP-40 Non sanding Epoxy Primer zinc chromate primer
1 QT. DP-401 Catalyst for DP-40
1 QT. DAR-9000 Acrylic Enamel-black topcoat
1 Pt. DXR-80 Delthane Ultra-additive for acrylic enamel
1 QT. DTR-602 Acrylic Enamel Reducer-temperature range 70-90 degree F.

PROCEDURE:

1. Scuff sand to remove all blistered paint and roughen factory finish. Remove sanding dust.
2. Follow manufacturer's recommendations and instructions on the individual containers.
3. Apply DX-533 (Alumiprep #33) to clean and condition the aluminum.
4. Apply DX-503 (Alodine #1201) brush on chemical conversion coating for aluminum.
5. The DP-40 (Epoxy Chromate Primer) mixed with DP-401 Catalyst can now be applied. A .75 mil film build is recommended.
NOTE: Allow 30 minute induction period for permeation of the epoxy chromate primer and the catalyst prior to application.
6. The topcoat consists of DAR-9000 Acrylic Enamel Black and the DXR-80 Delthane Ultra additive, and DTR-602 Reducer. It is a polyurethane acrylic enamel system which provides fast drying, durability, high resistance to corrosion and good color and gloss retention.
7. The type of spray gun used will determine the proper reduction ratio IMPORTANT: DO NOT use any type of aerosol spray paints, as the paint will not properly adhere to the surface, nor will the coating be sufficiently thick to resist future paint blistering.
NOTE: DO NOT PAINT SACRIFICIAL ANODES.
 

Attachments

  • photo221045.jpg
    photo221045.jpg
    48.5 KB · Views: 4
  • photo221046.jpg
    photo221046.jpg
    65.7 KB · Views: 4
  • photo221047.jpg
    photo221047.jpg
    56.4 KB · Views: 4
Top