Sears Eska 7.5 HP Carburetor Parts and Running Issues

CurrT

Cadet
Joined
Jul 12, 2022
Messages
17
Well, I’m fairly confident that all the remaining issues I that I have been having are related to the gasket leak and not the SSI. Aldo, bought a compression tester so I will be able to do a compression check once the new head gasket arrives and I get it installed.
 

CurrT

Cadet
Joined
Jul 12, 2022
Messages
17
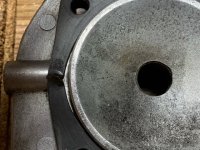
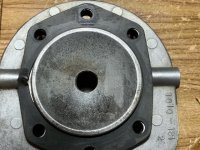
Well, the new head gasket came in. I loosely turned down the six bolts by hand and then gradually tightened the bolts in a crisscross fashion starting with bolt at 6 o'clock - then 12 o'clock, then 2- then 8, then 10-then 4 until the head compressed the gasket and the bolts were tight. I then put the motor back together, hooked up the remote gas tank, primed the carburetor and started the motor. Started on third pull. It was still running rough at full throttle but not nearly as bad as previously. I ran the motor for around twenty minutes trying various speeds, prop engaged/disengaged and etc and then it stalled. As I attempted to start the motor I began to hear the air hissing noise again so I pulled the six head bolts and the head and found that the head gasket had developed a rip on one side. See photos.

Is there a better way to bolt the head onto the engine so the gasket does not rip? Perhaps start to tighten the bolts closer the long edges of the gasket. Example: Start with bolt at 10, then 4, then 2 then 8, then 12 then 6?

Also, the gasket I ordered is Tecumseh P/N 510298A. My engine gasket part number is 510298. I am fairly sure that these two gaskets are same. If they are not, please let me know.

Anyway, I am going to order yet another head gasket today so I would appreciate any advice you folks might have.
GasketRip1.jpegGasketRip2.jpeg
 

CurrT

Cadet
Joined
Jul 12, 2022
Messages
17
Well, the new head gasket came in. I loosely turned down the six bolts by hand and then gradually tightened the bolts in a crisscross fashion starting with bolt at 6 o'clock - then 12 o'clock, then 2- then 8, then 10-then 4 until the head compressed the gasket and the bolts were tight. I then put the motor back together, hooked up the remote gas tank, primed the carburetor and started the motor. Started on third pull. It was still running rough at full throttle but not nearly as bad as previously. I ran the motor for around twenty minutes trying various speeds, prop engaged/disengaged and etc and then it stalled. As I attempted to start the motor I began to hear the air hissing noise again so I pulled the six head bolts and the head and found that the head gasket had developed a rip on one side. See photos.

Is there a better way to bolt the head onto the engine so the gasket does not rip? Perhaps start to tighten the bolts closer the long edges of the gasket. Example: Start with bolt at 10, then 4, then 2 then 8, then 12 then 6?

Also, the gasket I ordered is Tecumseh P/N 510298A. My engine gasket part number is 510298. I am fairly sure that these two gaskets are same. If they are not, please let me know.

Anyway, I am going to order yet another head gasket today so I would appreciate any advice you folks might have.

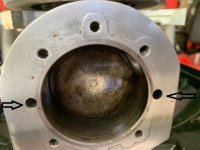
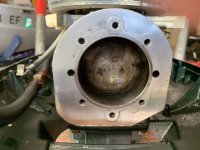
Update: The mating surface on the motor has two holes, one on both sides of the cylinder head, located directly under the gasket. The hole on the side of the cylinder head that the gasket tore/failed went completely across the gasket width based on the indention in the gasket. On the other side the indentation goes about 2/3 across the gasket. It looks to me as if the gasket dipped down into the hole and then tore. See photos. Can these holes be filled in with something like JB Weld? How can the head be tightened down without tearing the gasket over the hole?


Head Engine Side 1.jpegHead Engine Side 2.jpeg
 

CurrT

Cadet
Joined
Jul 12, 2022
Messages
17
After surfing the internet for a bit on this, I see that some folks are using gasket sealing compound on both sides of the gasket prior to reassembly. Should I be using some gasket sealing compound? I figure at this point with this old of an engine, perhaps using some gasket sealing compound might fill in some imperfections that are causing the gasket failure.

I will say this, this rebuild has certainly been a learning process. :)
 

CurrT

Cadet
Joined
Jul 12, 2022
Messages
17
Final update: Used high tack gasket compound on both mating surfaces and the gasket. Torqued head bolts to around 70 ft-lb which is low to spec but felt one bolt begin to strip so stopped. Motor is not running super smooth when throttle is wide open but is working fine without additional head gasket blow outs. Fished with the outboard yesterday with no issues even at a very slow troll speed.

To those here that gave good advice initially, thank you. It would have been more helpful if that good advice had continued as the project near completion.

Good luck all and happy boating!!
 

brim_buster

Lieutenant Junior Grade
Joined
Jul 9, 2013
Messages
1,204
Im wondering why this thread didnt show up as new till today? I would of been following. Ive never had to replace the head gasket on one. What did the manual show or say
 
Top