Screw and Pilot Hole Sizes

76SeaRay

Lieutenant Junior Grade
Joined
Aug 24, 2017
Messages
1,071
In the past when I was young and dumb, I broke a few stainless screws trying to put them into fiberglass on the sailboat that I had at that time. Later I found out that the screws will bind in the fiberglass without the right size pilot hole. Is there a table of screw size versus pilot hole sizes for fiberglass applications as I am assembling my hardtop and mounting the horns, lights, antennas, etc.? I have drilled out the mounting holes and refilled them with thickened epoxy so that they are waterproof when I put the screws into them. I will use screws that are short enough to not go all the way through the epoxy plug.

Thanks....
 

JASinIL2006

Vice Admiral
Joined
Feb 10, 2012
Messages
5,678
I never found anything like that; for me, it was trial and error. I broke my share of stainless screws when attaching my deck to heavy fiberglass stringers. Those screws are so brittle... you hole needs to be nearly the size of the screw, just a hair smaller. I found that putting a bit of 3M 5200 in the hole also helped keep the screws from binding.
 

todhunter

Canoeist
Joined
Sep 15, 2020
Messages
1,316
Hold the drill bit in front of the screw and look at it. I like the drill bit to cover the minor thread diameter, but still be able to see the threads out past the drill bit. The more the drill bit covers the threads, the easier it will be to install, but the less bite you'll get.
 
  • Like
Reactions: KJM

dingbat

Supreme Mariner
Joined
Nov 20, 2001
Messages
16,129
Too late know, but too repaired the stripped screws in the deck hatch I coated the screws with silicon spray and inserted them in the holes while the epoxy was wet. Next day, backed the screws out leaving perfectly formed threads in place.

To answer your question about size, When drilling holes in fiberglas for screws I always start with the root diameter and go from there. The Link gives you the root diameters of wood screws

BTW: Any time you drive a screw in fiberglass you need to countersink the hole. All but eliminates any cracking around the hole


KJM

Lieutenant
Joined
Jul 31, 2016
Messages
1,266
Too late know, but too repaired the stripped screws in the deck hatch I coated the screws with silicon spray and inserted them in the holes while the epoxy was wet. Next day, backed the screws out leaving perfectly formed threads in place.

To answer your question about size, When drilling holes in fiberglas for screws I always start with the root diameter and go from there. The Link gives you the root diameters of wood screws

BTW: Any time you drive a screw in fiberglass you need to countersink the hole. All but eliminates any cracking around the hole

I wondered about doing sometning like that. Was it thickened resin? I didn't try it because i figured the thickened resin would be too thick to run into the threads and take their shape.
 

dingbat

Supreme Mariner
Joined
Nov 20, 2001
Messages
16,129
I wondered about doing sometning like that. Was it thickened resin? I didn't try it because i figured the thickened resin would be too thick to run into the threads and take their shape.
I used MarineTex. Basically white epoxy. The instructions are on the side of the box. Worked like a charm for my application
 

76SeaRay

Lieutenant Junior Grade
Joined
Aug 24, 2017
Messages
1,071
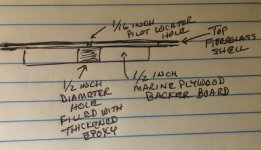
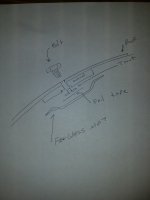
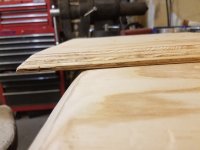
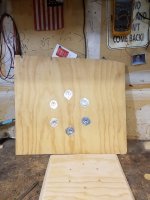
As you can kind of see it in my profile pic, I am working on the upper hard top. The fiberglass top has backing boards that were used to attach the head liner but only a couple of hand rails on the top. Those hand rails were through bolted so leaked into the head liner. I am adding a GPS antenna, moving the horns to the roof, adding AM/FM antenna, adding the NAV/ANC light, stern and docking lights and of course the hand rails all on the top. Everywhere something is to mount, I drilled a small pilot 1/16 inch hole from the top down to locate the screw holes on the inside and bonded a 1/2 inch piece of marine plywood for a backer board over the holes using thickened epoxy. I drilled up the pilot holes from the inside through only the backer board with a 1/2 inch drill (didn't drill through the outer fiberglass shell) and then filled the 1/2 inch hole in the backer board with thickened epoxy. I have a stop set up on my drill bit so when I re-drill the pilot holes for the screws from the top down, the drill bit will stop before I go all the way through the inner plug in the backer board. That way the screws will remain sealed in the epoxy plug in the backer board. Sounds like I need to drill the pilot hole then almost the same size of the screw and use MarineTex on the screws when I put them in. If I do that, will I ever be able to remove the screws if I need to change something?

Mounting Hole Prep.jpg
 

JASinIL2006

Vice Admiral
Joined
Feb 10, 2012
Messages
5,678
If you put Marine-Tex in the hole, I'd be concerned about stripping the head of the screw when trying to remove it. Maybe if you sprayed the threads with silicone first, so the Marine-Tex doesn't grab much?

Personally, I'd probably experiment some with some test holes in a sample slug of thickened resin to find out what size of holes will give the screw a good bite (without being too tight) and then I'd seal the hole with a UV-stable urethane product, like 3M 4000UV, when inserting the screw.
 

dingbat

Supreme Mariner
Joined
Nov 20, 2001
Messages
16,129
Maybe if you sprayed the threads with silicone first, so the Marine-Tex doesn't grab much?

Product: White or Gray Marine-Tex Epoxy Putty 'The Mighty Repair Kit'

Materials: 80-100 grit sandpaper, a drill-bit slightly larger than the original fastener hole, WD-40 or other silicone lubricant, wrench or screwdriver for removal after cure

Conditions: Minimum 60˚F temperature, 48 hours to fully cure at 60˚F, 24 hours to fully cure at 70˚F

Drill a slightly oversized hole, slightly shorter than the new fastener, to remove any soft or deteriorated material. Clean debris from the hole.

Apply a little penetrating oil or a silicone spray (like WD-40) to the new fastener to act as a release agent; wipe off excess film.

Mix Marine-Tex White or Gray and fill the hole 3/4ths deep. Apply a small amount of Marine Tex to the fastener, being sure to fill in around the threads.

With a slight twisting motion, insert the fastener in to the hole and allow the epoxy to cure for the full 24 hours. Marine-Tex will have the threads cast into it, and the fastener can be backed out if necessary. A wrench or a screwdriver with a little extra elbow grease may be needed the very first time the re-inserted fastener is removed since it will stick the first time it is backed out."
 

froggy1150

Master Chief Petty Officer
Joined
Nov 3, 2017
Messages
846
Here is an idea if you want strong removable hardware. Get stainless t nuts and put them in location and tighten down. Cover t nut with foil tape to isolate from resin then glass over. Screws will pull out but tnuts wont.
You can see what i did if you look at my build. I think the title is 74 reinell cuddy restore
 

JASinIL2006

Vice Admiral
Joined
Feb 10, 2012
Messages
5,678
Here is an idea if you want strong removable hardware. Get stainless t nuts and put them in location and tighten down. Cover t nut with foil tape to isolate from resin then glass over. Screws will pull out but tnuts wont.
You can see what i did if you look at my build. I think the title is 74 reinell cuddy restore

That would work, but you still need to prevent water from entering the hole and running along the threads, so you're back to using epoxy or some sort of sealant.
 

dingbat

Supreme Mariner
Joined
Nov 20, 2001
Messages
16,129
Here is an idea if you want strong removable hardware. Get stainless t nuts and put them in location and tighten down. Cover t nut with foil tape to isolate from resin then glass over. Screws will pull out but tnuts wont.
You can see what i did if you look at my build. I think the title is 74 reinell cuddy restore
Might I introduce you to my wife's horse trailer that uses said Stainless "T" nuts to hold (turns out temporarily) the plywood panels to the aluminum shell.

Lasts 5-6 years before fasteners start falling out and or the "brown death" starts oozing out from around the fastener holes.

At this point, the fasteners have stripped as the result of vibration coupled with corrosion. I assume vibration is the primary culprit, but by the time I get around to dealing with the panel the fasteners have all but disintegrated as well. Leaving no hard evidence of the initial failure mode.

My wife noticed a screw missing the other day. Guess it's been 5-6 years since the last rebuild. :(
 

froggy1150

Master Chief Petty Officer
Joined
Nov 3, 2017
Messages
846
Drill hole for t nut. Seal wood with epoxy. Put tnut back in. Install wood assembly in location. Then cover end of tnut with foil tape to prevent resin from getting in tnut and then 1 layer of glass to cover wood to roof and secure. Final install does get a sealant on hardware. If it did get water past sealant it would never get past the layer of glass to get on headliner.
As far as the hardware failing from vibration with steel you get a red dust and stainless would be more black but if installed right it should not come loose and that should never happen. If things come loose all bets are off no matter what hardware you do. I work on amusement rides and all our stuff vibrates ALOT and we dont have that problem but we do check torque on things daily. A boat in that application should not see that lind of vibration
 

jhande

Chief Petty Officer
Joined
Jun 26, 2010
Messages
442
Is there a table of screw size versus pilot hole sizes for fiberglass applications as I am assembling my hardtop and mounting the horns, lights, antennas, etc.?
Thanks....
What ever material I am running screws into I always match the drill bit to thr center core of the screw. As mentioned earlier, holding the drill bit along side of the screw, see threads on both sides of the bit but not the solid center. It's always worked for me.
 

76SeaRay

Lieutenant Junior Grade
Joined
Aug 24, 2017
Messages
1,071
Thanks for all the ideas. The AM/FM antenna (folds back for road travel), NAV/ANC light (folds back for road travel), the Hailing Speaker (opening facing front, and the horns (trumpet facing front) would see the biggest loading on the screws. I could use the T Bolt/Nut approach on the leading edge fasteners with screws on the trailing edge fasteners for the hailing speaker and horns. The hand rails (two screws per stanchion), the AM/FM (three screws in triangle with two facing forward), and the NAV/ANC (two screws only on the sides) would need the T Bolt/Nut. The GPS antenna is 4 inch high profile and 3 1/2 to 4 inch hockey puck so very little loading on that. Would just go with screws.

So, summing up all the great suggestions; 1) pilot drill at least large enough for the screw core diameter where loading is not an issue and 2) T Bolt/Nut with the Nut covered by fiberglass cloth where extra strength is required due to potential pull out stresses is what I think I will go with for these.
 

froggy1150

Master Chief Petty Officer
Joined
Nov 3, 2017
Messages
846
Something i do when glassing tnuts in is put bolts in and when resin is gelled enough to hold shape but not cured enough to hold bolt i remove. Then i clean threads with a tap later so things go together smooth
 
Top