Rough and ready '74 Starcraft Chieftan 18' rebuild

Watermann

Starmada Splash of the Year 2014
Joined
Jan 12, 2013
Messages
13,795
Morning Chem, so I don't have to look back did you replace all those 5/32" blind rivets that hold the gunnels on to the hull? I pulled all my RRs off and there was not one single blind rivet that was tight holding the gunnels to the hull. The inboard angle on the RR just covers the seam between the gunnel and the hull, there's a stout bracket solid riveted to the hull all the way around.

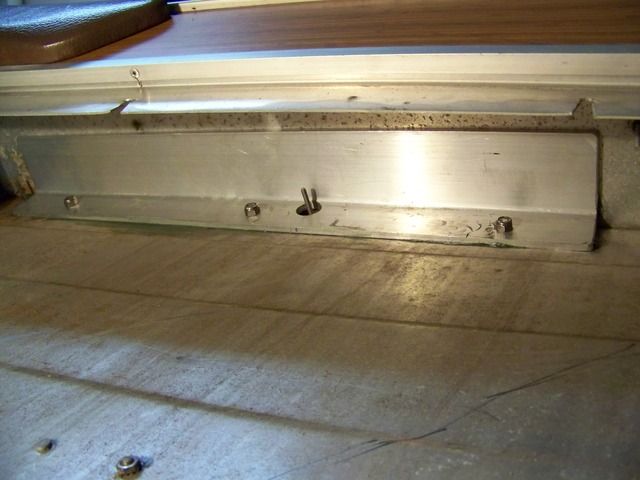
So in keeping with the design of these boats and what they use to limit the gunnel flex, I would fabricate the same sort of piece SC uses to place very near or under the location of the rigger and either solid rivet in place or SS machine screws and nylocs. Your idea of a back is a good idea if the gunnel is weakened by holes but it doesn't create support or transfer the stress to the sides of the hull. I seriously thought about adding another one of those supports to each side halfway between the existing supports and the stern for added strength

This is the simple supports I'm referring to...

92e3d5b1-8e00-4213-90f0-9cc5cd4b678e.jpg
 

laurentide

Lieutenant Commander
Joined
Jul 24, 2011
Messages
1,869
CC, I think that would work for my issue. May be the quickest/easiest solution.

Waterman, I didn't do the full-on restore that you did on yours, so I never took the gunwales off. At this point I'd rather not, as it would kill a big chunk of my season. I'm going to try CC's idea, maybe with a couple of L brackets to the hull side. The problem, near as I can tell, is that the gunwale aluminum is too thin, so it really flexes with lateral force. I do think it's secured to the hull OK, but we'll see.

Thanks for the tips, gents!
 

Watermann

Starmada Splash of the Year 2014
Joined
Jan 12, 2013
Messages
13,795
CC, I think that would work for my issue. May be the quickest/easiest solution.

Waterman, I didn't do the full-on restore that you did on yours, so I never took the gunwales off. At this point I'd rather not, as it would kill a big chunk of my season. I'm going to try CC's idea, maybe with a couple of L brackets to the hull side. The problem, near as I can tell, is that the gunwale aluminum is too thin, so it really flexes with lateral force. I do think it's secured to the hull OK, but we'll see.

Thanks for the tips, gents!

Yeah I don't blame you for not wanting to replace the gunnels rivets, it's a huge pain alright.

Now on the "quickest/easiest" note. I will climb up on the soap box for a minute here. The backer will be a bigger pain working upside down underneath that gunnel and it's only duplicating the rail on top's lack of lateral support. To fab up a couple of those support pieces all of the work is done outside of that PITA to work under gunnel channel. The supports angle thats against the hull goes downward and the supports outer lip is just secured to the outer gunnel angle. Also you won't even need to remove the channel or worry about those long RR bolt tails.

Another thing to check is the very stern end of the gunnels to make sure you have the end support brackets screwed down good to the transom wood.

There I'm down now, resume normal traffic. :D
 

Grandad

Lieutenant Commander
Joined
Jun 7, 2011
Messages
1,504
Hi chem. I added a 24" long piece of 2"x3"x1/4" aluminum angle under each of the four legs of my arch/tower. I fiberglass "buttered" each the hull to fit the angle and any curve of the side, ensuring a flat fit to the top of the gunnel using props until the butter was set. Then I installed 3 5/16" carriage bolts through the hull tight under the rub rail. I preped the angle with clearance holes to clear the long rub rail bolts before installing. No wiggle or dimpling at the tower mounts whatsoever. You might find some sort of angle that is wider than the 3" (maybe 4"x2" channel?) that would reach the area where you want to fasten. - Grandad
 
Last edited:

laurentide

Lieutenant Commander
Joined
Jul 24, 2011
Messages
1,869
Hi chem. I added a 24" long piece of 2"x3"x1/4" aluminum angle under each of the four legs of my arch/tower. I fiberglass "buttered" each the hull to fit the angle and any curve of the side, ensuring a flat fit to the top of the gunnel using props until the butter was set. Then I installed 3 5/16" carriage bolts through the hull tight under the rub rail. I preped the angle with clearance holes to clear the long rub rail bolts before installing. No wiggle or dimpling at the tower mounts whatsoever. You might find some sort of angle that is wider than the 3" (maybe 4"x2" channel?) that would reach the area where you want to fasten. - Grandad


...and there it is! Perfect. I think the hull is pretty straight where I want these, so I'll probably sub some JB weld for glass. Thanks GD, this is literally exactly what I was thinking/wondering. And it solves the through hull location problem by bonding it first...awesome.

Watermann, thanks for the info on those braces. Mine are in pretty good shape and seem to be doing their job. The issue I'm having is with the skin on top of the gunwale, not the structural support of the whole thing. Though it sure wouldn't hurt to add another one of those between the transom and that front one. Might as well if I'm drilling through the hull anyway.

Once again, the Starmada comes through. Cheers!
 

Weep'n Willy

Master Chief Petty Officer
Joined
Jun 12, 2012
Messages
831
Chem, I have 1" oak under my gunwales where the rod holders are mounted but that does little as far as inboard or outboard flex.. As far as the riggers go they will always stress/flex the due to the nature of the riggers and the ball. The best way to remedy it is to install a downrigger trolling board that attaches to each side of the boat. Can be either homemade or store bought. Big Jon sold aluminum trolling boards that are on adjustable pedestal. I actually have one of those but if you recall I use the eagle feet and made my own board. The eagle feet attach to the outside rub rail and span the load across the entire board so there is virtually no flexing.
 

laurentide

Lieutenant Commander
Joined
Jul 24, 2011
Messages
1,869
Willy, thanks for checking in here. The mounting board is plan "b" if I don't think the angle will work. I can mount it right to the track pedestals if I go that route. The benefit besides it being a stout mount is that I can mount the riggers slightly inboard so they never hit a dock or piling. The downside to a board is that I don't have power tilt, and I use a kicker with a gearshift on the motor, so I need access to the transom. It'll work if it has to, but I'm going to see if I can make the gunwale mounts work first. Thanks! I bet you're looking forward to ice out...I know I am. Cheers!

Edit: I went out, pulled the tarp, and layed a board across. I can still access the kicker and pull the main up into the well. Plus, I think it's safer having the board there with me leaning over to do that stuff. I may have a winner here, and I had initially dismissed the idea. Thanks WW. I'll post pics when I re-splash with some new goodies.
 
Last edited:

Weep'n Willy

Master Chief Petty Officer
Joined
Jun 12, 2012
Messages
831
I certainly am glad to see the weather change and we have signs of spring here. Most of the snow has melted but ground is really soft and muddy. I want to get the Chief pulled back up to the garage so I get get her prepped for the season. Our harbors are still iced in but should open before too long. Have a big money tourney that I plan on entering in late April so I got less than a month to get things ready. I still have to mount the electric riggers and wire them up and get all my fishing gear back into the boat.

Glad you checked on whether the trolling board idea would work for you. It certainly will provide the strength you are looking for. With the track system it certainly allows you to keep everything within the rub rails so you won't have to worry about them hitting the docks. Looking forward to your pics.
 

laurentide

Lieutenant Commander
Joined
Jul 24, 2011
Messages
1,869
Willy, I think you'll be pleasantly surprised at how quick the rigger wiring is. Mine have internal breakers so it was just direct to battery.

I found a 5 x 1.5 x 72" aluminum C channel on amazon (cheaper than metal warehouses) that I'm going to use as the mount instead of wood, as it'll be out in the weather a lot.
 
Last edited:

Watermann

Starmada Splash of the Year 2014
Joined
Jan 12, 2013
Messages
13,795
Now that's a great solution, covers both bases with backing of the thin gunnel AL with the same width material and the forces are being transferred to the side of the hull. :thumb:

So be sure to slap some pics up!
 

laurentide

Lieutenant Commander
Joined
Jul 24, 2011
Messages
1,869
Now that's a great solution, covers both bases with backing of the thin gunnel AL with the same width material and the forces are being transferred to the side of the hull. :thumb:

So be sure to slap some pics up!

I definitely will. I'm taking a week off later in April to do home projects and boat rigging. I hope to have some new canvas and I've got one of these on the way for autopilot/anchor functions:

BsKfBmg.png


It's real easy to spend money when you put a little effort into it!
 

Watermann

Starmada Splash of the Year 2014
Joined
Jan 12, 2013
Messages
13,795
Now that is some sweet hardware right there! I've been following your thread in the boat Q's section, that was a cool video of the guy launching single handed.
 

Weep'n Willy

Master Chief Petty Officer
Joined
Jun 12, 2012
Messages
831
You are turning her into quite the fishing rig!!! I like it.

I agree wiring the riggers are no big problem. I wired the Thompson up before as I had a high speed Big Jon but that thing just lowered and raised the ball waaaay to fast for my liking so I sold them. The Big Jon have a regular electrical plug style on them so I can just install a 4 plug strip underside and keep all the connections out of the way and wire to my battery selection switch. I don't wire anything straight to the battery anymore I prefer to have go through the switch. I found out a few years ago that the battery in my Thompson kept being drawn down if left set for a couple weeks. Research showed that even though I turned of my GPS unit the external GPS antenna still draw a little power. So wiring the gps into the switch panel took care of that problem.
 

laurentide

Lieutenant Commander
Joined
Jul 24, 2011
Messages
1,869
Evening, gents. I've got some new toys and raw materials, and I've been working hard to get my domestic chore list out of the way.

I finally made a tiny little work space in my shed. World's smallest boat shop:

veQOAuT.jpg


I also got my downrigger "board" from onlinemetals. Big thick c-channel. I'm going to run it between the two track pedestals, so it'll sit right over the forward ledge of the splashwell. This will provide a tremendous amount of lateral strength, and allow me to mount the riggers slightly inboard so as to avoid any bangs against docks...and help keep me in the boat!

la8nRRs.jpg


I'm also going to be rehabbing my old Holsclaw tilt trailer. The trailer I have under the boat is too small, as evidenced by the cracked leaf that I luckily found.

Scary thing, though. When I bought the boat, I towed it home on the tandem that came with it. I knew the tilt hinge was damaged, but I didn't realize how badly until I took it apart yesterday. I towed about 20 miles with nothing but the tilt pin holding the tongue to the trailer chassis. Glad I made it!

On the left is the retainer bolt, on the right is the tongue with the rotted out hinge:

zDyfzo9.jpg


Yeah, that's not good:

eP0sJz8.jpg


Do you guys think a welder could fix that, or should I just get a new 3x4 steel tube and have it welded to the trailer frame (so it wouldn't tilt anymore)? It's just surface rust other than that bad piece.

I've got some work to do, but it's a good sled:

Z0FQJtZ.jpg


Continued.....
 

laurentide

Lieutenant Commander
Joined
Jul 24, 2011
Messages
1,869
The fun stuff! I got this fancy new electric trolling motor that self-deploys. I know it seems silly, but it makes sense on this boat due to the limited bow access. The only issue is that I don't have enough clearance for the shaft/head unless I do some backyard fabricating.

For those unfamiliar with this model, it's a self-deploying ipilot motor, so it's basically a trolling auto-pilot and anchor, and I may give it a shot when launching solo (which is like 99% of the time). I'll be using my gas kicker for most of the thrust, and this guy will do all the steering so I don't have to worry about wind or running my gear on the bottom.

So, the plan is make a small aluminum pulpit on which to mount the quick release and the motor. Check it out...advice/criticism welcome! I'll be rounding off the forward corners and run a grinder on the sharp edges to dull them.

vyzhbij.jpg


9vD4CEr.jpg


Plenty of windshield clearance with this rig, and everything is inside the rub rail.

tCxAyRr.jpg


I'm going to use some pvc board as a riser so the aluminum can clear the bow cap. I'll bond some 3/4" ply inside the bow cap, then through bolt everything. It should be solid.

3JfJh11.jpg


I'm also thinking that the two deep cycles will go in the forward berth hatch. It's pretty low there, so it may actually help with stability a bit. I'll be adding about 180 #'s to the bow area with batteries, charger, and motor. I can always rearrange if it's too much weight forward.

I hope to have all this done in the next week or so. Cheers!

PS: The 16 mil tarp is awesome...maybe I'll get more than one season out of it.

Also, I'll replace the bow nav light with a pole led mounted behind the trolling motor.
 
Last edited:

dozerII

Admiral
Joined
Oct 25, 2009
Messages
6,527
Looking good Chem, I really like that trolling motor, but with out dollar the way it is they are $3000. Cdn. How close to the windshield will the head of the TM be? You may want to build a little cradle for the shaft to sit in when it is stowed, they can bounce real good if you hit a bad pot hole or speed bump and take out your windshield. You could also swing it a little over to the starboard side so it is about 6-8 inches off center which would allow more angle and thus more clearance on the windshield, I have mounted three this way and they handle very well.
 

laurentide

Lieutenant Commander
Joined
Jul 24, 2011
Messages
1,869
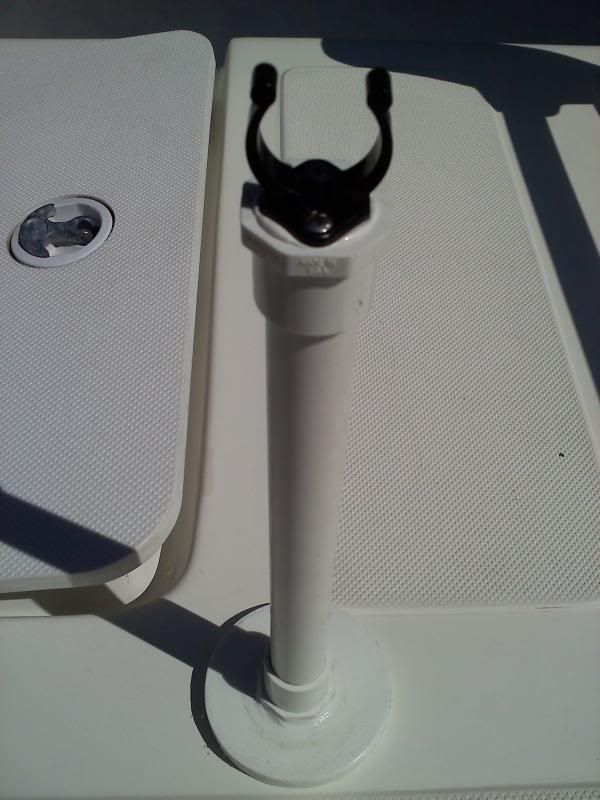
Thanks Glen! I like the cradle idea, as the thought crossed my mind. I searched for ready-made ones, and they're way too pricey. Then I found this one with a "clipper clip" on a PVC base. About $5. So I'll be making one of those, just a touch longer than the gap to keep pressure on it.

TMCradle1_zpsb22e9e65.jpg


I'll try to find the best orientation before I do any drilling.

Andy
 
Last edited:

dozerII

Admiral
Joined
Oct 25, 2009
Messages
6,527
Thanks Glen! I like the cradle idea, as the thought crossed my mind. I searched for ready-made ones, and they're way too pricey. Then I found this one with a "clipper clip" on a PVC base. About $5. So I'll be making one of those, just a touch longer than the gap to keep pressure on it.

TMCradle1_zpsb22e9e65.jpg


I'll try to find the best orientation before I do any drilling.

Andy


Great find right there, and you can't beat the price.
 

Watermann

Starmada Splash of the Year 2014
Joined
Jan 12, 2013
Messages
13,795
Those are some serious upgrades right there! That ipilot is top of the line. Not sure if it's the angle the base plate for the TM is clamped but I would square it up with the TM rather than the bow, it would take the forces better than angled with the bow shape.

The trailer tube issue, I vote to weld that sucker and use some overlap plates just to be sure. Lookin good! :thumb:
 

laurentide

Lieutenant Commander
Joined
Jul 24, 2011
Messages
1,869
Those are some serious upgrades right there! That ipilot is top of the line. Not sure if it's the angle the base plate for the TM is clamped but I would square it up with the TM rather than the bow, it would take the forces better than angled with the bow shape.

The trailer tube issue, I vote to weld that sucker and use some overlap plates just to be sure. Lookin good! :thumb:


Thanks Water! Yeah, I think you and dozer are right about the angle. I'm going to see what the best clearance angle is, probably off the starboard side of the bow.

I'm going to try to get the trailer down the street to the welding shop and just have it welded solid. I've never had the need for a tilt. Other than that, it's a nice tandem with shocks and coil springs. Axles, springs, and rollers are all good to go. It's set up for brakes if I ever tow long distance.

Thanks for stopping by, guys!
 
Top