Rotted motor mount boxes

GoneBoatN

Cadet
Joined
May 15, 2010
Messages
17
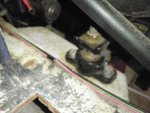
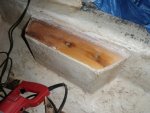
Yet another case of rotted motor mount boxes.

I have an 1995 Bayliner 2050 with 5.0 LX Alpha 1 Gen II Mercruiser.

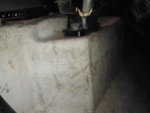
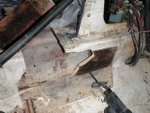
I acquired the boat the end of last season. The lag bolts securing the engine to the mounts were stripped so I started to investigate. When I drilled a test hole in the rear I found wet foam. So I opened some larger holes (10" x 20") in the ply deck beside the motor area. I dug out the wet foam from the cross stringer between the engine area and the gas tank area. The foam from this point back was wet but forward of this point it was dry. The plywood deck was damp in the area of the wet foam but dried out nicely with NO wood rot. Examining the main stringers (running from stern to bow) from this side, they also appear to have no wood rot.

I will be taking the engine out later today as I await deliver of my new alingnment tool. I want to check the alignment before removing the engine. Hopefully the engine is still aligned and this way I can know what the proper alignment is like before I have to put the engine back in.

I'm sure I'll have other questions as I proceed and find out the condition of the motor mount box and the condition of the stringer on the side and in the area the motor mount box is attached.

Now my current questions:
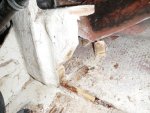
1) How are the motor mount boxes attached? Are they simply glued to the stringer and to the floor of the fiber glass hull with epoxy or is there something more to it?

2) What kind of wood do I use to re-create the motor mount boxes?

3) Do I just remove the fiberglass from the top, then remove the wood inside the fiberglass surrounding the wood of the motor mount box and then just glue in a new, properly shapped chunk of wood and then replace the fiberglass on top?

I've included pictures in the post.

Thanks in advance!
 

Attachments

  • Pic-2.jpg
    Pic-2.jpg
    39.8 KB · Views: 3
  • Pic-1.jpg
    Pic-1.jpg
    33.6 KB · Views: 3

clockwatcher

Petty Officer 1st Class
Joined
Nov 8, 2009
Messages
289
Re: Rotted motor mount boxes

1. Resined to the hull and stringer then encased in fiberglass.
2. Multiple layers of hardwood or quality ply.
3. I'd cut thru the glass around the edge surfaces of the hull and stringers using a rockwell sonicrafter or the like or a sawzall trying to keep it one piece. Take plenty of measurements first.

Check the lower part of the transom once the motor is out.
 

GoneBoatN

Cadet
Joined
May 15, 2010
Messages
17
Re: Rotted motor mount boxes

Got the engine out. I tested the alignment as is and it appears that it was still aligned well. Good news is now I know how the alignment tool works when I go to put the engine back in.

Bad news: of course the rot is somewhat into the stringer. I'll have to figure out how far it traveled at this point.

Question: Is it OK to cripple a portion of the stringer when replacing a section. If so, how is it recommended to do so?

Thanks again in advance!
 

GoneBoatN

Cadet
Joined
May 15, 2010
Messages
17
Re: Rotted motor mount boxes

When I cut the fiberglass away from the starboard motor mount box the wood was very rotted. About 1/2 of it was removed simply by picking at it and the remainder I removed with a wood chizel and sawzall. The stringer had rot about 1/16 to 1/8 inch deep in the motor mount box area so I cut it back towards the transom more than what the picture shows - just past the motor mount box area. I also cut it foward of the cross brace in front of the engine well so all the bad wood is gone. The foam was water logged towards the rear of the boat on the starboard side but dry as it moved forward of the engine compartment. Port side foam was dry. I did remove the foam from both sides where I could easily reach which appears to be the rear edge lounge seats. I plan to put drain holes in the bottom of the stringers so that any future water in these areas can drain into the bilge area. I do not plan on replacing the foam.

One picture shows the port side motor mount box which I also cut open. Wood looks good so I just plan to re-glass. Seems to be constructed of some 4x? (wood on the starboard side was so rotten it was hard to tell what it was orginally, but port side looks like pine) and then has 3/4 ply between it and the stringer. Question: I happen to have some high quality 2x4 pine and 1x8 pine (no knots in the wood). I was thinking I would use the 1x8 to recreate the angled bottom of the motor mount box and use in it place of the 3/4 ply. I was thinking I could also use it for the wood I'm replacing in the stringer via scarf joints as per described in the West System document (using a 12 to 1 angled joint). Anything wrong with using a high quality (well dried) pine wood? Of course then glassing everything in as per the document.

Thanks in advance!
 

Attachments

  • Pic-3.jpg
    Pic-3.jpg
    52.3 KB · Views: 7
  • Pic-4.jpg
    Pic-4.jpg
    49 KB · Views: 8
  • Pic-5.jpg
    Pic-5.jpg
    51.3 KB · Views: 9

clockwatcher

Petty Officer 1st Class
Joined
Nov 8, 2009
Messages
289
Re: Rotted motor mount boxes

I'm no wood expert, but I think the general consensus is that if the wood is good and dry, it should be no problem. The main concern is that certain wood have oils that could compromise your resin bond. Personally I'd go with a hard wood or layers of quality ply being that the engine mounting bolts thread into it.

Maybe some of the more knowledgeable folks here have an opinion?


I would be tempted to sister up boards on either side of your scarf joint extending them as far as possible on each end point of the joint. And I hate to say it, but that paint will need to come off and the surface needs to ground down smooth before you start glassing. Protect everything you don't want covered in fiberglass dust (especially your lungs).
 

GoneBoatN

Cadet
Joined
May 15, 2010
Messages
17
Re: Rotted motor mount boxes

Thought I would provide a follow-up. The rotted motor mount was removed. Remove the portion of the stringer that was also rotted and scarf-ed in a new section of stringer per the West System document noted in a prior post. Replace the portion of plywood floor that was removed during the process. Covered and reinforced with fiberglass and expoxy as needed. Put in new boat carpet on the floor - what a chore getting the carpet glue off the deck - resorted to sanding/grinding. Put the engne back in the boat. Aligned engine. Drilled new holes in the new motor mount. Fired up the engine hooked up to ears to provide water to the pump and cooling system. And finally took the boat out and had a good time this past Saturday.

All in all I figure I put in about $450 in supples (epoxy, fiberglass, Acetone, sand paper, wood, etc) and some more in tools. On of the tools I bought was an engine lift so it will be useful for future maintenace work. The tools are a future investment as well so I don't consider them as cost of this repair. More than what I expected but I would think far less than if I had to pay someone else to do it. I wonder what it would have cost for me to have someone else do the repair - I would think it would be in the thousands.

Thanks for the support from these forums! Being able to ask question and search already existing posts was a great asset - I could not have done it without this resource.
 
Top