Rochester Quadrajet Rebuild and Adjustments

Baylinerchuck

Commander
Joined
Jul 29, 2016
Messages
2,726
Figured I’d start a thread to list some of the adjustments I’ll try and information I find to properly tune a Q-jet 4 bbl carb for my 4.3L LX in my 1990 2000SL Sport Chaparral.

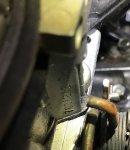
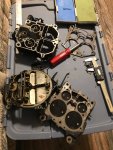
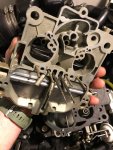
I bought this remanufactured carburetor from National Carburetor. The original that came on this engine was so polluted with white powdery contamination that I eventually damaged it trying to thoroughly clean it. This aluminum corrosion biproduct also polluted the rest of the fuel system, especially the fuel pump.

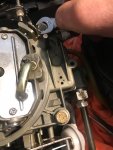
The new Q-jet worked ok, but had a few stumbles, one off idle, one a little further, and a major nasty stumble as the secondaries opened. Once past that major stumble and into the secondaries this motor screams to life. The stumble or major hesitation as the secondaries open is extremely annoying. This is the rpm and speed I need to be close to when pulling wake boards or tubes. In this area of the throttle, I’m either too slow, or way too fast.

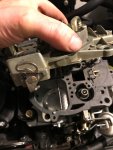
I’ve tried to tighten the air door spring to help compensate for this and it seemed to be helping, but created a starvation problem, like an intermittent miss at WOT.

There doesn’t seem to be a lot of help trying to adjust these, so I picked up this book.

6B24D383-70E5-47EF-935D-19A57668BC86.jpeg
I should have this book tomorrow, and will begin to have a more in-depth understanding of what makes these carbs tick.
 

kenny nunez

Captain
Joined
Jun 20, 2017
Messages
3,075
The white powdery substance is the result of ethanol based fuel which absorbs moisture and corrodes the aluminum in the fuel system.
 

Baylinerchuck

Commander
Joined
Jul 29, 2016
Messages
2,726
The white powdery substance is the result of ethanol based fuel which absorbs moisture and corrodes the aluminum in the fuel system.

Yep I agree. The PO left the boat moored in a slip in the summer, so there was a lot of chance for exposure to water. I’ve since replaced all the fuel line including the steel line from the pump to the carb, and installed a water separating fuel filter after the tank.

Book came in, time to do some reading. Gotta figure out which adjustments to try first.
 

Baylinerchuck

Commander
Joined
Jul 29, 2016
Messages
2,726
I definitely went beyond that in a quest to stop that nasty hesitation as the secondaries begin to open. I figured the more tension on the air door the more smoothly I would transition between primary and secondary. Obviously my theory is a bit flawed. I can say the stumble has gotten better, but now I’m to a point where I have a definite starvation issue at WOT which feels like an intermittent miss. So I will back off that tension and do more research on exactly how to smooth the transition between primary and secondary.
 

Baylinerchuck

Commander
Joined
Jul 29, 2016
Messages
2,726
I’m really glad I saved the carb that originally came on my boat. I had it all torn down and in a box. It makes a good model to reference as I read through this very thorough book.
9BB1AB6B-613A-4F3E-BF45-6457F951547D.jpeg
AE075ED7-3459-4007-881C-64946DA98496.jpeg I attached the code chart out of the book in case anyone else is ever interested. The Quadrajet has a rich history from the 60’s until fuel injection killed it in cars, and eventually boats years later.

More to come.
 

Attachments

  • D1D76ABA-021F-4881-A6BF-3EE29A4545BB.jpeg
    D1D76ABA-021F-4881-A6BF-3EE29A4545BB.jpeg
    417.5 KB · Views: 8
  • CD2403CF-36E5-4B59-A9A3-74A940D29121.jpeg
    CD2403CF-36E5-4B59-A9A3-74A940D29121.jpeg
    476.4 KB · Views: 7

kenny nunez

Captain
Joined
Jun 20, 2017
Messages
3,075
You probably have a restriction in the tank suction tube. You need to remove it and check if there is a small screen inside the tube. If there is one remove and pitch it. If the problem persist get a 6 gallon outboard tank and connect to the fuel filter inlet.
Do not loose the power valve spring and look closely at the float bowl plugs, sometimes they have to be sealed over with some epoxy.
 

Baylinerchuck

Commander
Joined
Jul 29, 2016
Messages
2,726
You probably have a restriction in the tank suction tube. You need to remove it and check if there is a small screen inside the tube. If there is one remove and pitch it. If the problem persist get a 6 gallon outboard tank and connect to the fuel filter inlet.
Do not loose the power valve spring and look closely at the float bowl plugs, sometimes they have to be sealed over with some epoxy.

Thanks for the reply! There is definitely no issue in the tank. The entire fuel system was overhauled when I restored this Chap a few years ago. The carb that is on the boat now is a remanufactured QJ, and really just needs tuned for my specific 4.3L. Keep in mind this is not the carb that came with the boat. The carb that came with the boat is plugged in the circuit that the primary rods feed. With this book in hand I intend to rebuild the old carb, and make the remanufactured carb work perfectly with my motor. Getting the reman carb adjusted properly is my first goal.

Most mechanics I ask about these Carbs, (in automotive applications mind you), either can’t remember, or say “they’re finicky, you just gotta play with them”. My mind needs to know how all this works, there are so many different rod, jet, cam, and valve combinations, where to start is the question.

Also, I agree with you in sealing the aluminum plugs in the bowl, under the secondary rods, I have seen epoxy on these in the past.
 

Baylinerchuck

Commander
Joined
Jul 29, 2016
Messages
2,726
There is a section in Chapter 2 subtitled “Remanufactured” Quadrajets. Cliff Ruggles, the author, explains to try and avoid remanufactured carburetors. He sites the fact that it was expensive to sell carburetors for specific applications and instead produced generic carburetors with part numbers to cover a much broader range of applications. He also states that in the past 10 years he hasn’t come across a single sample remanufactured QJ that works as well a rebuilt factory original unit.

All food for thought as I get ready to attempt to calibrate the one I purchased from National Carburetors.
 

kenny nunez

Captain
Joined
Jun 20, 2017
Messages
3,075
You might have some luck using muratic acid in the plugged float bowl passages. Another thing I have done is to drill out the lead plug to clear the blocked passage then replug it with some lead from a fishing lead sinker.
A QJet is the most tuneable carburetor ever built but it takes a lot of trial and error. Hopefully you can get the original back together. Your original carburetor was dyno tuned at the factory using O2 sensors and knock sensors.
 

Baylinerchuck

Commander
Joined
Jul 29, 2016
Messages
2,726
You might have some luck using muratic acid in the plugged float bowl passages. Another thing I have done is to drill out the lead plug to clear the blocked passage then replug it with some lead from a fishing lead sinker.
A QJet is the most tuneable carburetor ever built but it takes a lot of trial and error. Hopefully you can get the original back together. Your original carburetor was dyno tuned at the factory using O2 sensors and knock sensors.

I definitely plan on doing that, as you are 100% correct. I tried the Muratic acid on the original carb to no avail. You are correct that I’ll need to now drill out the plugs on that carb. The book shows how to seal those clean outs with shallow threaded fasteners and solvent resistant epoxy to seal the threads. It looks interesting and something I’ll try for this thread.

I did find that the secondary butterflies On the remanufactured carb were hanging up a bit due to the linkage not being bent properly, and the shaft being a little sloppy. I also loosened the air door spring back to a 5/8 turn to match the oem carb. I’ll post pictures with explanations soon to keep this thread as informative as possible. Thanks for your reply.
 

Baylinerchuck

Commander
Joined
Jul 29, 2016
Messages
2,726
If a Quadrajet needs to be rebuilt or cleaned the first thing we need to do is remove it. The next few posts describe how I removed mine from my 4.3LX Mercruiser. The steps should be pretty universal.

The Quadrajet has three main parts. The air horn, which is the top piece, the base, which is the main body, and the throttle plate which is the bottom. Adjustments to the secondaries, or large 2-1/4” barrels can usually be made without taking off the air horn. Most other calibrations can be done by removing the air horn.

The carburetor can be removed as an entire assembly. I choose to remove the air horn first.

Remove the spark arrestor, mine is held on with a 1/4-28 nut.
33C71BFF-AA44-4AD0-8309-E06EF173463C.jpeg

Open the choke door and remove the 2 Phillips screws. Be careful not to drop these screws.

Click image for larger version  Name:	EB809590-E18A-4E6E-A1A7-220C7C9E8CF4.jpeg Views:	1 Size:	378.9 KB ID:	10926188

Remove the two front mounting bolts, and center stud.

Click image for larger version  Name:	CE6C868B-7A15-4B3F-AEFD-C0297DD53F6D.jpeg Views:	1 Size:	367.4 KB ID:	10926190

continued on next post.
 

Attachments

  • CE6C868B-7A15-4B3F-AEFD-C0297DD53F6D.jpeg
    CE6C868B-7A15-4B3F-AEFD-C0297DD53F6D.jpeg
    367.4 KB · Views: 3
Last edited:

Baylinerchuck

Commander
Joined
Jul 29, 2016
Messages
2,726
All the bolts are now removed, just a few more linkages and the air horn will be free.

Remove the retaining clip from the upper choke door linkage. With the choke doors completely open the linkage can be removed from the arm. Holding the choke lever on the base fully clockwise will raise linkage to its highest point. Wiggle the linkage and slightly turn and it will release from the lever in the base.

Click image for larger version  Name:	E15F3E00-4AB7-449D-AE70-C18771CD9405.jpeg Views:	1 Size:	350.7 KB ID:	10926199Click image for larger version  Name:	AA90F5D3-F64C-44F4-9E21-D2DAD087635F.jpeg Views:	1 Size:	2.11 MB ID:	10926200

Remove the secondary air door vacuum hold back linkage by pushing open the door slightly and rotating the linkage.

Click image for larger version  Name:	A3A2525C-D016-4D3B-9608-83FC36F0A67A.jpeg Views:	1 Size:	310.0 KB ID:	10926201

Remove the air horn from the base. You may need to pry the gasket loose. Be careful not to bend the brass tubes or rods. The secondary rods can be removed beforehand, but I remove them with the entire air horn. Set the air horn aside.

Click image for larger version  Name:	DA9BC456-C4B6-4888-B6EB-BB7A8815C7EA.jpeg Views:	2 Size:	327.2 KB ID:	10926204

Click image for larger version  Name:	FB70E46D-68A8-47C2-AB28-3ABA3F813CCF.jpeg Views:	2 Size:	423.2 KB ID:	10926205

To remove the base and the throttle plate, remove the clip securing the divorced choke linkage, disengage the linkage.

Click image for larger version  Name:	447A1956-938C-4E6F-A526-A0B6EA87AC35.jpeg Views:	1 Size:	380.8 KB ID:	10926206

The last step is to remove the rear mounting bolts that secure the carburetor and the throttle cable bracket, then remove the carburetor from the intake manifold.

Click image for larger version  Name:	B0F4B9AF-43B1-4862-A396-3F0CAF424E3C.jpeg Views:	1 Size:	360.1 KB ID:	10926207

With the Quadrajet removed, I can now rebuild it, or in my specific case ensure that the secondaries begin to open at the proper time by adjusting the linkage between the primary and secondary.
 

Attachments

  • DA9BC456-C4B6-4888-B6EB-BB7A8815C7EA.jpeg
    DA9BC456-C4B6-4888-B6EB-BB7A8815C7EA.jpeg
    327.2 KB · Views: 1
  • FB70E46D-68A8-47C2-AB28-3ABA3F813CCF.jpeg
    FB70E46D-68A8-47C2-AB28-3ABA3F813CCF.jpeg
    423.2 KB · Views: 1
Last edited:

Baylinerchuck

Commander
Joined
Jul 29, 2016
Messages
2,726
Now that the carb is off there was a few things I wanted to check. Number one was to look at the fuel filter. This is behind the Fuel inlet and the cap is removed with a 1” wrench. There is a spring behind the filter. Simple stuff first.

83E25229-F45F-4CC3-94BC-87CC38023953.jpeg

Since the air horn and gasket is removed you can see the power valve and primary metering rods. The air horn gasket is slotted to allow you to remove the gasket without removing the power valve.

The power valve has a spring under it, and different sized springs, metering rods, and jets are used for calibrating the primary fuel load from idle off through WOT.

As the engine idles, the vacuum is high which pulls the power valve down, and overpowers the spring, lowering the rods into the primary jets. As the throttle plates are opened vacuum begins to drop and the power valve spring overcomes the vacuum, lifting the rods providing more fuel.

There are several opening sizes of jets, several metering rod diameters, lengths, and steps, and several power valve springs. I have a bit of frustration with the book I bought as it has no real troubleshooting section. In other words, there is no mention of if your having trouble here, change this.....Maybe the calibration is so vast it’s impossible to list all the changes. A basic idea would be valuable.

For example, the book mentions that the secondaries begin to open when the primaries are 2/3 open. There is no measurement given for this. Is that an exact throttle position, or is it variable? What changes if the secondaries open early? Late? There is no information on how to adjust this, which involves bending the linkage between the two plates. Same with the vast different sizes of jets, and metering rod combinations. What works best with what, and what to change if you experience this?

More on this linkage in the next post as I keep digging in.
 

Baylinerchuck

Commander
Joined
Jul 29, 2016
Messages
2,726
Since I decided to keep the old carburetor in lieu of returning it for the core fee, a have a good sample from which to compare. In a comparison, I found that the primaries in the remanufactured carb do not open as far as the oem at the point the secondaries begin to open.

I used a drill bit as a feeler gauge and found the a 5/16” bit seemed to fit best in the oem plate. The remanufactured carb opening was slightly less than 1/4”.

oem
9316C146-78E4-4286-9841-38CF0C1532BD.jpeg
Remanufactured
74AF5E1B-7B60-4B84-920A-F05DF1AEAB16.jpeg

I was able to get the Primary throttle plate on the remanufactured carb to open the same as the OEM by bending the connecting linkage. It took a bit of time to get it right.


791C48BA-58B9-4D0C-A581-1D8C2C688187.jpeg

If the linkage is not bent properly, in which the stem of the arm is not pushed a couple of degrees before the lower bend engages the lower portion of the arm, binding can occur which causes the secondary throttle
plate to snap open. It must operate smoothly throughout the entire throttle range. The secondary throttle plates must reach full open. Both primary and secondary throttle plates must reach full open together.

It takes a fair amount of tinkering to get it right. A bend here, a bend there, but now both throttle plates operate the same with the same basic measurement. I can’t seem to find anything that states an actual measurement of when the secondaries should begin to open other than when the primaries reach 2/3 open.

Since the carb was out, I decided to measure and document what size jets, rods, etc I had. More on that later.
 

Lou C

Supreme Mariner
Joined
Nov 10, 2002
Messages
11,856
great information...if you need more information consider posting up at Cliff's High Performance Quadrajets, they have a pretty active forum there. He also sells rebuild kits and parts.

https://cliffshighperformance.com/
 
Top