Regulator/Rectifier Installation

Denwa51

Cadet
Joined
May 20, 2021
Messages
6
Hey everyone,

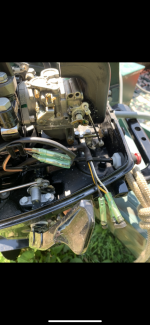
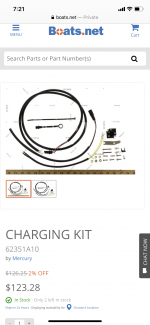
I have a 2011 Mercury Sea Pro 25Hp (serial# ON167245) (Model# 1025207Fl). I bought the regulator rectifier kit (Part# 62351A10) and I'm looking for proper installation instructions as the ones provided are very limited in information. The motor has three wires coming from the stator, 1 capped black wire on its own and a white and yellow that share the same cap. How do these three wires and the battery leads connect to the rectifier.
Any info is greatly appreciated!
Thank you.
 

Attachments

  • 79F0B311-C849-4CFA-AFED-8F02535BB9B3.png
    79F0B311-C849-4CFA-AFED-8F02535BB9B3.png
    4.4 MB · Views: 10
  • 26C9A033-2B31-4789-9472-649BAEA05CAF.png
    26C9A033-2B31-4789-9472-649BAEA05CAF.png
    929.5 KB · Views: 11

sam am I

Commander
Joined
Jun 26, 2013
Messages
2,169
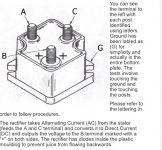
The white and yellow wires connect (any order) to the rectifier "~" AC terminals, the "-" neg terminal of the rectifier terminal goes to battery negative post or ground, and the "+" positive terminal of the rectifier goes to the battery positive post (usually battery side of starter solenoid).

BTW, that is just a rectifier and NOT a regulator.......You paid over $100.00 for around $5.00 in parts. Not sure how these people sleep at night with a 2000% mark-up. Oh wait, it's "By Mercury" N/M.......R & D and such, plus there's magic in all their parts!!
 
Last edited:

Denwa51

Cadet
Joined
May 20, 2021
Messages
6
The white and yellow wires connect (any order) to the rectifier "~" AC terminals, the "-" neg terminal of the rectifier terminal goes to battery negative post or ground, and the "+" positive terminal of the rectifier goes to the battery positive post (usually battery side of starter solenoid).

BTW, that is just a rectifier and NOT a regulator.......You paid over $100.00 for around $5.00 in parts. Not sure how these people sleep at night with a 2000% mark-up. Oh wait, it's "By Mercury" N/M.......R & D and such, plus there's magic in all their parts!!
Because the rectifier has three posts, two for A/C and one for Positive, the Negative being the where you screw the rectifier to the mount.. I assume the bare metal back of the rectifier acts as a ground for the rectifier itself? So it should be mounted to the bare metal bracket that came with the kit to ground properly? Do have thoughts to what the extra capped black wire from the stator is for?

I bought the kit off eBay for 50 bucks Canadian so I ain't complaining. Lol but ya I hear ya crazy how merc charges so much for basic 10 cent parts.
 

Attachments

  • F94BD41A-2E48-41E7-8D58-BCE622C0541B.jpeg
    F94BD41A-2E48-41E7-8D58-BCE622C0541B.jpeg
    99.4 KB · Views: 5

sam am I

Commander
Joined
Jun 26, 2013
Messages
2,169
I assume the bare metal back of the rectifier acts as a ground for the rectifier itself?
Yes, that is the "-" terminal of the rectifier if you will that ultimately goes to the batt's neg post/ground.

So it should be mounted to the bare metal bracket that came with the kit to ground properly?
As long as the bare metal bracket it came with you've mounted it too then mounts(ties) somehow to ground, sure, but it's not necessary if ya somehow can't make it fit, it looks sorta generic............Given that, when mounting, aside from being grounded, try to provide/mount it to as much of a metal surface area as you can (e.g. steel plate) to help it dissipate heat.

ALSO.......Smear a even layer of heat sink compound (mounting screws keep it grounded) between the two surfaces too if ya have some just laying around from the last uPC you put a fan on.

Do have thoughts to what the extra capped black wire from the stator is for?
I didn't see anything, but never looked too far....
Lol but ya I hear ya crazy how merc charges so much for basic 10 cent parts.
It must be nice to be King......
 
Last edited:

Denwa51

Cadet
Joined
May 20, 2021
Messages
6
Yes, that is the "-" terminal of the rectifier if you will that ultimately goes to the batt's neg post/ground.


As long as the bare metal bracket it came with you've mounted it too then mounts(ties) somehow to ground, sure, but it's not necessary if ya somehow can't make it fit, it looks sorta generic............Given that, when mounting, aside from being grounded, try to provide/mount it to as much of a metal surface area as you can (e.g. steel plate) to help it dissipate heat.

ALSO.......Smear a even layer of heat sink compound (mounting screws keep it grounded) between the two surfaces too if ya have some just laying around from the last uPC you put a fan on.


I didn't see anything, but never looked too far....

It must be nice to be King......
Seems I maybe SOL. Talked with a bit mechanic and because it's 3 wires coming from the stator he believes it is a lightening coil and not a charging coil. I'd have to pull the fly wheel and install the right coil for this to work. Thoughts?
 

Denwa51

Cadet
Joined
May 20, 2021
Messages
6
Seems I maybe SOL. Talked with a bit mechanic and because it's 3 wires coming from the stator he believes it is a lightening coil and not a charging coil. I'd have to pull the fly wheel and install the right coil for this to work. Thoughts?
Boat mechanic*
 

sam am I

Commander
Joined
Jun 26, 2013
Messages
2,169
Seems I maybe SOL. Talked with a bit mechanic and because it's 3 wires coming from the stator he believes it is a lightening coil and not a charging coil. I'd have to pull the fly wheel and install the right coil for this to work. Thoughts?
Not sure, I don't have/can't find enough info on your year/model, BUT I see where gray and yellow are used when only two wires are present from the "charge coil".

When he says "lightning coil", I wonder if this is a stator coil dedicated for the switch box power supply perhaps, but usually those are striped color coded wires not solid colors, so still, not sure. Few pages of various years/info below....


However FWIW, seems to be your color/ 3 wire config. He never loads it down, but it certainly charged the batt at 14.5V. Might be a few amps there.......Note, he's got a rectifier/regulator unit and you only have a rectifier.This means the battery in your case would substitute as the voltage regulator.

 
Last edited:

Denwa51

Cadet
Joined
May 20, 2021
Messages
6
Thanks I hooked it up and it works! Left the extra black wire terminated it's for a Tach.
 
Top