Refurbush Dashboard

jlcalbre

Cadet
Joined
Jun 8, 2008
Messages
14
I'm restoring a 1990 SKi Supreme. I've replaced most of the dash components (switches, button, breakers, etc) but the dash board itself looks pretty bad. It has a "cover", a molded piece of black plastic that fits over the actual white fiberglass dash. This is where all the labels for the switches and other info is printed. Most of the writing is wearing off and it has some chips and just looks bad. I am at a little bit of a loss of what to do about it. I can't imagine I could find a replacement that was in any kind of decent shape. Any suggestions on what to do with it are appreciated. Thanks.
 

bowman316

Lieutenant Commander
Joined
Oct 21, 2008
Messages
1,822
Re: Refurbush Dashboard

just replace the wood, and make cut outs for all of the gagues. Or get a new sticker for it.

Or paint.
 

Starcraftguy1

Petty Officer 1st Class
Joined
Sep 6, 2008
Messages
327
Re: Refurbush Dashboard

I would take it off.As long as it is all in 1 piece,sand it and spray can it black.Write down what the stickers are,try to find some new ones,if you can't make some with a label maker,just for other people to know what is what.
 

jlcalbre

Cadet
Joined
Jun 8, 2008
Messages
14
Re: Refurbush Dashboard

That would work actually. After looking at it again, it is actually metal so sanding it a bit and hitting it with spray paint would actaully look pretty good. Thanks.
 

special_kaye

Petty Officer 2nd Class
Joined
Apr 5, 2009
Messages
170
Re: Refurbush Dashboard

I cut the old fiberglass dash out and used a "found" road sign to cut an aluminum plate. Cut gauge holes, sprayed it black, added switches and finish washers. Looks great except for no gauges yet. I'll install them when I decide on what engine to buy. Or find one I can afford. If you want a picture, I'll post one in the next day or two. Let me know. I've got before and afters too.
 

jlcalbre

Cadet
Joined
Jun 8, 2008
Messages
14
Re: Refurbush Dashboard

I'd love to see a before and after pic. That would be an even better idea because I don't really like the set up of my dash and I could really do it any way I wanted to. I have a few "found" pieces of sheet metal laying around. How do you cut it? I am a contractor and can do anything with a piece of wood but don't know much of anything about metalwork. Would love to learn.
 

special_kaye

Petty Officer 2nd Class
Joined
Apr 5, 2009
Messages
170
Re: Refurbush Dashboard

I'd love to see a before and after pic. That would be an even better idea because I don't really like the set up of my dash and I could really do it any way I wanted to. I have a few "found" pieces of sheet metal laying around. How do you cut it? I am a contractor and can do anything with a piece of wood but don't know much of anything about metalwork. Would love to learn.

Give me a bit to get the pictures online. Yeah, I own an internet hosting company but it's the Plumber's Wife Syndrome. Her sink is always clogged.

As for cutting the metal, I just used a jigsaw with a 24tpi blade. Yes, the gauge holes were a bit tricky but nothing too major. The rectangular openings were actually harder. Plus, an old 5/8" woodworking spade bit did the horn button mounting hole like a champ.

Just an OBTW, I didn't use sheet metal per se, I used 1/8" thick aluminum. Might even be a tad thicker than that. I'll get a proper measurement on it.

I also used the 24tpi saw blades to cut the fiberglass. I bought five bargain blades and used two. If you take your time and don't rush the cut, it'll come out fine without cracking the 'glass. You also need to seal the freshly cut 'glass too.

I'll get to work on the pictures in the morning.
 

jlcalbre

Cadet
Joined
Jun 8, 2008
Messages
14
Re: Refurbush Dashboard

Can't wait to see them. You are right, those "spare" pieces are aluminum not sheet metal. Wouldn't have thought that stuff would cut that easy but I'll have to give it a shot. Thanks.
 

5150abf

Vice Admiral
Joined
Aug 12, 2007
Messages
5,808
Re: Refurbush Dashboard

The dash on mine is 1/4'' aluminum, just use a hole saw and some WD-40, I do it all the time at work, it is way faster and your holes are actually round.

Aluminum isn't much different than wood, we use a chop saw with a carbide blade to cut it, routers to trim it, I have even used a table saw on it.

For my stereo and speaker cut outs I had to use a jig saw but again just a metal blade is fine, cover the pad on the saw with a couple layers of masking tape, it will help the saw slide and it won't gouge your metal.

Cut your new panel and lay it out however you want off the boat but remember to hold the steering wheel where it goes to make sure you aren't blocking gauges before you cut your holes.

As for labels that is a little tougher, other than one of those label makers I don't have a clue.

Here is some pics of mine, it is painted with Rutoleum semi-gloss black.
 

Attachments

  • P4090392.jpg
    P4090392.jpg
    80.7 KB · Views: 0
  • P4090394.jpg
    P4090394.jpg
    80.5 KB · Views: 0
  • P4090391.jpg
    P4090391.jpg
    79.6 KB · Views: 0

Moody Blue

Captain
Joined
May 24, 2004
Messages
3,136
Re: Refurbush Dashboard

The dash on mine is 1/4'' aluminum, just use a hole saw and some WD-40,

That is the key when working with aluminum. It needs to be lubricated or the alum will quickly clog up the cutting tool whether it be a saw blade, hole saw, router etc. WD40 works great but is a little expensive so we use varsol. Works just as well but is much cheaper by the gallon.

I work with alum all the time and treat it just like wood. I cut it with table saws, miter saws, hole saws, routers, jig saws, counter sinks etc etc. Fine toothed carbide blades for the table and miter saws works great. Wear safety glasses or a face shield as the alum really "chips" on the saws. When using a hole saw, use lots of lube and run the saw at a slow RPM.

Don't attempt to cut anything thinner than 1/8" an a saw, it will catch and tear and cause a terrible accident. If we have to cut thinner, we use double sided tape and stick the alum to a piece of 1/2" ply then cut both at once.
 

special_kaye

Petty Officer 2nd Class
Joined
Apr 5, 2009
Messages
170
Re: Refurbush Dashboard

Okay, you asked for it. And no, I didn't use any type of WD40 or anything like that to drill or cut. I just went for it. And, my gauge holes came out pretty darn good.


IMG00451.jpg

This is what I started with. Please notice the microphone hook smack-dab in the middle. This is the kind of thing that'll drive me crazy. Yeah, name it what ever you want but it does drive me crazy.


IMG01005.jpg

Gauges out, cut lines marked. I never really planned to do this at this time but it all started because the larger, wider, cut-out on the bottom left wouldn't hide behind the new switch panel. That, and I couldn't find a replacement switch to actually fit the opening in the existing switch panel.


IMG01014.jpg

Designing with paper.


IMG01037.jpg

Dash cut out but not sealed.


IMG01187.jpg

Cut panel, ready for paint. This is an old aluminum No Dumping sign I "found" and it measures out to 3/32". It's a REAL bear to take the reflective coating off the old sign after it's been cooked on in the SW Florida sunshine for how ever many years. After using a heat gun, putty knives, razor blades, and sand paper, it was finally good enough to use. And no, I never got it all off the sign. I saved the rest of the sign, I can get two more panels out of it if I decide to change the layout. It'd take a couple hours, tops, and I'd have another panel ready to go in, except for paint to dry. I saved all the paper patterns.


IMG01189.jpg

First coat. Two more followed.
 

special_kaye

Petty Officer 2nd Class
Joined
Apr 5, 2009
Messages
170
Re: Refurbush Dashboard

IMG01225.jpg

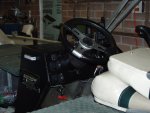
New helm, with panels, installed. No gauges yet, we haven't decided on style/engine yet. I have a 200 Suz but it needs a rebuild. If I rebuild it'll be Suz style gauges. If I get OMC, or Merc, it'll be those style gauges.

I cut the original West Marine switch panel in half. I really like being able to check voltage without turning key on. Just one of my things. Plus, the way I have it wired it'll check which ever battery I'm using for house power while at anchor whereas the engine voltmeter will only show what it's attached to or charging. This panel will also get a water-resistant push button when I get to it.

The white behind the gauges holes is a sheet of round computer labels I used to label wires. The wife had them sitting around her 'puter and I put them to work. I had the back of the helm back on by this picture and it was dark enough in there that you couldn't see the gauge cutouts. Hence, the white background. BTW, test fitted my old gauges, everything is fine.

Planned gauges are tach, speedo, trim, and volts. I don't know yet if I'm going to go with an on helm gas gauge. I have a gauge, it's just on the built-in tank behind an inspection cover. Because I don't have an electric fuel gauge, and do have an outboard, I don't need a blower yet. If I put a helm fuel gauge, I also have to install a blower. I think.

The blank space towards the upper left is where I will install the Suz engine check gauge if I stay with the Suz, and the fuel gauge if I go with one.

As for labels, the 6 switch panel on the right came from Bass Pro, not the highest quality but it's a Doofer. One thing, it had unfinished edges, no paint, and a crappy, sticky, piece of plastic over the face paint. The plastic DOES NOT come off easily around the switches, LEDs, and breakers. Be prepared to spend a bit of time with tweezers picking all the little bits of plastic away.

I set up my new wiring schematic to match the labels on the panel, with only one change, then used the extra HORN label out of the package for the water-resistant red button. The one marked HORN. There's plenty of other labels in the package but most are the same as what's on the panel.

As of today, the bottom two switches are not used. But, I just bought a new binnacle yesterday and the fifth switch down will be to turn the binnacle and gauge lights on and off. Yes, most of the time you'd want your gauge lights on while the running lights are on. But, there might be that one time you really want to enjoy the night sky but don't want to turn your running lights off. Just one of my things.
 

special_kaye

Petty Officer 2nd Class
Joined
Apr 5, 2009
Messages
170
Re: Refurbush Dashboard

Before and after.
All the work pictures are 50% of original size. If you want bigger ones, let me know and I'll send 'em.

helm%20before%20and%20after.jpg


IMG01025.jpg
 

JaSla74

Chief Petty Officer
Joined
Oct 14, 2008
Messages
506
Re: Refurbush Dashboard

Very nice.

I'm thinking of replacing the plastic gauge panels in my boat, but am considering using wood. If I did go the wood route what type would you guys recommend?
 

Bob_VT

Moderator & Unofficial iBoats Historian
Staff member
Joined
May 19, 2001
Messages
26,039
Re: Refurbush Dashboard

BONUS!!!! Dang I love using those aluminum signs. :D :D :D

Looks great!
 

special_kaye

Petty Officer 2nd Class
Joined
Apr 5, 2009
Messages
170
Re: Refurbush Dashboard

Very nice.

I'm thinking of replacing the plastic gauge panels in my boat, but am considering using wood. If I did go the wood route what type would you guys recommend?

Wood could be very nice. Make sure you seal everything up though unless you use teak. Even then, I would do something with it. One of my goals was to make my helm splash proof, hence, the boots on all the toggles and breakers, plus the planned water resistant button on the volt panel.

I was going to use Starboard but that's pretty expensive plastic. I though about going to Target or Wally World and getting a large cutting board. Same plastic. But, when I took the ferry to Dry Tortuga, they had an aluminum helm and I really liked the way it looked. Minimalistic, though not plain. Very functional.

Thanks for the compliments. Means a lot. There is a lot of experience here.
 

reelfishin

Captain
Joined
Mar 19, 2007
Messages
3,047
Re: Refurbush Dashboard

I've used Lexan and even Starboard in similar applications, but aluminum or finished wood works just as well. I like using Lexan since it won't deteriorate or corrode. I've also put wood tone or just flat black vinyl over the Lexan too. I did one with padded vinyl over the panel, then added my gauges, it looked great but that was in a go fast boat for a buddy.
 

special_kaye

Petty Officer 2nd Class
Joined
Apr 5, 2009
Messages
170
Re: Refurbush Dashboard

IMG01348_041209.jpg

Installed the compass and radio yesterday. The compass is new from a local shop and is actually mounted on the BACK of the helm. I did that so I could wipe off the flat area easier and also to lower the compass. I felt, with it on top, that it was like right in my face. Yeah, I'm also the kind of guy that can't have anything on his Jeep dashboard either.

The radio was moved back and left off the top of the console and bolted down. I did this so I could still use the counter space in front of the radio. I also added a power disconnect. Now, I can take the radio out of the boat by unscrewing the antenna and separating the power plug. Please notice that the microphone clip is no longer in the middle of the dash. I actually put it here so you can key the mike and "talk toward" the mike without actually having to pick it up. I do it at work all the time and it's very convenient and habit forming. If you have a good radio voice, this is a great set-up. And did I say convenient?

The black and red wires you can see under the compass are actually the power wires for the radio. The power wires for the compass are tiny little black things that don't show up in this picture. I drilled a hole in the compass mounting base so I could run the radio and compass light power wires through the same place. This is not the final resting place for these wires. It's just where they were hanging when I happened to think of taking a picture. The radio power wires and antenna wire are now cabled together and mounted in a cable clip. Neat, clean, and out of the way.

The radio is hot wired so power is available if house power is on. The compass light is wired to the fifth switch down, with a new label. All the other gauge lights will also be wired through this switch so I can turn them on or off as I choose.

Normally I wouldn't run power or antenna wires this close to the compass but I tested everything, with zero interference, before I decided to do it like this. And I mean everything. I'm like that.
 
Top