Reassemble

FreeBeeTony

Captain
Joined
May 15, 2002
Messages
3,991
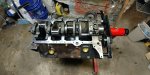
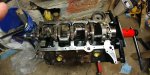
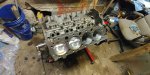
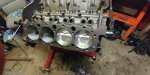
Picked up my block, piston/rods, crank shaft, etc., last night.
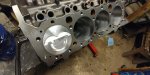
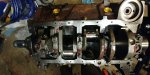
Installed the crank tonight.......not torqued down, just snug. Seems to spin nice.....just coated the bearings w/ oil.
Going to take it slow......probably won't start it until spring.

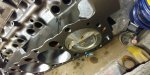
What is everyone's thoughts on assembly lube?..........I'm leaning on using because of the time span.

Here's the first pic......
 

Attachments

  • photo282489.jpg
    photo282489.jpg
    1.3 MB · Views: 1

Grub54891

Vice Admiral
Joined
Jun 17, 2012
Messages
5,917
I always use assembly lube, oil will slowly drain away when sitting. The assembly lube stays put, and helps with the initial start up after priming the oil pump.
 

Bt Doctur

Supreme Mariner
Joined
Aug 29, 2004
Messages
19,112
assembly lube as long as its not the white grease, I use STP. It`s never let me down plus I pre-oil untill I see oil in all the rocker arms using a drill driven priming dist.
 

FreeBeeTony

Captain
Joined
May 15, 2002
Messages
3,991
I bought the assembly lube from Jegs.
What about thrust bearing clearance? Should I be concerned about it?
 

Grub54891

Vice Admiral
Joined
Jun 17, 2012
Messages
5,917
Yes, The end clearance should be checked. Only seen it happen once, but it was to tight, when the guy started the motor, she squealed like a stuck pig. Shut down, pull motor, repair/replaced bearing. Luckily it didn't damage anything else. Still a lot of work for a simple check.
 

Scott Danforth

Grumpy Vintage Moderator still playing with boats
Staff member
Joined
Jul 23, 2011
Messages
47,562
I have a tub of assembly grease. I coat everything in the assembly grease and slather with oil. when I did my motor, I went thru about 4 quarts of oil covering parts.

a few things you can do. (all tips originated on the Grumpys Garage site)
  • take the timing chain and gears, put in aluminum pan, add oil, then stick in oven at 250 for an hour, then cool (pre-lubes chain)
  • I drill the one oil galley plug with a 0.030" hole to squirt the back side of the timing chain and gear
  • I soak my lifters in oil over-night with the bleed holes up. they fit nice in the plastic containers that sandwich meat comes in
  • mic your bores with a bore gauge. I did top, middle, bottom, two directions.
  • Plasticgage all rods and mains
  • use modeling clay from the dollar store to check clearances. especially the oil pickup to bottom of oil pan to verify the new pickup is in the right location.
  • make sure to file your rings for proper end gap. debur as needed
  • I highly recommend coated bearings
  • I highly recommend having the oil pickup brazed in place after you blue-print the pump
  • run a bottoming tap in all the head bolt holes to clean them out
  • pre-heat parts in the oven at about 180 degrees before painting. make sure the wife isnt home when you do this.
 

Bondo

Moderator
Staff member
Joined
Apr 17, 2002
Messages
70,527
Ayuh,.... I agree with everything above,....

Assembly lube is cheap insurance, primin' the oil system before start up is a must, 'n measurin' every, 'n all the pieces Absolutely must be done,....
 

FreeBeeTony

Captain
Joined
May 15, 2002
Messages
3,991
Can I check the end clearance w/ a feeler gauge or do I need a dial indicator?
0.003-0.004" sound correct?
 

FreeBeeTony

Captain
Joined
May 15, 2002
Messages
3,991
Plastigauged the main caps.............all in spec.
Also checked the crank end play w/ a feeler........came in @ 0.005.

What's a good way to get the plastigauge off the crank and bearings?
 

FreeBeeTony

Captain
Joined
May 15, 2002
Messages
3,991
Final installed the crank.........end play verified w/dial indicator @ 0.004".
Installed #1 & #2 pistons........didn't make any measurements but looks pretty close to zero deck........the machinist knew what I was looking for.

I really like the way these pistons look in the block........glad I went w/ them!
 

Attachments

  • photo282628.jpg
    photo282628.jpg
    988.1 KB · Views: 1
  • photo282629.jpg
    photo282629.jpg
    948 KB · Views: 1
  • photo282630.jpg
    photo282630.jpg
    997.4 KB · Views: 1
  • photo282631.jpg
    photo282631.jpg
    1.2 MB · Views: 1

Scott Danforth

Grumpy Vintage Moderator still playing with boats
Staff member
Joined
Jul 23, 2011
Messages
47,562
Plastigauged the main caps.............all in spec.
Also checked the crank end play w/ a feeler........came in @ 0.005.

What's a good way to get the plastigauge off the crank and bearings?

double check end play with a dial indicator - never mind, see that you did

use your fingernail and some brake cleaner to get the plastigage off the journals
 

Scott Danforth

Grumpy Vintage Moderator still playing with boats
Staff member
Joined
Jul 23, 2011
Messages
47,562
Also, make a check list of everything you need to do...check clearances, clean block, torque rods, etc. I once installed a motor into a hot-rod S-10 that required the cab to be lifted to get the custom oil pan to clear the cross-members. I didnt remember torquing the rods.....so at 11pm, I start pulling the front clip to lift the cab....so 4 hours later I had the motor back out..... another hour on the stand, pull pan, check torques.....and another 4 hours I had the motor back in

all could have been avoided if I simply made my check list back then.

Now i have check lists, the final one being on a wired tag on the carb
 

FreeBeeTony

Captain
Joined
May 15, 2002
Messages
3,991
Installed 2 more pistons today........

Looks like the pistons are ~ 0.005 below the deck........just about perfect........
 

Attachments

  • photo282694.jpg
    photo282694.jpg
    1.1 MB · Views: 1
  • photo282695.jpg
    photo282695.jpg
    1 MB · Views: 1

Bt Doctur

Supreme Mariner
Joined
Aug 29, 2004
Messages
19,112
Tony, I know somebody is going to ask about the socket on the crankshaft so for those that don`t know it`s a special socket the locates on the crankshaft keyway to rotate the motor
MOR-61760_NT_ml.jpg
 

Grub54891

Vice Admiral
Joined
Jun 17, 2012
Messages
5,917
Tony, I know somebody is going to ask about the socket on the crankshaft so for those that don`t know it`s a special socket the locates on the crankshaft keyway to rotate the motor
MOR-61760_NT_ml.jpg

Hummm... Never saw one of them, never needed one myself.
 

Bt Doctur

Supreme Mariner
Joined
Aug 29, 2004
Messages
19,112
I use a old, slighly bored out harmonic balancer with 6 holes bored in it for a rebar to turn the motor, In the very old days
we used a steering wheel welded to a balancer
 

Lou C

Supreme Mariner
Joined
Nov 10, 2002
Messages
11,856
Tony the block looks great! Its a good lesson for anyone who thinks closed cooling is not necessary, look at how clean your cooling ports are! SK did a good job, eh?
 
Top