Ready to Install Outdrive, However...

Tacoma_Dave

Seaman
Joined
Aug 11, 2021
Messages
60
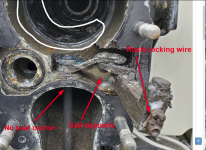
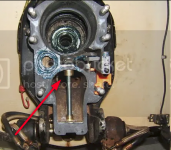
OK, so I've replaced the impeller, water pocket cover, oil seal, flow tested both upper and lower housings...now I'm ready to install the outdrive back onto the bellhousing. Before I do, I've noticed this on the bellows(?) and it has me concerned. I mean, when I reinstall the outdrive, won't these ridges cause a problem? Possible leakage? Should I replace the bellows? Any suggestions are appreciated. Thanks folks!
outdrive-1.jpg
 

kenny nunez

Captain
Joined
Jun 20, 2017
Messages
3,290
It almost looks like the remains of the sealing ring. You need to clean that whole bellhousing, the mounting surface of the drive, the bellhousing, inspect the boot for tears, the shift linkage, especially where the shift slider travels for reverse. Also the pocket in the drive shaft housing where the slider travels for forward with compressed air. You will be surprised how much grime is in there. Then lightly grease the moving parts of the shift linkage.
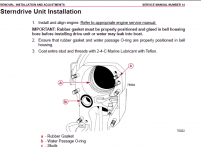
After everything is clean use some rubber cement or similar and glue the large rubber ring in the bellhousing and the water passage “O” ring and give the glue some time to set. The gasket is a dry fit so no sealer is used.
Watch the video that Chris made on how to re mount the drive.
 

Tacoma_Dave

Seaman
Joined
Aug 11, 2021
Messages
60
It almost looks like the remains of the sealing ring. You need to clean that whole bellhousing, the mounting surface of the drive, the bellhousing, inspect the boot for tears, the shift linkage, especially where the shift slider travels for reverse. Also the pocket in the drive shaft housing where the slider travels for forward with compressed air. You will be surprised how much grime is in there. Then lightly grease the moving parts of the shift linkage.
After everything is clean use some rubber cement or similar and glue the large rubber ring in the bellhousing and the water passage “O” ring and give the glue some time to set. The gasket is a dry fit so no sealer is used.
Watch the video that Chris made on how to re mount the drive.
Thanks Kenny,

Yeah I watched Chris' vid(s) several times. All of'em invaluable. I figured I had some work to do. Thanks y'all for the reaffirmation.
 

achris

More fish than mountain goat
Joined
May 19, 2004
Messages
27,468
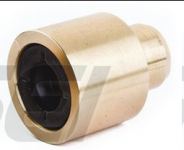
I don't see an signs of water ingress into the bellows, so I'm going to assume that folded up piece of rubber is an old sealing ring that's been pushed beyond the sealing face of the bell housing. You should be able to just pull it out without any resistance. If you feel resistance, STOP and investigate further. What I do see is what looks like salt deposits, and a rusty locking wire on the shift slide. I DON'T see a new style upper shift shaft seal carrier....

1632537452413.png

This is the new style seal carrier I'm talking about.
1632537596682.png
Merc revised the upper shift shaft seal situation after the original setup leaked all the time. The seal kept being burnt by exhaust gases. You need to remove the screw through the shift lever, then remove the lever and push the shaft down. Knock the old seal out, clean up the area and install the new carrier. I use a 6mm bolt, a bunch of washers and a nut as a driver tool. Once the new seal is in, clean up the shaft and refit it, and put the lever and screw back in. Unfortunately, the screw through the lever is Loctited in, and you can't always get it to come out. If it's stuck beyone removal, just hit the roller end of the lever and it breaks right along the screw line, take the bits out, pull the screw out of the lever and carry on. Obviously you'll need a new lever.. Don't try heating. There's a plastic washer under the lever and it'll melt and the whole job turns to sh*t.

Here's what the carrier looks like installed.
1632538003696.png

Chris.........
 

Tacoma_Dave

Seaman
Joined
Aug 11, 2021
Messages
60
I don't see an signs of water ingress into the bellows, so I'm going to assume that folded up piece of rubber is an old sealing ring that's been pushed beyond the sealing face of the bell housing. You should be able to just pull it out without any resistance. If you feel resistance, STOP and investigate further. What I do see is what looks like salt deposits, and a rusty locking wire on the shift slide. I DON'T see a new style upper shift shaft seal carrier....

View attachment 350412

This is the new style seal carrier I'm talking about.
View attachment 350413
Merc revised the upper shift shaft seal situation after the original setup leaked all the time. The seal kept being burnt by exhaust gases. You need to remove the screw through the shift lever, then remove the lever and push the shaft down. Knock the old seal out, clean up the area and install the new carrier. I use a 6mm bolt, a bunch of washers and a nut as a driver tool. Once the new seal is in, clean up the shaft and refit it, and put the lever and screw back in. Unfortunately, the screw through the lever is Loctited in, and you can't always get it to come out. If it's stuck beyone removal, just hit the roller end of the lever and it breaks right along the screw line, take the bits out, pull the screw out of the lever and carry on. Obviously you'll need a new lever.. Don't try heating. There's a plastic washer under the lever and it'll melt and the whole job turns to sh*t.

Here's what the carrier looks like installed.
View attachment 350414

Chris.........
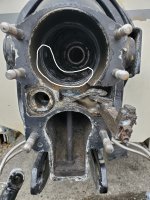
Thanks for the advice Chris, much appreciated.
 

flashback

Captain
Joined
Jun 28, 2002
Messages
3,963
I am wondering if it has a sealing ring at all. I suppose you will put a new one in it? Man that salt water is brutal, just looking at all the gunk on the shift lever its a wonder it even moves.
 

Tacoma_Dave

Seaman
Joined
Aug 11, 2021
Messages
60
This is the new style seal carrier I'm talking about.
View attachment 350413
Merc revised the upper shift shaft seal situation after the original setup leaked all the time. The seal kept being burnt by exhaust gases. You need to remove the screw through the shift lever, then remove the lever and push the shaft down. Knock the old seal out, clean up the area and install the new carrier. I use a 6mm bolt, a bunch of washers and a nut as a driver tool. Once the new seal is in, clean up the shaft and refit it, and put the lever and screw back in. Unfortunately, the screw through the lever is Loctited in, and you can't always get it to come out. If it's stuck beyone removal, just hit the roller end of the lever and it breaks right along the screw line, take the bits out, pull the screw out of the lever and carry on. Obviously you'll need a new lever.. Don't try heating. There's a plastic washer under the lever and it'll melt and the whole job turns to sh*t.

Chris.........
So Chris...Can this procedure be performed with the bellhousing in, or is it prudent to remove it and then replace the seal?
 

tank1949

Lieutenant Commander
Joined
Apr 4, 2013
Messages
1,893
Leaving an outdrive in saltwater, regardless of the best paint and maintenance, is asking to spend more time and money. If you want to keep the boat, now is the time to clean, repair, etch, prime and paint. Next season, you will have a warm fuzzy feeling, while on the water. Good luck!
 
Joined
Mar 27, 2010
Messages
3,008
That "salt deposits" area Chris has noted is his photo can build up enough to prevent the shifter from moving forward enough to engage reverse. Its a good idea to scrape and clean out that cavity as best you can, and is what Kenny referred to in post #3.

I use a little Mercruiser bellows adhesive (could also use 3M weatherstrip adhesive) to glue the large round gasket in place in the bellhousing as well as a little on the Oring that seals the water passage, just on the front side. I apply a little Mercruiser 2-4-C on the aft end of these gaskets/Orings. The glue holding them in there helps with one less thing to worry about falling out of place when your bolting the drive back in.
 

achris

More fish than mountain goat
Joined
May 19, 2004
Messages
27,468
I use a little Mercruiser bellows adhesive (could also use 3M weatherstrip adhesive) to glue the large round gasket in place in the bellhousing as well as a little on the Oring that seals the water passage, just on the front side....
As per the service manual instruction. đź‘Ť

1632613010299.png
 
Top