Re-thread 2000 VP SX-M cylinder for hydraulic hose

Wanna Tango

Cadet
Joined
Sep 12, 2022
Messages
27
Quick question all.
I was reconnecting the the hydraulic (port outer trim line) and it would not screw in all the way and leaked fluid. Cleaned thread with a 7/16-20 thread chaser but still leaks fluid the leak is not from the thread but from the fitting.
Do I need to change the line or remove the cylinder and re-thread it?
I tried removing the cylinder from the pivot pin but it won’t budge at all.
Thanks in advance for any and all help.
 

ESGWheel

Chief Petty Officer
Joined
Aug 29, 2015
Messages
469
Chasing and not using a tap or trying to rethread is the way to go. If the hose fitting is leaking then the hose needs to be replaced.

But is seems as if you are still not sure.

One method to ensure its the 'hose to metal tube' crimp issue and not the ‘threads’ leaking and running down the hose is to clean and dry it all off so there is no fluid anywhere. Then take a piece of string and tie it to the metal tube as a wick to help detect where the fluid is coming from. Depending on which hose (lower or raise) have the trim all the way up or down and have someone trim it up (or down) with you watching. Idea is to get the pressure on the hose that is an issue. Drive will not move but will have pressure in the hose. Wear safety glasses in case it lets go (pressure is in excess of 1000# when it hits the limit of travel).

Also did you replace the O-ring with a new one when putting it back together? That could lead to the ‘threads’ leaking.
 

Wanna Tango

Cadet
Joined
Sep 12, 2022
Messages
27
Chasing and not using a tap or trying to rethread is the way to go. If the hose fitting is leaking then the hose needs to be replaced.

But is seems as if you are still not sure.

One method to ensure its the 'hose to metal tube' crimp issue and not the ‘threads’ leaking and running down the hose is to clean and dry it all off so there is no fluid anywhere. Then take a piece of string and tie it to the metal tube as a wick to help detect where the fluid is coming from. Depending on which hose (lower or raise) have the trim all the way up or down and have someone trim it up (or down) with you watching. Idea is to get the pressure on the hose that is an issue. Drive will not move but will have pressure in the hose. Wear safety glasses in case it lets go (pressure is in excess of 1000# when it hits the limit of travel).

Also did you replace the O-ring with a new one when putting it back together? That could lead to the ‘threads’ leaking.
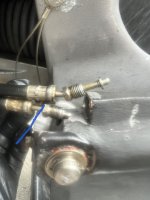
I see the fluid coming out of the space between the little tube and the fitting that goes in. So I am not sure if the issue is the hose or the threads. See picture (I am not that great at making lines in photos :) )
 

Attachments

  • IMG_3892.jpeg
    IMG_3892.jpeg
    553.1 KB · Views: 18

ESGWheel

Chief Petty Officer
Joined
Aug 29, 2015
Messages
469
Ah, I thought you were talking about the black part where the crimp is. So, the ‘threaded’ fitting is leaking, got it.

Try this: Prior to assembly ensure there is no debris whatsoever on the hose or inside the cylinder fitting. Check the ‘seat’ of the cylinder as well, should not be damaged; use a good flashlight to check. And you should be using new O-Rings. Are you? Ensure to lube it up with hyd oil prior to fitting on the O-Ring and a dab more prior to threading the fitting. Q-tips work well for this. Ensure the tube is going in nice and square and thread the 'nut' by hand until you feel it seat or cannot screw it anymore. Is the metal tube still nice and square and centered in the fitting? If it’s cocked at all, it’s not going to seal. And the torque for the fitting is not much at all, so do NOT overtighten. I’ll go look up the spec.
 

ESGWheel

Chief Petty Officer
Joined
Aug 29, 2015
Messages
469
84-108 in-lbs which is about 8 ft-lbs so it seats and then just a little bit more torque. No grunting.
 

harringtondav

Commander
Joined
May 26, 2018
Messages
2,439
High pressure steel lines seal at the flare at the end of the steel tube. The straight thread flare nut on the tube doesn't seal. It just forces the tube flare on the male seat in the housing with enough force make a metal/metal seal.

Before you put a tap into the cylinder you need to know the size and type of the flare. See attachment below. VP is European, so I suspect an ISO bubble flare with metric threads. SAE double flare is less likely

I suspect four causes for your leak.
1) Low torque on the nut. General guidelines are solid contact with the wrench and another 1/4 turn

2) Debris on the housing seat or flare. Clean the flare and the seat.

3) Damaged flare. A hydraulic hose shop will fix you up, assuming they can tell a double flare from an ISO bubble flare. ...guessing the ISO here,

4) Damaged seat. Ouch. These are normally machined into the housing, trim cyl. in you case. I don't know if these can be touched up at a machine shop.
So I'd try tightening it per above or a bit more be for I moved on.
 

ESGWheel

Chief Petty Officer
Joined
Aug 29, 2015
Messages
469
High pressure steel lines seal at the flare at the end of the steel tube. The straight thread flare nut on the tube doesn't seal. It just forces the tube flare on the male seat in the housing with enough force make a metal/metal seal.
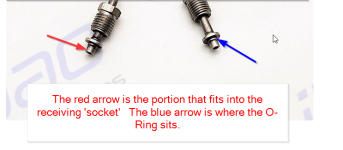
These are not the typical flare type of hyd fitting that we are all used to. They are an unusual design and it uses an O-Ring. Here is a picture of the hose end. The torque is very low as stated above which is out of the manual. I suspect a ¼ turn would over torque it. The threads as OP mentioned are in fact 7/16-20. Why VP went this direction is a mystery to me as its not like any hyd fitting I have ever seen.
 

Attachments

  • Hose Fitting End.png
    Hose Fitting End.png
    105.6 KB · Views: 11

Wanna Tango

Cadet
Joined
Sep 12, 2022
Messages
27
Well, I tried the above steps and was not successful. I can’t really see inside to see if the housing seat is damaged. I tried removing the cylinder but couldn’t take off the pivot pin at all. The cylinder moves up and down on the pívot pin so it’s not corroded there but I just can’t get it to slide off the pin.
Talked to a shop and they said probably cut the cylinder off and get a new one.
At the pint of just putting the flare in ther and cover with marine-Tec for the season until I can afford to buy a new cylinder.
 

dypcdiver

Lieutenant Junior Grade
Joined
Nov 1, 2005
Messages
1,039
Try taking a photo with a phone to see if there is damage or that the "O" ring is damaged. The "O" ring is very small and must be seated correctly, the barrel nut only needs nipping up not atall tight.
 

ESGWheel

Chief Petty Officer
Joined
Aug 29, 2015
Messages
469
I feel your frustration. But do NOT flare your tubing. It will only be worse. And given that its stainless steel and thick I do not think it would flare anyway.

When you do attach it and its still leaking, how bad is it? Is it 'drip… drip… drip' always or only when cycling? Or a constant stream? Does the drive go up and down?

Can you post a video?

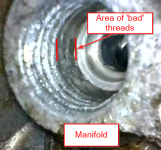
While it may be a challenge perhaps using a mirror or you phone to somehow get a look inside the cylinder fitting hole. Below are some pics I took of my situation albeit it was in the manifold block (other end of where the hose goes). And the drive was still attached! Note the highlight of the bad threads that cleaned up with a thread CHASER (not tap). Perhaps you may still have that last thread or two still not cleaned up. Only way to know is to look.

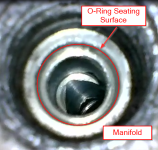
Also see picture of the ‘seat’. Not a great one but this is where the O-Ring sits and even with the poor quality of the pic, can still see that that seat is good to go. If it was not, I would not have tried to clean the threads, would have gone straight to changing the manifold.

Again these situations are so frustrating but encourage you to give it one more heave oh :)
 

Attachments

  • Bad Threads in Manifold.png
    Bad Threads in Manifold.png
    728.2 KB · Views: 4
  • Manifold Seating Surface.png
    Manifold Seating Surface.png
    828.6 KB · Views: 4

Wanna Tango

Cadet
Joined
Sep 12, 2022
Messages
27
I feel your frustration. But do NOT flare your tubing. It will only be worse. And given that its stainless steel and thick I do not think it would flare anyway.

When you do attach it and its still leaking, how bad is it? Is it 'drip… drip… drip' always or only when cycling? Or a constant stream? Does the drive go up and down?

Can you post a video?

While it may be a challenge perhaps using a mirror or you phone to somehow get a look inside the cylinder fitting hole. Below are some pics I took of my situation albeit it was in the manifold block (other end of where the hose goes). And the drive was still attached! Note the highlight of the bad threads that cleaned up with a thread CHASER (not tap). Perhaps you may still have that last thread or two still not cleaned up. Only way to know is to look.

Also see picture of the ‘seat’. Not a great one but this is where the O-Ring sits and even with the poor quality of the pic, can still see that that seat is good to go. If it was not, I would not have tried to clean the threads, would have gone straight to changing the manifold.

Again these situations are so frustrating but encourage you to give it one more heave oh :)
I will have to see this weekend if I can get a good picture of threads and seat. I will also try to get a video but the leak is not coming from the threads but from where the tube goes into the nut. It only leaks when you cycle the up or down and just squirts out until the pressure is relieved. The outdrive has not gone up or down. It may still need to go through the self bleeding process since I changed the pump reservoir and the seals from the cylinders.
Keep you all posted and I am crossing my fingers. I don’t want to spend another weekend not being able to get on the water.
 

ESGWheel

Chief Petty Officer
Joined
Aug 29, 2015
Messages
469
I initially referred to the “threaded” portion of the hose only to differentiate it from the “crimped” potion and stuck to that refence. I am not implying its leak is coming up thru the threads (between the nut and the cylinder).

There is complete understanding where the fluid is coming out from. This is clear form your post #3. This is indictive of the O-Ring not being properly pinched into the seat or the seat being bad. This is why it’s so important to look. If the threads are still not ‘clean’ the entire depth then the ‘nut’ will not force (pinch) the O-Ring into the seat as it should and hence it will leak exactly where you are seeing it. If the threads are ok and the seat is bad then the O-Ring will again not seal and the leak will be exactly where you are seeing it.

And now for some of my confusion: you changed the cylinder seals but cannot get off the cylinder?

I understand the current issue is a leaking fitting but could you provide a brief outline of what the initial issue was and the steps you have done?
 

Wanna Tango

Cadet
Joined
Sep 12, 2022
Messages
27
I initially referred to the “threaded” portion of the hose only to differentiate it from the “crimped” potion and stuck to that refence. I am not implying its leak is coming up thru the threads (between the nut and the cylinder).

There is complete understanding where the fluid is coming out from. This is clear form your post #3. This is indictive of the O-Ring not being properly pinched into the seat or the seat being bad. This is why it’s so important to look. If the threads are still not ‘clean’ the entire depth then the ‘nut’ will not force (pinch) the O-Ring into the seat as it should and hence it will leak exactly where you are seeing it. If the threads are ok and the seat is bad then the O-Ring will again not seal and the leak will be exactly where you are seeing it.

And now for some of my confusion: you changed the cylinder seals but cannot get off the cylinder?

I understand the current issue is a leaking fitting but could you provide a brief outline of what the initial issue was and the steps you have done?
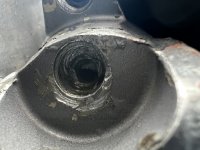
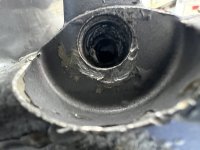
I was able to go to the boat today and take a couple of pictures.
A little background. The was water in my hydraulic fluid and the reservoir was cracked. Replaced the reservoir and the seals in the cylinders. I disconnected the lines to remove the pivot pin and cylinder but since I was unable to remove the whole cylinder, I disassembled them while connected to the pivot pin. Changed the seals, reassembled them and proceeded to connect the lines. When I tried the trim to bleed it, I saw the leak. Outdrive did not move up or down either.
When I used the thread chaser, I kind of measured the depth and made sure the chaser went that deep.
I just can’t stick my head back there to see if the seat is clean or in good condition.
 

Attachments

  • IMG_3979.jpeg
    IMG_3979.jpeg
    1.8 MB · Views: 8
  • IMG_3980.jpeg
    IMG_3980.jpeg
    1.9 MB · Views: 8

ESGWheel

Chief Petty Officer
Joined
Aug 29, 2015
Messages
469
It looks like you got great pictures! But unfortunately, it looks bad > like both the threads are still shot and the seat looks like it is chewed up. Since you had this connected with no issues before at this union, I am going to speculate that there are loose metal threads in the hole and this is what we are seeing. When you had difficulty disassembling it (and thus the need for the thread chaser) what typically happens is the raised portion of the thread of the softer material (in this case the aluminum cylinder) breaks off. Its like a sliver (or shaving) of metal. If that is the case the possibility still exists to recover.

Start by using a Q-tip and swab down in the hole by twirling the Q-tip a couple of times while pushing it against the sides of the hole and then pull it out. See any metal shavings? Keep going. No shavings? New cylinder time.

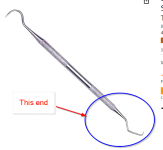
If do have metal shavings and all seem to be out with Q-tip, use a dental pick to see if can get anymore. See picture of what style and end to use. This one is on Amazon for $6. As you can see from the design it will pick out more stuck metal shavings. Scrap along the threads just like the dentist does your teeth. It will not further damage the threads. Keep flushing it with WD40. Take another pic. If looks improved then back to the thread chaser or even this time a bottom tap (this is different from a regular tap) but this requires great care as you can cut a whole new set of threads and there is not enough material in there to do that.

Good luck and keep going and posting!
 

Attachments

  • Pick.png
    Pick.png
    50.1 KB · Views: 3

Wanna Tango

Cadet
Joined
Sep 12, 2022
Messages
27
It looks like you got great pictures! But unfortunately, it looks bad > like both the threads are still shot and the seat looks like it is chewed up. Since you had this connected with no issues before at this union, I am going to speculate that there are loose metal threads in the hole and this is what we are seeing. When you had difficulty disassembling it (and thus the need for the thread chaser) what typically happens is the raised portion of the thread of the softer material (in this case the aluminum cylinder) breaks off. Its like a sliver (or shaving) of metal. If that is the case the possibility still exists to recover.

Start by using a Q-tip and swab down in the hole by twirling the Q-tip a couple of times while pushing it against the sides of the hole and then pull it out. See any metal shavings? Keep going. No shavings? New cylinder time.

If do have metal shavings and all seem to be out with Q-tip, use a dental pick to see if can get anymore. See picture of what style and end to use. This one is on Amazon for $6. As you can see from the design it will pick out more stuck metal shavings. Scrap along the threads just like the dentist does your teeth. It will not further damage the threads. Keep flushing it with WD40. Take another pic. If looks improved then back to the thread chaser or even this time a bottom tap (this is different from a regular tap) but this requires great care as you can cut a whole new set of threads and there is not enough material in there to do that.

Good luck and keep going and posting!
Update on this. I gave up and called someone and yes, new cylinder needed. I am going to just cut it off since I cannot pull it off the pivot pin and order a new cylinder.
I am wishing myself luck on this.
Thanks all for the help and tips.
 

ESGWheel

Chief Petty Officer
Joined
Aug 29, 2015
Messages
469
I am going to just cut it off since I cannot pull it off the pivot pin and order a new cylinder.
Thanks all for the help and tips.

Boy that $uck$ > these cylinders are expensive. If I may, here are some additional thoughts and tips:

Be prepared to replace both cylinders. Reason: the pin may get damaged when cutting off the one cylinder and that pin supports both cylinders. If the pin is stuck on one cylinder its probably frozen on both. And if you damage the pin making it unusable for the new cylinder and cannot get it off the other cylinder, well….

This means be extra carful when cutting off the bad cylinder. Since its cast aluminum it is brittle so cutting into it almost to the pin and then using a large chisel you may be able to break it off. My cylinders were so ‘frozen’ to the pin that this did not work, i.e. the bore of the cylinder where the pins goes thru were 100% ‘welded’ to the pin. So even if I chipped off a portion, I could not chip it all off so ended up slicing thru the pin to get it out.

Use a right-angle electric grinder with a proper metal cutting blade. Wear gloves and safety glasses! And you will be laying on you side / back a lot so park it where that is comfortable as much as possible and out of the way of anyone running over your legs 😊

As much as possible cut such that the sparks and debris fly down and not up into the gimbal housing.

Cap off the trim hose and tuck it out of the way.

Stuff rags into area to protect from debris and sparks the various components in the gimbal housing (hoses, bellows, etc.). Rinse the area well (after pulling out the rags) post cutting off. I used a spray bottle of Simple Green to and then my garden hose. Twice.

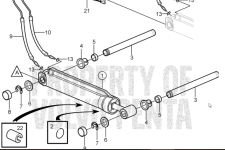
Also get in advance all the other bits needed, like items 4, 5, 6, 7, and 8 of the picture below.

Item 4 of the pic below inserts into the pivot housing with the pin. Due to corrosion in this area of the picot housing the (new) bushing may not insert all the way causing the cylinder to ride a little further out on the pin. This in turn will cause the combination of washer 6 and clip 7 to not fit. Use a car brake cylinder hone or some such to clean out the pivot housing where the bushing goes. Mine was so bad I had to leave off item 6 and have been closely monitoring it this season with no issues. I’ll get it fixed this off season. Heck I am even considering modifying the pin so it can be greased. Else I will be pulling it out each time the drive comes off.

Good luck and PM me if you want to talk live about this.
 

Attachments

  • Cylinder Parts.png
    Cylinder Parts.png
    284.2 KB · Views: 3
Top