Priming a Rebuild Engine

Rivergator

Petty Officer 1st Class
Joined
May 7, 2013
Messages
224
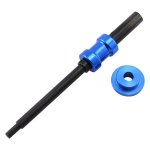
I know everything drags on with me. Last spring I rebuilt the 4.3 ltr engine for my 1988 Sylvan. In August I put the engine back into the boat. Then I ran into what I thought were problems with the starter but it was something else. Now I just got done with the coupler/gimbal bearing alignment and my next step was going to be to prime the engine and make sure I have good oil pressure. I was going to proceed very carefully with that because the engine hasn't been turned since it was rebuilt. So my plan was to crank the engine for about 10 seconds at a time (I don't want to overheat the starter) by using the starter until the oil filter has filled up, circulates through the engine and oil comes squirting out of the push rods. Then the other day I saw a Youtube clip where a guy was using this slick oil pump priming tool that you install temporarely in the engine instead of the distributor, which will only drive the oil pump and therefore pump oil nicely through all the bearings all the way up to the valve rockers. Now that sounds like a solid idea to me. Does anybody have any opinions on this? Is it safe to just crank the engine until pressure builds up or should I use the oil pump priming tool. If yes, does anybody know or have a picture or number of that tool that will fit my 1988 4.3 ltr. Mercruiser engine. There are plenty of pictures and offers of the tool on ebay and other internet sellers, but they are all for car engines and I am not sure if they will fit my engine because it uses the factory thunderbolt IV ignition module and distributor. With other words, does it matter if it is a car or marine engine and does it matter what distributor is on the engine, is it all the same or should I have to watch out for any differences? I asked the seller but as one can expect they have no clue. Their answer is, if it is a 1988 4.3 ltr Chevy or GM engine it should fit, but I am not trusting their word on that
 

Scott Danforth

Grumpy Vintage Moderator still playing with boats
Staff member
Joined
Jul 23, 2011
Messages
49,574
get a priming tool.

I have an old distributor that I modified. prior to that, a piece of 1/2" diameter rod and a chunk of copper pipe is what I used for decades.

same tool for V6's, V8's (small block and big block), and most other GM motors
 

tank1949

Lieutenant Commander
Joined
Apr 4, 2013
Messages
1,893
I know everything drags on with me. Last spring I rebuilt the 4.3 ltr engine for my 1988 Sylvan. In August I put the engine back into the boat. Then I ran into what I thought were problems with the starter but it was something else. Now I just got done with the coupler/gimbal bearing alignment and my next step was going to be to prime the engine and make sure I have good oil pressure. I was going to proceed very carefully with that because the engine hasn't been turned since it was rebuilt. So my plan was to crank the engine for about 10 seconds at a time (I don't want to overheat the starter) by using the starter until the oil filter has filled up, circulates through the engine and oil comes squirting out of the push rods. Then the other day I saw a Youtube clip where a guy was using this slick oil pump priming tool that you install temporarely in the engine instead of the distributor, which will only drive the oil pump and therefore pump oil nicely through all the bearings all the way up to the valve rockers. Now that sounds like a solid idea to me. Does anybody have any opinions on this? Is it safe to just crank the engine until pressure builds up or should I use the oil pump priming tool. If yes, does anybody know or have a picture or number of that tool that will fit my 1988 4.3 ltr. Mercruiser engine. There are plenty of pictures and offers of the tool on ebay and other internet sellers, but they are all for car engines and I am not sure if they will fit my engine because it uses the factory thunderbolt IV ignition module and distributor. With other words, does it matter if it is a car or marine engine and does it matter what distributor is on the engine, is it all the same or should I have to watch out for any differences? I asked the seller but as one can expect they have no clue. Their answer is, if it is a 1988 4.3 ltr Chevy or GM engine it should fit, but I am not trusting their word on that
There is a tool u can buy at most autopart stores that fits into the distributor hole. If my old memory is correct, it has a slot on one end to fit oil pump and the other end is hex to fit /3/8 drill. Turn on drill. Be sure to remove one valve cover to make sure u see oil pumped up through the push rods.
 

Scott06

Admiral
Joined
Apr 20, 2014
Messages
6,443
Priming tool is great but if the engine is already timed- aka distributor is stabbed in I’ve also had success taking the plugs out and running it on the starter until oil is present at rockers
 

Rivergator

Petty Officer 1st Class
Joined
May 7, 2013
Messages
224
Priming tool is great but if the engine is already timed- aka distributor is stabbed in I’ve also had success taking the plugs out and running it on the starter until oil is present at rockers
Distributor is properly installed on engine pointing to #1 spark plug wire on cap while #1 piston is at TDC and both valves are closed, but timing has not yet been set to 8 degrees ahead using a timing light because engine has yet to be started and run. I am not there yet. Using the starter routine was my initial thought and what I was going to do when I stumbled on to the priming tool, which makes more sense and seems to be safer. Yes, I probably could makeshift something myself that will work (I don't have an old distributor to use) but the tool is only $19 and free shipping so I think I will get it instead of taking the chance and damage a bearing or 2. Once I see oil coming out of the push rods I will put on the valve covers and start cranking the engine using the starter. Before I do that I will squirt some oil into each cylinder to lubricate the cylinder walls and I think I will have covered all the bases. After that on to the real test. See if she starts and runs under her own power. If there is anything else I need to pay attention to please let me know. Thanks
 

Scott06

Admiral
Joined
Apr 20, 2014
Messages
6,443
Distributor is properly installed on engine pointing to #1 spark plug wire on cap while #1 piston is at TDC and both valves are closed, but timing has not yet been set to 8 degrees ahead using a timing light because engine has yet to be started and run. I am not there yet. Using the starter routine was my initial thought and what I was going to do when I stumbled on to the priming tool, which makes more sense and seems to be safer. Yes, I probably could makeshift something myself that will work (I don't have an old distributor to use) but the tool is only $19 and free shipping so I think I will get it instead of taking the chance and damage a bearing or 2. Once I see oil coming out of the push rods I will put on the valve covers and start cranking the engine using the starter. Before I do that I will squirt some oil into each cylinder to lubricate the cylinder walls and I think I will have covered all the bases. After that on to the real test. See if she starts and runs under her own power. If there is anything else I need to pay attention to please let me know. Thanks
Do it however you like either way will be fine. Leave the distributor loose so you can turn it while cranking to get it to run doesn’t hurt to dump some gas down carb to get it going. do you have a roller or flat lifter cam ?
 
Joined
Mar 27, 2010
Messages
3,008
They work great. If you crank the engine over with the distributor out your have to bring it back up to TDC for #1 on the compression stroke.

You can also set the timing tab at 8°F BTDC or whatever your initial timing is, when you drop the distributor back in, set it so the rotor is pointing exactly at the post for #1 on the cap and lock it down, your timing will be set when you go to start it. You can put a piece of tape below the base of the cap on the aluminum distributor body under the #1 cylinder post, and use a sharpie marker for the center line of #1. This way with the cap off you know where to align up the rotor to...
 

Lou C

Supreme Mariner
Joined
Nov 10, 2002
Messages
12,681
When I replaced my cyl heads I just grounded the high tension lead from the coil to the distributor and cranked it over for like 10 sec and the oil pressure actually came up to 40 psi in maybe 5 sec. Did that twice with the oil cap off watching inside and it was all good. But use the tool if it makes you feel better.

Here's another tip for starting an engine that hasn't been started in a while (I do this my first start of each season). I hook up the water muffs and turn on the water. Then go up to the stat housing and disconnect the raw water intake hose, and pour water mixed with Dawn dish soap down that hose. That gets some lubricant down to the impeller to make starting after winter hibernation easier on the rubber... Reconnect the hose and let 'er rip....
 

stresspoint

Lieutenant Junior Grade
Joined
Sep 19, 2022
Messages
1,045
iv always filled the filter with oil , by that i mean filling allow to soak in until the filter can take no more oil .
when i build the motor i always use a good dash of assembly lube on everything .
first things first after motor goes in is to fill with oil and get the starter powered up .
as i am assembling i randomly crank the starter for 20 or so seconds every now and then during the assembly process .
when the time comes to fire up the oil pressure is already taken care of.

i have yet to ever use a priming tool , but hey if i had one in the tool box , i would probably give it a whirl before dropping the dizzy in.
 

Rivergator

Petty Officer 1st Class
Joined
May 7, 2013
Messages
224
Today I received the priming tool and I got right to it. I installed it in the hole where the distributor goes and with my cordless drill attached started to turn that baby clockwise. It took a few minutes because the oil filter was also empty and all of a sudden I saw oil coming out of the push rods. I was elated, I do not take my good luck for granted. Alright, oil pump works. Now I will put the distributor back and crank the engine a few more times using the starter just to give it the extra touch and assurance and then put the valve covers back on. As I proceeded to pull the oil pump priming tool out of the engine I saw to my horror that the oil pump extension shaft came out with it. I noticed that the priming tool fit was a little snug on the shaft and obviously pulled out the shaft too. Am I in trouble? Please say it ain't so. I noticed there is a retainer sleeve holding the shaft to the pump. What does this retainer do. Is it still on the oil pump or did it fall in to the oil pan? I will peek through the distributor hole tomorrow with a flash light to see what is. Can I somehow, carefully put the shaft back in and it will find its way to the sleeve and drop back on to the oil pump or am I screwed and have to pull the engine, drain the oil and drop the pan to fix this mishap?
 

Scott06

Admiral
Joined
Apr 20, 2014
Messages
6,443
I would get a scope camera and look if the retainer sleeve is still on the oil pump if it is you can probably get the drive shaft back in with some finagling and cursing … if it fell off into the pan you have to pull the motor.
 

Scott Danforth

Grumpy Vintage Moderator still playing with boats
Staff member
Joined
Jul 23, 2011
Messages
49,574
If the retaining sleeve is plastic, just leave it in the pan and get another
 

stresspoint

Lieutenant Junior Grade
Joined
Sep 19, 2022
Messages
1,045
i just went out to the shed and checked a motor to see what you are up against , sorry to say , it looks like you are pulling the sump .
it looks like the plastic sleeve cant be replaced from the top as it sits right on top of the pump and there is a hole about 1mm bigger than the shaft in the engine block ,so once the drive is removed it will just press off and drop to the sump as there is nothing stopping it.,
cant run without it or the shaft could wobble and chop up the oil pump or engine block where the shaft goes through.

i don't know the procedure for posting pics to give you insight from a disassembled motor.

edit , i just had a thought , you may have got lucky and it is balancing on top of the oil pump " fingers crossed for you ".
 
Last edited:

Rivergator

Petty Officer 1st Class
Joined
May 7, 2013
Messages
224
i just went out to the shed and checked a motor to see what you are up against , sorry to say , it looks like you are pulling the sump .
it looks like the plastic sleeve cant be replaced from the top as it sits right on top of the pump and there is a hole about 1mm bigger than the shaft in the engine block ,so once the drive is removed it will just press off and drop to the sump as there is nothing stopping it.,
cant run without it or the shaft could wobble and chop up the oil pump or engine block where the shaft goes through.

i don't know the procedure for posting pics to give you insight from a disassembled motor.

edit , i just had a thought , you may have got lucky and it is balancing on top of the oil pump " fingers crossed for you ".
stresspoint, I would love to see a picture of what it looks like inside the engine block where the oil pump shaft goes. A year ago when I rebuilt the engine I had it all apart but I can't remember what it looks like there. However, it is very easy to post a picture. On the left side bottom of this window it says: Attach files. Click on that and go from there.
Now the good news. Scott06, I do have a scope camera and I used it to look inside the distributor hole and it looked like the retainer sleeve was still sitting on top of the oil pump shaft. I used a piece of plastic tubing which fitted snuggly around the extension shaft and that's how I lowered the shaft back in to the plastic sleeve. Then I inserted a metal rod into the plastic tubing to hold the shaft firmly in position while I pulled up the plastic tubing. Then with the help of a flash light and a long screw driver I turned the shaft a little in each direction to make sure that it was indeed correctly in place and then I pushed on the screw driver and to my relief it made that feel and sound when something snaps right in. I believe there is a ring or call it shoulder inside the plastic retainer that is supposed to snap in around both shaft ends which are grooved and hence hold them together and in position.
 

Rivergator

Petty Officer 1st Class
Joined
May 7, 2013
Messages
224
When I replaced my cyl heads I just grounded the high tension lead from the coil to the distributor and cranked it over for like 10 sec and the oil pressure actually came up to 40 psi in maybe 5 sec. Did that twice with the oil cap off watching inside and it was all good. But use the tool if it makes you feel better.
Lou, when you cranked it over, was there a lot of oil coming out of the push rods. When I cranked my engine oil came out of some of the push rods but very little. It wasn't squirting or anything like that more like little drops. Is that because the engine is not going fast enough and will the pressure go up to 40 psi just by cranking? I am a little worried that I don't see more oil coming and faster. It took me a lot longer than 10 seconds, but then my oil filter was empty. I take that in consideration. Now I am more worried about how little oil I am seeing coming from the push rods.
 

Lou C

Supreme Mariner
Joined
Nov 10, 2002
Messages
12,681
It was about the same as what I've seen by taking off the oil cap with engine running, so it appeared fine to me....what I'd consider enough. Yes when I cranked it over 2 times for 10 sec each my oil pressure gauge went right up to 40 so that was good enough for me. When I started it after the top end rebuild it hadn't been run in about a year, although I make sure the cam lobes and roller lifters were well coated in motor oil when I put it back together.
After that I replaced the spark plugs and hooked up the high tension lead for the coil (not necessary to disconnect & ground if you use a remote starter switch) it started up so fast it startled me, I was half expecting it not to start!
The engine will crank over faster with the spark plugs out and a nice new PMGR starter, & fully charged battery. Now when I did this job all I did was replace the heads, the bottom end was not touched so I'm sure there was still some oil in the bearings, etc.
I use Mercruiser/Quicksilver 25/40 oil, it always gives me good oil pressure.
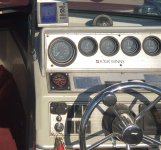
Idling while fishing a couple of years ago....
'88 FW instrument panel.jpg
 
Last edited:

Scott06

Admiral
Joined
Apr 20, 2014
Messages
6,443
stresspoint, I would love to see a picture of what it looks like inside the engine block where the oil pump shaft goes. A year ago when I rebuilt the engine I had it all apart but I can't remember what it looks like there. However, it is very easy to post a picture. On the left side bottom of this window it says: Attach files. Click on that and go from there.
Now the good news. Scott06, I do have a scope camera and I used it to look inside the distributor hole and it looked like the retainer sleeve was still sitting on top of the oil pump shaft. I used a piece of plastic tubing which fitted snuggly around the extension shaft and that's how I lowered the shaft back in to the plastic sleeve. Then I inserted a metal rod into the plastic tubing to hold the shaft firmly in position while I pulled up the plastic tubing. Then with the help of a flash light and a long screw driver I turned the shaft a little in each direction to make sure that it was indeed correctly in place and then I pushed on the screw driver and to my relief it made that feel and sound when something snaps right in. I believe there is a ring or call it shoulder inside the plastic retainer that is supposed to snap in around both shaft ends which are grooved and hence hold them together and in position.
Sounds like you were able to index the drive shaft back in the oil pump, if so i would drop the distributor in there remove spark plugs bump it on starter to ensure oil is moving up to rockers and building pressure. If so then you should be good to go.
 

stresspoint

Lieutenant Junior Grade
Joined
Sep 19, 2022
Messages
1,045
good result , thanks for posting (y).

ill take a pic later and attempt to post ,thank you for the hint.
 
Top