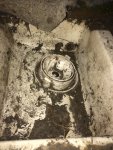
Newbie doing a first restore on a budget....this should be interesting!

FirstRealBoat

Petty Officer 2nd Class
Joined
May 24, 2015
Messages
126
Well, I just got a 1977 Super Craft Sportsman I5. At least that is what information I have been able to find. The floor is soft in a 18" area between the seats right before you get to the bowled area.

I have never done fiberglass repair, aluminum repair yes, fiberglass not. So I have some question that all you knowledgeable in the people might be able to help a fellow out with.

How do I get the floor out? I know I need to cut it, but where? How large of a section? Just the area I "Think" needs to be replaced or cut it all out and play a fresh deck down?

This boat from what I can tell is a double hull, how will me doing this effect the floatation it has to have for CG standards and safety (my kids will be on this boat, would rather swamp it than sink it).

Suggestions, advice and concerns are alway welcome. I won't get butt hurt if you tell me I'm an idiot for even messing with this hull. But it is the cards I was dealt and don't have $ to buy another that I will still have to work on anyways.

Thanks
 

Attachments

  • photo221621.jpg
    photo221621.jpg
    81.9 KB · Views: 1
  • photo221622.jpg
    photo221622.jpg
    180.8 KB · Views: 1

alldodge

Moderator
Staff member
Joined
Mar 8, 2009
Messages
42,216
Small, large chunks it all has to come out. Don't try to save anything on the floor. Try your best to not cut into the outer hull, if you do it to can be fixed, but just keep it in mind. It will cost plenty to tear apart and put back together. I have more the $2K in materials alone and I just was replacing the transom and some bulk heads, only partial replacements, but the stuff adds up quick.

The foam will run you maybe $500
 

gm280

Supreme Mariner
Joined
Jun 26, 2011
Messages
14,605
Well, I just got a 1977 Super Craft Sportsman I5. At least that is what information I have been able to find. The floor is soft in a 18" area between the seats right before you get to the bowled area.

I have never done fiberglass repair, aluminum repair yes, fiberglass not. So I have some question that all you knowledgeable in the people might be able to help a fellow out with.

How do I get the floor out? I know I need to cut it, but where? How large of a section? Just the area I "Think" needs to be replaced or cut it all out and play a fresh deck down?

This boat from what I can tell is a double hull, how will me doing this effect the floatation it has to have for CG standards and safety (my kids will be on this boat, would rather swamp it than sink it).

Suggestions, advice and concerns are alway welcome. I won't get butt hurt if you tell me I'm an idiot for even messing with this hull. But it is the cards I was dealt and don't have $ to buy another that I will still have to work on anyways.

Thanks

You couldn't have found a better place to post a boat refurbish project. There are tons of folks on here that are doing the same type things and can lean an ear or two to assist you in your endeavor. But I will tell you, it is going to get really dirty, itchy and smelly before too long and you will wonder why you chose to do this. But if you can hang with it, it will start getting a lot better and after you are finished, you will be a proud owner of a better then new boat... Seriously! I suggest you pick a boat project on these forums and start reading before hacking into your boat. Seeing how others started will give you an idea of how to start. And we love pictures so if you make the decision to continue, we will need pictures to help you along... If you are willing and able, let's get started... :thumb:
 

Daniel97

Cadet
Joined
May 23, 2015
Messages
25
Welcome aboard. I wish I had some information to give you but I have never done fiberglass repair. Keep us updated with plenty of pictures.
 

Woodonglass

Supreme Mariner
Joined
Dec 29, 2009
Messages
25,927
How do I get the floor out? I recommend using a standard Circular saw with the blade set to about 1/16" deeper than the thickness of the deck material.

I know I need to cut it, but where? Go around the perimeter of the outer edge of the sides of the hull.

How large of a section? Then cut cross sections and then use pry bars to peel up the sections.

Just the area I "Think" needs to be replaced or cut it all out and play a fresh deck down? I'd advise removing the entire deck. Boats of this vintage usually have a lot of issues below the deck as well. The Stringers, bulkheads and Transom will probably need replacing as well.

This boat from what I can tell is a double hull, how will me doing this effect the floatation it has to have for CG standards and safety (my kids will be on this boat, would rather swamp it than sink it). If there is foam below the deck you should replace it, either with pour in foam or with Plank Foam which you can get from the big box stores.

Realistically you can expect to spend 100 - 200 man hrs of work on restoring the boat and anywhere from $1,500 to $2,500 for materials.

See my comments above in Blue
 

steely85

Petty Officer 2nd Class
Joined
Apr 18, 2015
Messages
121
Wood on glass is spot on. That is how I got my deck out. As I have found out the hard way, there really is no rebuild on a "budget". No matter what corners you cut it will cost what wood on glass said. I researched and researched for about a year before I started my rebuild. There are plenty of people who post their material costs. I have no idea what mine is, i really don't even want to think about it. I have been purchasing supplies, vinyl, wood, foam and misc parts for my project since last summer just so it wouldn't hurt as bad when I tore into it.
Best thing to do is research, research research, keep on asking questions and posting your pictures. The best thing I think I did was went on youtube and watched friskoboater entire rebuild for his sea ray 220 over and over and over again. Then I watched it a few more times taking notes. :) It is one thin to have someone tell you verses watching someone do it vs reading about it. It sure cleared things up for me. Good luck and take care.
 

FirstRealBoat

Petty Officer 2nd Class
Joined
May 24, 2015
Messages
126
That is a lot of man hours, but then again what else do I have to do....lol

Well, I guess I will make an engine stand and pull the 1150 Mer and set aside. Pull the bump rail and start cutting.

Where do I cut the deck off at? Just below the top? or right where the bump rail was attached?

Sorry I will have loads of questions but will also post loads of pictures for your all amusement while I learn.....lol
 

FirstRealBoat

Petty Officer 2nd Class
Joined
May 24, 2015
Messages
126
I have been purchasing supplies, vinyl, wood, foam and misc parts for my project since last summer just so it wouldn't hurt as bad when I tore into it.
Best thing to do is research, research research, keep on asking questions and posting your pictures. The best thing I think I did was went on youtube and watched friskoboater entire rebuild for his sea ray 220 over and over and over again. Then I watched it a few more times taking notes. :) It is one thin to have someone tell you verses watching someone do it vs reading about it. It sure cleared things up for me. Good luck and take care.

I am figuring that this will be done by next summer. Going to do one step at a time and as money permits.

friskoboater's video's are nice. He takes the time to explain what it going on and why it is happening. Lots of video's just brush over the idea's and not explain it for dummies, or as the Army would say barney level of understanding!
 

Woodonglass

Supreme Mariner
Joined
Dec 29, 2009
Messages
25,927
Good luck with your timeframe. My project was Guess-Ti-Mated at 6 months 3 1/2 years later I finally splashed her!!! AND she was NOT a total rebuild!!!! Life has a funny way of making things happen!!! You cut the deck/floor about 2" just inside where it meets up with the inside of the sides of the boat. You remove the rubber insert from the rub rail on the outside of the boat and then drill out all the rivets or screws and then remove the top of the boat in order to be able to get the transom out. As previously stated, you should do a LOT of searching here on the forum and study the other members projects...You'll see what they did and learn a lot. This is...The Boat Restoration University!!!!;)
 

FirstRealBoat

Petty Officer 2nd Class
Joined
May 24, 2015
Messages
126
Good luck with your timeframe. My project was Guess-Ti-Mated at 6 months 3 1/2 years later I finally splashed her!!! AND she was NOT a total rebuild!!!! Life has a funny way of making things happen!!! You cut the deck/floor about 2" just inside where it meets up with the inside of the sides of the boat. You remove the rubber insert from the rub rail on the outside of the boat and then drill out all the rivets or screws and then remove the top of the boat in order to be able to get the transom out. As previously stated, you should do a LOT of searching here on the forum and study the other members projects...You'll see what they did and learn a lot. This is...The Boat Restoration University!!!!;)

I just got done watching all of friskoboaters video's. That simply amazing to see that kind of redo and rebuild. I'm going out of town this weekend, but next week I will be pulling the motor and starting the cutting, after I get the PPE for the job. Must have PPE! Fiberglass dust sucks!
 

gm280

Supreme Mariner
Joined
Jun 26, 2011
Messages
14,605
FirstRealBoat, when you get to the rub rail, use a hair drier and apply a little heat and the rubber portion of the rub rail will come out and maybe you can reuse it if you like. Because replacement rub rail is expensive... The screws or rivets will be seen after you remove the rubber rub rail insert. Remove them and that will allow you better access to split the top hull section (usually referred too as the cap) from the lower hull section. And before cutting anything, ask on here how to, so you can avoid making extra work for yourself... JMHO! :thumb:
 

FirstRealBoat

Petty Officer 2nd Class
Joined
May 24, 2015
Messages
126
FirstRealBoat, when you get to the rub rail, use a hair drier and apply a little heat and the rubber portion of the rub rail will come out and maybe you can reuse it if you like. Because replacement rub rail is expensive... The screws or rivets will be seen after you remove the rubber rub rail insert. Remove them and that will allow you better access to split the top hull section (usually referred too as the cap) from the lower hull section. And before cutting anything, ask on here how to, so you can avoid making extra work for yourself... JMHO! :thumb:

Good looking out, I was pulling on the rub rail today and it didn't budge. They are expensive, I was looking at them today online also! I have a heat gun and will try this method for sure, something require more attention than others.

Once I get the cap off I will be posting a lot of pictures and questions for sure!
 

FirstRealBoat

Petty Officer 2nd Class
Joined
May 24, 2015
Messages
126
With me being in the planning stages of this build, I have a couple questions about what to put under the decking.

I found the data plate for this boat! Well, at least 1/3 of it, but the 1/3 I found had the HP rating and the weight capacity. Which helped me figure out what I have, it is 1968 Super Craft Tri-Hull Sportsman. The boat either has a double Bottom or an air chamber, it says there isn't foam used till 1970.

I know about the expanding foam, but price, wow price! What about foam board cut to fit and compressed a bit with the decking? I have heard of people using.....wait for it.......Pole noodles! Slit so they slide together and fill the space too. Or if it has an air chamber, just make another one, if that is realistically possible.

Sorry for so many questions, I'm excited and want to plan a bit this week before I start really cutting into it.

Thanks
 

steely85

Petty Officer 2nd Class
Joined
Apr 18, 2015
Messages
121
I have heard about the pool noodles before, but not sure about those. (I haven't been around enough to give advice on those) But one of the ideas I had to save a nickle was to dual purpose my foam templates. My thought was to cut the foam templates I used for my stringers and transom into 2" blocks, and dump some down each hole until I was out, Then I would fill with the expanding foam. This way I would not have any waste to get rid of and it would help fill the void so I wouldn't need so much expanding foam. It wouldn't save much but it might be worth it.

As for an air chamber goes... using my same logic as before. You could take a foam sheet, cut it and glue it together to make a box. Then you could fiberglass the foam box making an "air chamber". I'm not sure about your applications shape or how strong it needs to be but just an idea. This is the concept I was going to use to make a cooler under my rear bench seat when I get to that point with my rebuild.
 

Woodonglass

Supreme Mariner
Joined
Dec 29, 2009
Messages
25,927
I'd recommend the Pink Or Blue Slab Foam from the Big Box stores but...I think you'll find it to be pretty pricey too. Pool Noodles work well too and can be purchased cheap in the off season. Air chamber realistically just doesn't work. Heck People have use stuff like coke bottles and ping pong balls!!!!:eek: Pretty much up to you.
 

dorelse

Chief Petty Officer
Joined
Feb 24, 2003
Messages
624
You really need to see how bad things are when you open up the floor. My 1986 Bayliner 1600 OB project I got creative, looked for bargains, closeouts, trolled ebay, etc as I was trying to maintain a strict budget of under $1k for the rebuild. I think I ended up at $850 if I remember right...however, I didn't need to do the transom or the floors.

In the end I had a very usable boat, that wasn't perfect (needed new bow cushions), but something we enjoyed having, and a boat I still regret selling. My new project is hopefully going to stick around a while.

Keep at it, work smart and you'll be fine! Stay motivated, there are days you simply aren't going to want to work on the boat...but get out there anyway and get something done and keep at it...I think that's the biggest challenge sometimes.

P7090190.JPG
 
Last edited:

FirstRealBoat

Petty Officer 2nd Class
Joined
May 24, 2015
Messages
126
You really need to see how bad things are when you open up the floor. My 1986 Bayliner 1600 OB project I got creative, looked for bargains, closeouts, trolled ebay, etc as I was trying to maintain a strict budget of under $1k for the rebuild. I think I ended up at $850 if I remember right...however, I didn't need to do the transom or the floors.

In the end I had a very usable boat, that wasn't perfect (needed new bow cushions), but something we enjoyed having, and a boat I still regret selling. My new project is hopefully going to stick around a while.

Keep at it, work smart and you'll be fine! Stay motivated, there are days you simply aren't going to want to work on the boat...but get out there anyway and get something done and keep at it...I think that's the biggest challenge sometimes.

P7090190.JPG

Thanks

I just got back from a trip to Ohio. So the fun begins. I'm going to figure out how to get this motor off. I don't trust my trusses, so I will have to find a tree and just lower it into the bed of the truck.

Will the motor be fine laying on it's side? Or do I NEED to make a stand? I don't have room for a stand, but can slide it (on a dolly) under the work bench.

First thing after motor removal is cutting floor out to see the stringer damage then go from there.
 

FirstRealBoat

Petty Officer 2nd Class
Joined
May 24, 2015
Messages
126
No Title

I was wanting to take the boat out and just do a float test. But don't want to till I get a new bilge put in, this leads me to my problem.

How do I change this bildge? I can't feel any screws or rivets or anything? I can't find a new top to just snap onto the bottom, so what are my options great boat people of iBoats.........lol

Thanks
 

Attachments

  • photo222392.jpg
    photo222392.jpg
    68.5 KB · Views: 1
  • photo222393.jpg
    photo222393.jpg
    64.3 KB · Views: 1

alldodge

Moderator
Staff member
Joined
Mar 8, 2009
Messages
42,216
I was wanting to take the boat out and just do a float test. But don't want to till I get a new bilge put in, this leads me to my problem.

How do I change this bildge? I can't feel any screws or rivets or anything? I can't find a new top to just snap onto the bottom, so what are my options great boat people of iBoats.........lol

Thanks

There has to be screws in the Vee but guess you cannot find them. Since you want to replace it anyway, just put something under the plastic and bust it out of there (wear safety glasses). Once removed you will see the screws, unless the prior owner used 3M 5200 to glue it to the deck

fetch
 

Pcolafisher

Petty Officer 2nd Class
Joined
Jun 26, 2013
Messages
188
What's going on with your boat? I was interested in following your progress.
Cheers,
Craig
 
Top