Need Kill switch Repair vs. Replacement 1985 6hp E6RCOB.

cprodave

Petty Officer 1st Class
Joined
Jul 1, 2012
Messages
301
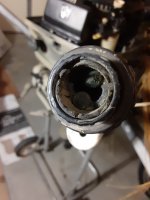
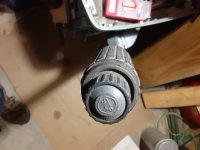
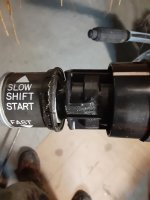
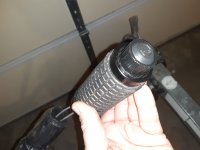
Does anybody know a cheap/redneck fix for this Stop Switch Assembly? It could be p/n 396115 or 398744 or 583975 for this Model/year. The rubber bulb is broken and I am unsure what other components were lost/misplaced when the bulb broke (while Previous Owner had the motor).
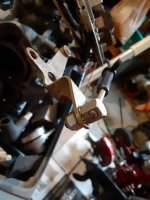
Retail Price from most sources for this is $142-145, lowest price I found was around $60 although I would not like to spend even $60 if possible. Of course I can use an insulated-handle flathead screwdriver to bridge across the 2 contacts thereby stopping engine. But I would like something a bit less crude and more convenient.
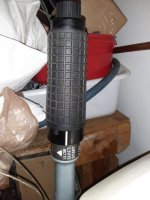
The hardening to brittleness is a known problem on rubber bulbs in these switches. I have 2 "Parts Motors" (1984 E6RCRM and 1986 E8RCDE) where the Rubber Bulb is hardened although not yet broken. I have tried to soften up the Rubber bulbs on these 2 motors using spray silicone, but they didn't soften-up much.
I'm thinking possibly a Rubber Bulb from chainsaw/trimmer/gasblower or lawnmower combined with some closed-cell foam or neoprene insulator/spacer actuating a conductive metal stud might work. RTV the "redneck assembly" into place, making it reasonably rainproof.
Any ideas/attempts/successes/failures?
 

cprodave

Petty Officer 1st Class
Joined
Jul 1, 2012
Messages
301
Photos added. Broken Rubber Bulb showing 2 electrical Contacts and 2 Hardened Rubber Bulbs from Parts Motors.
 

Attachments

  • 20210115_071545.jpg
    20210115_071545.jpg
    853.7 KB · Views: 8
  • 20210115_071650.jpg
    20210115_071650.jpg
    869.1 KB · Views: 8
  • 20210115_071737.jpg
    20210115_071737.jpg
    1,001.7 KB · Views: 8

racerone

Supreme Mariner
Joined
Dec 28, 2013
Messages
36,051
I can't believe the over engineering on these throttle handles.----All done to make it more efficient on the assembly line.------No regard to future repairs.-----I would go to an electrical supply store and install a simple toggle switch on the lower cowling.
 

cprodave

Petty Officer 1st Class
Joined
Jul 1, 2012
Messages
301
I can't believe the over engineering on these throttle handles.----All done to make it more efficient on the assembly line.------No regard to future repairs.-----I would go to an electrical supply store and install a simple toggle switch on the lower cowling.
Thanks Racer for the input. I too can't understand the overengineering/pricing. I am tempted to do the lower cowling switch as you suggest. I saw on youtube or similar a person installed a nice-looking pushbutton momentary switch for $5-10 from a farm supply store...
 

cprodave

Petty Officer 1st Class
Joined
Jul 1, 2012
Messages
301
On one of the "Parts Motors" that I have , the silicone soak method may have softened-up the Rubber Button enough to give this "one last shot" before I resort to installing a Dig-key etc Momentary Push Button Switch on the Lower Cowling. I hope this will also allow me to use (from the Parts Motor) the "SLOW SHIFT START FAST" #43 Throttle Control Plate.

How do I get the Stop Button Switch removed? I got the Twist Grip partially off, and removed the Nut from Arm at opposite end of the #41 Throttle Cable. I did read Leeroy's Ramblings on this, but don't understand "The twist grip slides off the end, but will not, UNLESS you screw in the slow speed ring all the way until it disengages allowing the kill switch to become unattached from the handle system (remember there are two wires to this kill switch). You can pull it forward just enough slack to remove the twist grip handle without cutting the kill switch wires." Where is this "Slow Speed Ring"? Is it the thingamajig feature (i.e. a Throttle Lock) in the end of the Tiller Handle/Grip that is intended to trolling, etc?

Sorry to be dense but I haven't seen/used one of these working properly, so fixing it is a special challenge. Thanks in advance.
 

cprodave

Petty Officer 1st Class
Joined
Jul 1, 2012
Messages
301
Photos added, sorry my camera in phone doesn't link to my laptop. Throttle Cable far end befor i removed the linkage to Arm, and Throttle Grip partially removed (but not far enough to access/remove Stop Switch Assembly). I am stuck here...
 

Attachments

  • 20210116_153743.jpg
    20210116_153743.jpg
    898.3 KB · Views: 9
  • 20210116_133956.jpg
    20210116_133956.jpg
    892.2 KB · Views: 9

Vic.S

Rear Admiral
Joined
May 4, 2004
Messages
4,690
You have to disconnect the stop switch wiring , ( or cut it if you are not reusing the switch)
You dont need to mess with the throttle cable to remove the switch and grip Maybe you do if you are changing the index ring (#43), don't know, but most people ignore the marking anyway ........ worn off mine years ago. Good idea to replace it with the #43A with a lock if that is what you are doing ( I wish mine could be locked).

IIRC to pull the grip off you need to depress a couple of little catches . They are not obvious and I cannot remember exactly where they are. I'll try to photograph them in the morning if you cannot find them bur probably wont post them until the evening, GMT
If you press the button in this hole. and another on the opposite side
you will be able to slide the grip c/w switch off

1610919801274.png
 

webbd

Seaman
Joined
Jul 20, 2011
Messages
64
Sometimes you can soften rubber by placing it in boiling water. Just a thought.

- DW
 

cprodave

Petty Officer 1st Class
Joined
Jul 1, 2012
Messages
301
If you press the button in this hole. and another on the opposite side
you will be able to slide the grip c/w switch off

View attachment 332009
Vic, thanks but i already pushed in the Buttons (yes there are 2 of them) and the twist grip came off partially--but then stuck (see rightmost photo above). It feels like the electrical wires to the switch are stretched tight, not allowing the grip to be pulled off any further. Does this sound familiar?
Webbd, yes i will try soaking the button if i can get the darn switch removed from the handle.
 

Vic.S

Rear Admiral
Joined
May 4, 2004
Messages
4,690
Vic, thanks but i already pushed in the Buttons (yes there are 2 of them) and the twist grip came off partially--but then stuck (see rightmost photo above). It feels like the electrical wires to the switch are stretched tight, not allowing the grip to be pulled off any further. Does this sound familiar?
Webbd, yes i will try soaking the button if i can get the darn switch removed from the handle.
Yes
As I said in my previous post you have to disconnect the wiring . The grip and switch, c/w wiring, should then come away together,
A new replacement switch comes with new wiring so you can cut the old wiring if you want to but if you are fitting an alternative type of switch to the lower cowl you'll probably want to reconnect and reuse the existing wiring,

Now would be a good time to consider fitting a stop button with a safety lanyard, either one for later model ( '86 ??) in the tiller or an alternative to the lower cowl.
 

cprodave

Petty Officer 1st Class
Joined
Jul 1, 2012
Messages
301
Yes
As I said in my previous post you have to disconnect the wiring . The grip and switch, c/w wiring, should then come away together,
A new replacement switch comes with new wiring so you can cut the old wiring if you want to but if you are fitting an alternative type of switch to the lower cowl you'll probably want to reconnect and reuse the existing wiring,

Now would be a good time to consider fitting a stop button with a safety lanyard, either one for later model ( '86 ??) in the tiller or an alternative to the lower cowl.
OK on the donor/PartsMotor I succeeded in creating enough slack in the 2 wires to pull the TwistGrip/StopButton off the Tiller Arm. Whether i use the donor motor Switch or a later model Stop Button with a Safety Lanyard then on the I will need to remove the Switch from the Twist Grip. How does the Switch disassemble from the Twist Grip?
Good point on the Lanyard--could save my life.
 

cprodave

Petty Officer 1st Class
Joined
Jul 1, 2012
Messages
301
BTW Sierra p/n MP28870 is a Stop Button with Lanyard for $25.99 that could mount on the Lower Cover or possibly even be fitted to the Tiller. Good alternative to OMC 398692 or equivalent 583974 which costs $143, correct?
 

cprodave

Petty Officer 1st Class
Joined
Jul 1, 2012
Messages
301
Without cutting the 2 wires I was able to create enough slack thereby able to pull out the Kill Switch Assembly. An interesting design to say the least! I did this on 2 Parts Motors and the the "recipient motor". By the 3rd time i had disaasembly quite mastered. I soaked the 2 Rubber Bulbs from Parts Motors i silicone for 5 days. Then i installed on the Recipient motor. It works! I have a 9.9hp with similar problem. On the 9.9 I will try re-annealing the rubber bulb--this might further prevent the bulb from cracking. Once a month or so i will spray the bulbs on all my motors to prevent cracking. If this doesnt keep the bulbs working (or even if it does) then installing a switch with lanyard on the lower cowling is next step.
 

Attachments

  • 20210121_205857.jpg
    20210121_205857.jpg
    2 MB · Views: 3
  • 20210124_212946.jpg
    20210124_212946.jpg
    1.4 MB · Views: 3
Top