My OMC, 305 V8 stinger has a Prop Lyft problem

craigkenney

Cadet
Joined
Aug 14, 2021
Messages
9
I have a 1980 seaswirl with an OMC stinger prop 3 solenoid lift up/down system. Since the last time I had it in the ocean and or lakes, have tried 3 lift motors thinking cheap might be just cheap but didn't solve the problem. The problem is the prop won't go up by itself without me lifting up the prop while hitting the up button. Electrically from switch to lift motor everything is good getting power and ground correctly, it does go down perfectly.
Parts replaced:
1. up solenoid
2. lift motor assembly--replaced to see if would help cause
3. tilt clutch assembly and seal kit--was replaced due to water in oil
Don't understand if there is anything else that i"m missing in the system that I'm overlooking. Not much found online about how the system operates other than the electrical portion.
Anyone know about these systems?
 

kenny nunez

Captain
Joined
Jun 20, 2017
Messages
3,290
With the drive down remove the rubber bumpers then back the 4 saddle mounting bolts 1 turn. Pump sone grease in the fittings, snug up the 4 bolts but not tight then try raising the drive, see if that helps. Then tighten them.
are the 2 plastic thrust washers on both sides of the spring coupling?
 

southkogs

Moderator
Staff member
Joined
Jul 7, 2010
Messages
14,922
Make sure you're getting all of the juice from the battery too.
 

craigkenney

Cadet
Joined
Aug 14, 2021
Messages
9
With the drive down remove the rubber bumpers then back the 4 saddle mounting bolts 1 turn. Pump sone grease in the fittings, snug up the 4 bolts but not tight then try raising the drive, see if that helps. Then tighten them.
are the 2 plastic thrust washers on both sides of the spring coupling?
I will try that, this weekend since it is raining here! thanks
 

craigkenney

Cadet
Joined
Aug 14, 2021
Messages
9
Make sure you're getting all of the juice from the battery too.
Yes, have plenty of voltage for the up/down motor. when I was messing with it the other day i put the prop up by hand and put a jack under it and took the toothed gear off the prop not the pump and the prop stayed in the up position, it should not do that, that's why I was thinking that saddle bolt area was not lubricated enough to slide correctly. I will try this weekend if weather is better! thanks
 

craigkenney

Cadet
Joined
Aug 14, 2021
Messages
9
With the drive down remove the rubber bumpers then back the 4 saddle mounting bolts 1 turn. Pump sone grease in the fittings, snug up the 4 bolts but not tight then try raising the drive, see if that helps. Then tighten them.
are the 2 plastic thrust washers on both sides of the spring coupling?
so went out tonight to try loosening the bolts and squirting grease into the fittings no matter the weather tried to get the prop to lift, sometimes it will travel about less then a 1/4 way up and stop. then anytime after that when i try to complete the cycle the lift motor just clicks and doesnt push it any higher.
What is the spring coupling, do you have a pic!
 

kenny nunez

Captain
Joined
Jun 20, 2017
Messages
3,290
The spring coupling is known as the “hammer blow coupling“ in the OMC service/parts manual. It gives the motor a free 1/4 turn before it engages the tilt worm shaft. Check post#2 about the plastic thrust washers. They center the coupling.
 

kenny nunez

Captain
Joined
Jun 20, 2017
Messages
3,290
The glass fuse holder that provides current to the tilt/trim solenoids can cause a problem. The fuse holders tend to loosen up and may be the reason. Remove the fuse and pinch the holder on both ends to give the fuse a better contact and also replace the fuse with a new 50 amp one. Or go to a NAPA store and get a “high current “ fuse holder that uses spade type fuses. Cut out the glass fuse holder and either solder or crimp the new fuse holder in. Be sure to get some 50 or 60 spade fuse.
 

Serf27

Petty Officer 2nd Class
Joined
Aug 23, 2018
Messages
167
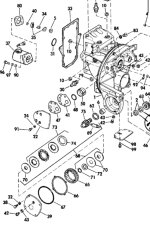
When I rebuilt my tilt clutch pack, I remember there was a pin/rod that had a screw I would tighten to increase pressure on the clutch packs. Too tight and it wouldn’t move. Too lose and it wouldn’t move.
I believe it was part no69 in this diagram.
 

Attachments

  • 698FED6B-A854-488B-A330-F7E302877899.jpeg
    698FED6B-A854-488B-A330-F7E302877899.jpeg
    508.2 KB · Views: 3

craigkenney

Cadet
Joined
Aug 14, 2021
Messages
9
The glass fuse holder that provides current to the tilt/trim solenoids can cause a problem. The fuse holders tend to loosen up and may be the reason. Remove the fuse and pinch the holder on both ends to give the fuse a better contact and also replace the fuse with a new 50 amp one. Or go to a NAPA store and get a “high current “ fuse holder that uses spade type fuses. Cut out the glass fuse holder and either solder or crimp the new fuse holder in. Be sure to get some 50 or 60 spade fuse.
I will look at this as soon as weather is better, dont want to dump any more water in the boat, thanks
 

craigkenney

Cadet
Joined
Aug 14, 2021
Messages
9
When I rebuilt my tilt clutch pack, I remember there was a pin/rod that had a screw I would tighten to increase pressure on the clutch packs. Too tight and it wouldn’t move. Too lose and it wouldn’t move.
I believe it was part no69 in this diagram.
they make two versions of this clutch pack system, mine is not the one listed in that pis.
 

craigkenney

Cadet
Joined
Aug 14, 2021
Messages
9
The glass fuse holder that provides current to the tilt/trim solenoids can cause a problem. The fuse holders tend to loosen up and may be the reason. Remove the fuse and pinch the holder on both ends to give the fuse a better contact and also replace the fuse with a new 50 amp one. Or go to a NAPA store and get a “high current “ fuse holder that uses spade type fuses. Cut out the glass fuse holder and either solder or crimp the new fuse holder in. Be sure to get some 50 or 60 spade fuse.
Took a look at both fuses and look in real good shape, and do have a tight fit. turned the bolts 2 1/2 turns lose, the ones that hold the upper end of the prop where you grease the zerk fittings didn't make the prop move any more than it could already move. with the ratcheting gear off the prop that meets the lift motor gear i can physically lift the prop into the far most position without a lot of effort. When i throw the switch to the up position it will move the prop 1/4 way and then make a clicking noise? like a battery volt issue and then the next hit with the button its a solid hit on the motor again but, doesnt move any further up?
 

kenny nunez

Captain
Joined
Jun 20, 2017
Messages
3,290
Did you disassemble the clutch pack? If so how did you manage to reinstall the thick snap ring that holds the bellville springs which provides tension on the clutch pack?
 

craigkenney

Cadet
Joined
Aug 14, 2021
Messages
9
Did you disassemble the clutch pack? If so how did you manage to reinstall the thick snap ring that holds the bellville springs which provides tension on the clutch pack?
I had taken a look at this clutch pack after i had replaced 3 lift starter motors thinking there is no way it's a starter problem, When I had opened the cover for the clutches it was water contaminated in the oil so There was no new clutch packs on the market so I went to the boat place in my city and they work on a lot of these and found me a clutch kit already put together with good clutches, I installed the clutch pack into the case with new seals and gaskets and still had the same problem! I just couldnt figure out why with all these new parts the starter cant seem to lift this prop!????
 

froggy1150

Master Chief Petty Officer
Joined
Nov 3, 2017
Messages
843
Have you bypassed everything and fed power directly to motor? I would try that. Get a good ground on the case and jump the up wire (should be blue).
I have also read that the aftermarket motors don't quite have the power the original ones have. There is also a thermal overload In Those motors that fails
 

kenny nunez

Captain
Joined
Jun 20, 2017
Messages
3,290
Try running a #10 ground wire directly from the negative battery terminal to where the negative from the motor is grounded. Do the same from the positive battery terminal with another #10 to the side of the solenoid that is connected to the fused feed wire. See if that makes a difference.
 
Top