Monmouth's 1979 Starcraft Kingfisher Rebuild

Monmouth00

Petty Officer 2nd Class
Joined
Nov 26, 2017
Messages
198
Hello All,
My eight year old son caught the fishing bug a few years ago. After a few trips out on a buddy's boat to a local trophy trout lake, he started asking about us getting a boat. I have never wanted a boat - my opinion was that it was always better to have friends with boats. But, when my wife started getting in my ear about how we owed it to the kids to give them memories of growing up on the water,I knew I was sunk. I reluctantly started looking for a boat.
I didn't want to spend thousands on a boat, because I wasn't sure we'd actually use it. I love to fish, but my weekends are filled with housework, and the kids always seem to have a birthday party or sporting event. I wanted to spend the least amount of money possible, until I was convinced my son't interest in fishing wasn't just a passing phase, and that it got used more than twice a season.
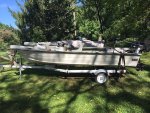
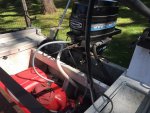
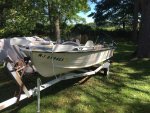
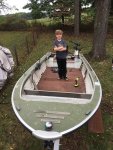
I found a 1979 Starcraft Kingfisher at the only marine shop near my house. I was warned that it leaked, but assured that it only takes on a few gallons after hours on the lake. I was told that the engine - a 20 Hp Mercury two stroke - had been fully serviced and had no problems. The boat, motor and trailer cost me $1,500 - which my parents later reimbursed me for as a 40th birthday present.
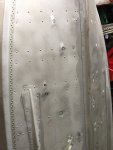
I got my boating license, and we got out on the water. It was a disaster. The battery was dead, so we had to re-trailer the boat and get a replacement. On the second launch, the boat took on about 10 gallons of water in the first hour we were on the lake, despite running the bilge pump on and off the entire time. The engine sputtered, and frequently stalled when I tried to put it into gear. It's amazing I didn't fry the starter considering how many times I stalled and re-started. I eventually had to use the trolling motor to get us back to the dock.
Despite all of this, my son and I fell in love with the "Rod Bender" (his choice). We were catching beautiful rainbow and lake trout. Trips to another nearby lake produced a few large dinners of whiper - hybrid white/striped bass. I was hooked. We were using the boat, and the boy is getting to be a really good fisherman.
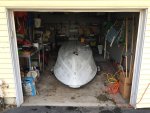
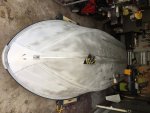
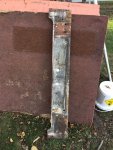
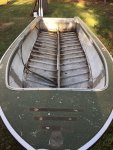
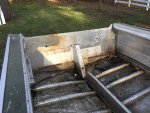
Due to a very busy work travel schedule, the boat came out of the water in September. In early October, we started work. It's happening on weekends, and going slowly, but I wanted to get this thread started to show you guys where we're at so far.
Many thanks to all of you who don't even know how much you've already helped. It's greatly appreciated, because I've never taken on a project like this before.
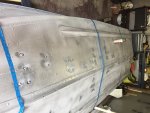
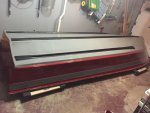
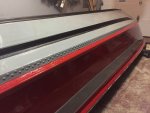
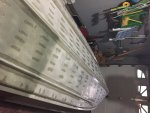
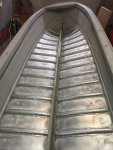
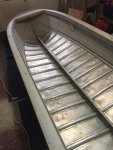
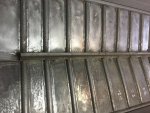
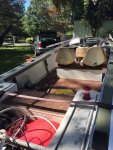
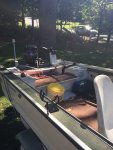
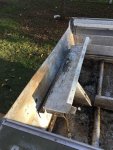
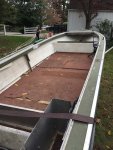
So, without further do, please meet the "Rod Bender," and please follow along as my son and I try to make it into something that doesn't leak and won't leave us bobbing on the far side of a very large lake at 1 a.m.
Thanks so much!
 

Attachments

  • photo282516.jpg
    photo282516.jpg
    314.3 KB · Views: 9
  • photo282517.jpg
    photo282517.jpg
    223.3 KB · Views: 9
  • photo282518.jpg
    photo282518.jpg
    251.2 KB · Views: 7
  • photo282519.jpg
    photo282519.jpg
    203.4 KB · Views: 7
  • photo282520.jpg
    photo282520.jpg
    189.3 KB · Views: 8
  • photo282521.jpg
    photo282521.jpg
    282.7 KB · Views: 10

jbcurt00

Moderator
Staff member
Joined
Oct 25, 2011
Messages
24,917
Welcome to the Tin-sanity

Beware the MBS....

good luck w your KF rehab
 

Monmouth00

Petty Officer 2nd Class
Joined
Nov 26, 2017
Messages
198
Teardown Begins!
My travel schedule for September an October was awful, but were were able to spend a weekend tearing the guts out of the boat.
Before we started, the outboard came off and went to a local small engine repair shop that came highly recommended. No, I wasn't taking it back to the marine shop where I bought it - after his gross underestimation of the leakage problem, and his assurance that the engine ran like a top, I wasn't giving him another opportunity to mislead me.
Teardown went pretty easy, especially considering how much I let my 8 year old do. This was always going to be a father-son project, as the boat is more for him than it is for me. He gets to learn how to use tools while building something he'll hopefully get to use for years to come.
The transom was of course a giant pain in the ass to remove - but it was necessary as it didn't look like it had ever been replaced. Once I understood which rivets needed to get drilled out, and got the hang of doing it without elongating the holes, it went pretty steady. Thanks for the tips on cutting the backs of the top rail. A $20 Harbor Freight cut-off tool made pretty quick work of them. The transom slid right out after that.
The one question I had in my mind was about the two "boxes" that sat on either side of the rear bench, and extend back to the transom. They were empty, and I wasn't sure what purpose they were serving. (you can see them in the first post) I emailed Starcraft, who said they were likely originally filled with foam for flotation. Not anymore, and they made getting to the engine and rear rod holders difficult, so they came out.
When it came time to pull the floor, I was surprised to find no foam underneath. None. That will be remedied before another floor goes in.The hull under the floor was in good shape. Minor pitting in places, but for the most part it was relatively solid.
It was a good weekend, and the boy was a great help.
 

Attachments

  • photo282522.jpg
    photo282522.jpg
    275.8 KB · Views: 8
  • photo282523.jpg
    photo282523.jpg
    262.6 KB · Views: 8
  • photo282524.jpg
    photo282524.jpg
    231.6 KB · Views: 7
  • photo282525.jpg
    photo282525.jpg
    250.3 KB · Views: 8
  • photo282526.jpg
    photo282526.jpg
    253.6 KB · Views: 7
  • photo282527.jpg
    photo282527.jpg
    224.3 KB · Views: 8

BWR1953

Admiral
Joined
Jan 23, 2009
Messages
6,052
All right! Another KIngfisher project! And another "the boy" to boot! Woohoo! :rockon: :rockon:

Welcome! :welcome:
 

Monmouth00

Petty Officer 2nd Class
Joined
Nov 26, 2017
Messages
198
Thanks, Fellas! I've got a ton of pictures, but I'll be posting sporadically. I don't want to load up the thread all at once, then leave it silent for weeks between posts.
Talk to you all soon!
 

BWR1953

Admiral
Joined
Jan 23, 2009
Messages
6,052
Thanks, Fellas! I've got a ton of pictures, but I'll be posting sporadically. I don't want to load up the thread all at once, then leave it silent for weeks between posts.
Talk to you all soon!
It's actually more helpful for everyone, yourself included, if you post pix and progress as you go along, rather than doing a bunch of work and then posting it after the fact.

If you post as you make progress, we'll be able to learn from you and also maybe provide you with some insight and tips. I know that I've certainly gotten a lot of great advice on my KF thread as I progress.

Keep up the good work! :)
 

Watermann

Starmada Splash of the Year 2014
Joined
Jan 12, 2013
Messages
13,754
:welcome: to the Starmada

Good see another little KF on the mend and a father - son project too!

Be sure you clean the transom skin really well to remove all that discoloration you can see which is corrosion.
 

Monmouth00

Petty Officer 2nd Class
Joined
Nov 26, 2017
Messages
198
It's actually more helpful for everyone, yourself included, if you post pix and progress as you go along, rather than doing a bunch of work and then posting it after the fact.

If you post as you make progress, we'll be able to learn from you and also maybe provide you with some insight and tips. I know that I've certainly gotten a lot of great advice on my KF thread as I progress.

Keep up the good work! :)

Ha! Learn from me? I don't have a clue what I'm doing. Everything I've done so far has been learned from you guys!

I'll get more posts up with pictures. I just have to catch up. I've done a ton of work since these pictures were taken. I just don't want to post everything at once, then not have anything for a long time.

Yes, the corrosion on the transom was taken care of. You'll see. ;-)
 

Monmouth00

Petty Officer 2nd Class
Joined
Nov 26, 2017
Messages
198
Okay - ask and ye shall receive.
The boat got torn down completely, as you saw above. I mentioned that I got started later that I had intended, so the cold weather hindered some plans. I had originally wanted to strip the paint off the boat myself, but when everything dropped to 50 degrees in a matter of a week, plans went out the window. The stripper I wanted to use needed to be used in weather 60 degrees or warmer. I could get the boat in the garage, and warm it up with an indoor propane heater I bought, but it had to be a well ventilated area too. So, long story short, I paid to have the boat blasted, inside and out.
The guy I used assured me he would be gentle on the thin aluminum, and guaranteed that he'd blasted a boat before with fine glass. He said it wouldn't get hot enough to warp the aluminum, but of course it did. It's not horrible, but there's a section towards the stern that is definitely bowed in a bit.
That was the least of my worries, though. The blasting revealed the source of all the leaking. I counted 61 missing, loose or broken rivets. Ouch. The previous owner had tried to stem the leaks with marine-tex.
I loaded the boat into my tiny one-car garage (please don't laugh) and took to it with an orbital sander to remove all of the marine-tex. Once done, I set about drilling the broken or missing rivets out with a 1/4" bit, one by one.
After I drilled a hole, I sunk a 1/4" aluminum rivet covered in 5200 in, and used the heavy-duty two-handed rivet tool I picked up on Amazon for $38 to pop it in place. Repeated 61 times.
On the advice of many in the forums, I made sure they were aluminum closed end blind rivets. These had steel mandrels, so I needed to address the gaping holes at a later date. First priority was to get all the rivets set.
 

Attachments

  • photo282603.jpg
    photo282603.jpg
    208.6 KB · Views: 5
  • photo282604.jpg
    photo282604.jpg
    184.9 KB · Views: 6
  • photo282605.jpg
    photo282605.jpg
    185.2 KB · Views: 3
  • photo282606.jpg
    photo282606.jpg
    194.8 KB · Views: 4
  • photo282607.jpg
    photo282607.jpg
    240.9 KB · Views: 5
  • photo282608.jpg
    photo282608.jpg
    277.1 KB · Views: 5

Monmouth00

Petty Officer 2nd Class
Joined
Nov 26, 2017
Messages
198
I had to make sure that the new rivets were sealed, and make sure the old ones that were left didn't leak more. I used a 1.8 Lb. can of Gluvit on every seam and rivet. I made sure to get plenty in the open ends of the new rivets. It went on smooth, and after curing with the help of my indoor propane heater, I was ready to paint.
I sourced some self etching primer from Amazon, and got a pretty sweet buzz applying it. Pro-tip: ventilate. I seriously lost IQ points that day.
Two coats of Duralux Marine Haze Gray on the bottom, with plenty of propane-assisted drying time int between. Then two coats of Regal Red Rustoleum Professional on the sides. The Boy requested the side stripe, which later got a black highlight stripe on the beveled edge above and below (not shown). Masking was a giant pain in my butt.
Because the lake we primarily fish has been badly affected by the drought in New Jersey this year, the bottom of the boat is usually hitting rocks during launch and retrieval. I decided to hit the nose and the strakes with truck bedliner to give it an additional bit of protection.
I'm pleased with the progress so far. I have the next week off, so this week will see me flipping her over, cleaning corrosion on the inside of the keel (this wasn't blasted, as there was no paint down there), and applying another can of Gluvit to the inside. Hopefully we get around to paint.
I don't intend to use self etching primer on the inside. Instead, I have a rustoleum latex aluminum primer that I can roll on. It's not for marine use, but the inside of the boat hopefully won't be getting wet too much. I just can't spare the brain cells to try to use the SEP again. I can get away with the Rustoleum latex aluminum primer, right?
 

Attachments

  • photo282611.jpg
    photo282611.jpg
    135.5 KB · Views: 3
  • photo282612.jpg
    photo282612.jpg
    161 KB · Views: 4
  • photo282613.jpg
    photo282613.jpg
    172.5 KB · Views: 4
  • photo282614.jpg
    photo282614.jpg
    160.7 KB · Views: 3
  • photo282615.jpg
    photo282615.jpg
    183.4 KB · Views: 4
  • photo282616.jpg
    photo282616.jpg
    257.8 KB · Views: 4
Last edited:

Watermann

Starmada Splash of the Year 2014
Joined
Jan 12, 2013
Messages
13,754
I would use a respirator when painting or primering. It might be alright but personally I wouldn't use latex primer under oil based paint.
 

Monmouth00

Petty Officer 2nd Class
Joined
Nov 26, 2017
Messages
198
I would use a respirator when painting or primering. It might be alright but personally I wouldn't use latex primer under oil based paint.

I used a cheap Home Depot mask. It wasn't enough. If I use SEP again, I'll invest in something more substantial. Trust me.

Considering the color scheme of the boat is grey and red, and the fact that the latex primer is a light grey, I was debating just using two coats of primer on the inside and leaving it at that. I will probably use the SEP on the inside stern (transom) and coat it with the same regal red Rustoleum. But the gunwales will likely just be grey.

I have the choice of two coats of the grey latex primer, or one coat of latex with the Duralux haze grey on top. Is the Duralux oil-based? I haven't been able to confirm.

Keep in mind that I had the boat blasted, and the inside surface is pretty rough. I don't think I'll have any adhesion issues with the latex primer.

I could potentially use the rattle can SEP from Home Depot and cover it with the Duralux. But again, the fumes are killer, and stink up the whole house.

What says the crowd?
 

jbcurt00

Moderator
Staff member
Joined
Oct 25, 2011
Messages
24,917
Duralux Marine thins w mineral spirits, so oil based enamel
 

MNhunter1

Lieutenant Junior Grade
Joined
May 12, 2014
Messages
1,025
Check out Aluma Hawk paint for the interior. They have it in grey and it goes right to bare aluminum without priming. Similar to the Duralux Aluminum Boat Paint, but the Duralux w/o primer only comes in green. I used the Duralux on my Nova and wouldn't hesitate to use it again.
 

Monmouth00

Petty Officer 2nd Class
Joined
Nov 26, 2017
Messages
198
Thanks. But can I get away with just the latex primer? Will it hold up over time? My budget isn’t super tight, but I’d like to try to get away with using what I’ve already bought. Thanks.
 

Watermann

Starmada Splash of the Year 2014
Joined
Jan 12, 2013
Messages
13,754
My issue with latex and oil based is between the 2 of them, I have no idea how well the latex AL primer works on the AL but I have to assume it would work alright. Do some research on that oil over latex or send duralex an email and ask. If they say it will be fine then I would move forward.
 

Monmouth00

Petty Officer 2nd Class
Joined
Nov 26, 2017
Messages
198
My issue with latex and oil based is between the 2 of them, I have no idea how well the latex AL primer works on the AL but I have to assume it would work alright. Do some research on that oil over latex or send duralex an email and ask. If they say it will be fine then I would move forward.

Thank you, Watermann, but I think you misunderstood my question.

I'm think of using JUST the primer. Since it's gray already, I don't think i'm going to put a top coat over it.

My question is if two coats of the Rustoleum latex primer, without a topcoat, will hold up over time.

If I don't put a topcoat over it, will it start peeling after a season?

Thanks!
 

Monmouth00

Petty Officer 2nd Class
Joined
Nov 26, 2017
Messages
198
Christmas break was not nearly as productive as I would have hoped. Family was in town, which sucked up most of my free time, but the boat did get flipped. The inside of the boat got a good working over with a wire wheel and an orbital sander. There was a good amount of corrosion, but very little pitting. It all came up very quickly with 120 grit and minimal effort. You can see how shiny it turned out compared to what I started with. (3rd pic)
Another 1.8 Lb. can of Gluvit was applied to all the rivets and seams. I hit the rear sections towards the stern, where there was more corrosion from sitting water, with a thin coat of Gluvit as well. I hope this protects it a bit better if the bilge doesn't drain completely in the future.
It's absolutely freezing in NJ right now, without relief in sight, so plans are changing a bit. It's too cold to paint, so I'm likely going to save painting for when it gets warmer. Instead, the boat will be re-trailered and covered outside.
I'll turn my attention to sealing the plywood floor that's already been cut. Then I'll cover it with the vinyl I've purchased. Once everything is sealed and vinyled, I'll lay it into the boat, and the whole lot will go to my metal guy for fabrication of the rear bench and casting deck.
I'm hoping I can get the driver's seat bench and console painted too. I can turn on the propane heater in the garage for that, I hope.
How am I doing so far? Anything I've missed or forgotten?
 

Attachments

  • photo283165.jpg
    photo283165.jpg
    192.2 KB · Views: 4
  • photo283166.jpg
    photo283166.jpg
    182.4 KB · Views: 5
  • photo283167.jpg
    photo283167.jpg
    215.8 KB · Views: 5

Watermann

Starmada Splash of the Year 2014
Joined
Jan 12, 2013
Messages
13,754
Looking good so far. I would add some primer and paint over the gluvit you put down to cover the bilge pitting.

Come on spring!
 
Top