I just used blue loctite on mine... then I coated the exposed metal of the stud on the drive side with a few layers of paint for good measure...
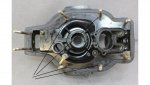
make sure you put the correct length studs in the right spots.. I had to fix mine in the middle of the install.. I have my install video below if it's of any use.
Excellent video explaining the "pitfalls." I experienced similar while rebuilding an old Proline a couple of years back. I couldn't find information concerning short bolts either!!!!!
One thing that you didn't mention (or I didn't hear) was the importance of your rebuilt transom thickness and parallelism. It is important, or your inner transom plate (also rear motor mounts) after torqueing will be canted too much port or starboard.
The inner transom rebuild needs to be almost perfectly flat too or after torqueing lock nuts, gaps between inner plate and inner transom skin may cause metal fatigue later on.
If transom builders don't try to adhere to the previous transom's thicknesses, on V8s, front motor mounts may have to be relocated or adjusted forward or backward. Mercruiser provides some "wiggle-room" but not much. I don't know how critical this is for 4 cylinders.
Any imperfections between inner plate and transom can be minimized by applying thickened epoxy or poly onto transom where inner plate will be attached. Be sure to use a releasing agent on metal, or you will not be able to remove plate later on (especially if epoxy was used). Draw up the four inner lock nuts to squeeze out excess. Once cured, you will have a perfect fit. Imperfections can also be minimized by not overlapping fiberglass seems close to transom plate. I made this mistake too! Ok to over lap but not near plate area or you will have to do a lot of grinding to make thickness parallel.
The former owner of my boat must have run out of gimbal studs when he retrofitted Alpha drives with Bravo 1 drives. . He used (4) 4.25" and (4) 4.75" studs. I cannot find any 4.25" studs on the WWW. I suspect that I will have to buy 4.75" studs, shorten and re-thread.
If my memory serves me correctly, the (2) shorter studs are needed so that they don't bind against the y pipe? I don't know where the remaining (2) short studs go. I guess I will have to "trial and error" it.
Excellent video and lots of work!!!!! THX! You didn't mentioned how you cleaned up all the 5200? Lots of acetone...