Mercruiser 165's First Engine Align, Having Trouble

ttownthomas

Petty Officer 2nd Class
Joined
Jun 7, 2019
Messages
191
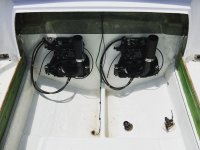
1974 Bertram 25. Twin Inline 6 Mercruiser 165's. I had the motors pulled to redo the transom and now the engines are back in -- I'm trying to align them myself for the first time. I'm struggling. One I have pretty close. On the port side I can slip in the alignment tool in until it is about 1" from bottoming out. Then only light taps from a 3lb dead blow hammer get it to bottom out. The stbd side I can only get about 3/4 inches into the splines and then it stops going in even with "taps".

Here are my questions:

Is it best practice to line it up close by eye? If I look into the stbd transom assembly with a flashlight looking through the bearing it looks like it is parallel to the bearing but low by like 1/4 inch or so. Does that mean I need to bring the mount way down?

How much side to side movement is there? In theory the aft side of the engine is fixed to the transom assembly right? I have not bolted the engine mount hardware in the the engine bed yet. Seems like I can move them a tiny bit side to side one way or the other with the dead blow hammer. Is there a best practice here?

Once i have it close, like on the port side, how much should I be turning the nut between attempts? I can turn the nut to lower or raise the mount in about 1/4 turn increments. Are we talking about moving it fractions smaller than quarter turns or is fine tuning it more like 4 x 1/4 turns?

I know its is supposed to slip in. Does that mean the tool should slip in all the way (3 fingers of pressure) until it bottoms out? The couplers are original...Dont know if that matters
 

alldodge

Moderator
Staff member
Joined
Mar 8, 2009
Messages
42,215
Looking does nothing to help.

Before starting to adjust the motor will sit on the rear mounts, Bolts snugged and will hang from a hoist on the front. Adjust the lower nuts so they just touch the lower side of the motor mounts.

Now adjust each side the same amount up or down

Bar should go in and out fully using 2 fingers.

Did the rear mounts on the transom plate look good and even?

Did the drives come off easy?

A new gimbal bearing will be tight. Put alignment bar in and smack the bar with your hands up/down/left/right
 

ttownthomas

Petty Officer 2nd Class
Joined
Jun 7, 2019
Messages
191
Before starting to adjust the motor will sit on the rear mounts, Bolts snugged and will hang from a hoist on the front. Adjust the lower nuts so they just touch the lower side of the motor mounts.
The rear motor mounts are not attached to the engine bed yet. I re-cored and re glassed the transom and engine bed
Did the rear mounts on the transom plate look good and even?
I used the original holes on the outside of the transom to install the rebuilt transom assemblies...Im not sure what you are asking
Did the drives come off easy?

A new gimbal bearing will be tight. Put alignment bar in and smack the bar with your hands up/down/left/right
It is a new gimbal bearing, I have tried smacking it....IM still missing somthing
 

Lou C

Supreme Mariner
Joined
Nov 10, 2002
Messages
12,756
I think alldodge is referring to the rubber engine mounts in the inner transom plate. The bellhousing sits on these mounts….
 

ttownthomas

Petty Officer 2nd Class
Joined
Jun 7, 2019
Messages
191
The transom plate has the rear motor mounts attached to it.
Oh...My mis read. Sorry. I replaced the bushings in the inner transom plates with new ones and re-used the double washers and collars. Everything was cleaned, sanded and repainted before install.
 

Attachments

  • DD96CF3E-690A-4BC5-8624-E0A6F66A9ADF.jpeg
    DD96CF3E-690A-4BC5-8624-E0A6F66A9ADF.jpeg
    257.4 KB · Views: 16

cyclops222

Lieutenant
Joined
Mar 21, 2024
Messages
1,426
Is there the SLIGHTIST chance someone has the motors NOT in their original spaces ? We had a bad time with swapped motors & parts. Took a while.
 

ttownthomas

Petty Officer 2nd Class
Joined
Jun 7, 2019
Messages
191
Is there the SLIGHTIST chance someone has the motors NOT in their original spaces ? We had a bad time with swapped motors & parts. Took a while.
The motors are for-sure in their original places. The transom assemblies were rotted and rebuilt replacements have been installed with the original inner transom plates, which may not be in the same place as they were before.
 

alldodge

Moderator
Staff member
Joined
Mar 8, 2009
Messages
42,215
Before starting to adjust the motor will sit on the rear mounts, Bolts snugged and will hang from a hoist on the front. Adjust the lower nuts so they just touch the lower side of the motor mounts.
This is key to start off with. Attaching the rear mounts then lifting the front of the motor gets things level with rear mounts. Once done then adjusting each the same amount up/down should keep it where it needs to be
 

ttownthomas

Petty Officer 2nd Class
Joined
Jun 7, 2019
Messages
191
This is key to start off with. Attaching the rear mounts then lifting the front of the motor gets things level with rear mounts. Once done then adjusting each the same amount up/down should keep it where it needs to be
The motors were lifted into place by a shop. I have a cherry picker but perhaps I should span the transom with a wooden header and winch it off the engine bed again?
 

todhunter

Canoeist
Joined
Sep 15, 2020
Messages
1,316
The motors were lifted into place by a shop. I have a cherry picker but perhaps I should span the transom with a wooden header and winch it off the engine bed again?
I would use the cherry picker to lift the front of the motor so it is floating. The rear of the engine will sit on the inner transom plate and pivot from there. This allows you to get alignment side to side really easy since the engine can swing some. Have one person man the cherry picker, very slowly raising it up, then have another person at the back with the alignment bar. When you find that sweet spot where it all comes together, do as AD said and start with the motor mount nuts at the bottom, then raise them the same amount (count the turns) until they contact the floating portion of the engine mount. Remove the alignment bar, then remove the cherry picker, then try the alignment bar with no cherry picker. You may have to come up on both nuts a small amount (evenly on both sides) to get the alignment just right after removing the cherry picker.

I can attest to it not being "two finger loose" with a new gimbal bearing. I spent hours trying to find this mythical alignment point, only to realize for my boat, it didn't exist. I can push my alignment bar in and pull it out with one hand gripping the back of the bar...having to heft my weight into it just a little bit. It's been fine for 3 years now, and I pull my drive every winter to check everything.
 

ttownthomas

Petty Officer 2nd Class
Joined
Jun 7, 2019
Messages
191
I would use the cherry picker to lift the front of the motor so it is floating. The rear of the engine will sit on the inner transom plate and pivot from there. This allows you to get alignment side to side really easy since the engine can swing some. Have one person man the cherry picker, very slowly raising it up, then have another person at the back with the alignment bar. When you find that sweet spot where it all comes together, do as AD said and start with the motor mount nuts at the bottom, then raise them the same amount (count the turns) until they contact the floating portion of the engine mount. Remove the alignment bar, then remove the cherry picker, then try the alignment bar with no cherry picker. You may have to come up on both nuts a small amount (evenly on both sides) to get the alignment just right after removing the cherry picker.

I can attest to it not being "two finger loose" with a new gimbal bearing. I spent hours trying to find this mythical alignment point, only to realize for my boat, it didn't exist. I can push my alignment bar in and pull it out with one hand gripping the back of the bar...having to heft my weight into it just a little bit. It's been fine for 3 years now, and I pull my drive every winter to check everything.
In my case the front motor mounts are NOT connected to the boat currently. I think that means I will need to adjust the top and bottom nut to LOWER the mounts into place and then drill and lag screw them in place. A cherry picker will be tricky here because I cannot access the adjusting nuts without opening the deck hatch. Is it unusual to use timbers spanning the gunnels to lift the front of the engine?
 
Last edited:

Scott06

Admiral
Joined
Apr 20, 2014
Messages
6,478
In my case the front motor mounts are NOT connected to the boat currently. I think that means I will need to adjust the top and bottom nut to LOWER the mounts into place and then drill and lag screw them in place. A cherry picker will be tricky here because I cannot access the adjusting nuts without opening the floor hatch. Is it unusual to use timbers spanning the gunnels to lift the front of the engine?
you can use timbers spanning the gunnels no issue. Could also hang a chain fall off a roof joist

They are not that heavy so you can shove the engine around a bit when on the front mount.

were you able to get any witness marks on the tool to show you which way top go? You would be best to remove floor hatch and be able to get in there multiple times
 

Scott06

Admiral
Joined
Apr 20, 2014
Messages
6,478
I can attest to it not being "two finger loose" with a new gimbal bearing. I spent hours trying to find this mythical alignment point, only to realize for my boat, it didn't exist. I can push my alignment bar in and pull it out with one hand gripping the back of the bar...having to heft my weight into it just a little bit. It's been fine for 3 years now, and I pull my drive every winter to check everything.
I had same issue on my boat. Got it very close then subsequent adjustments made if go farther away from ideal. Jerked myself off for afternoon trying to get it right, never got textbook witness marks on the bottom of alignment tool. Been haven't touched it since in 9 summers, alignment hasnt moved drive goes on and off like butter
 

alldodge

Moderator
Staff member
Joined
Mar 8, 2009
Messages
42,215
In my case the front motor mounts are NOT connected to the boat currently.
Install front mounts on motor mounts
Pickup front of motor (in the center) just enough for mounts to be off the deck.
Lower motor down and mark mounting holes.
Install lag screws

Now lift the motor off the mounts and start the leveling as mentioned previously

A cherry picker will be tricky here because I cannot access the adjusting nuts without opening the deck hatch. Is it unusual to use timbers spanning the gunnels to lift the front of the engine?
Guess I'll need a pic to see the issue(s)
I would assume the hatch has to be open to do all of this
 

kenny nunez

Captain
Joined
Jun 20, 2017
Messages
3,305
I agree with the 2 fingers feel. I have seen myself beat the hell out of the alignment tool up/down/left/right and still not able to get it where I wanted it.
As long as you do not have to “pile drive” the drive on it should be good. Usually as the boat gets a few hours everything falls into place. I bet next time the drive is removed you will have the correct feel.
 

ttownthomas

Petty Officer 2nd Class
Joined
Jun 7, 2019
Messages
191
Guess I'll need a pic to see the issue(s)
I would assume the hatch has to be open to do all of this
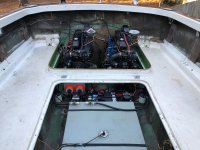
This picture is several years ago before the restoration. The batteries, battery wiring and fuel lines are removed right now because of all the glass work I did. The front motor mounts are about 1 inch from the raised fiberglass edge and you have to go in from the fuel/battery compartment to get a wrench on them. I dont have a lifting eye. Sounds like I should get one. Or fabricate one. Am I correct that it attaches to the top of the thermostat housing?
 

Attachments

  • IMG_2678.jpeg
    IMG_2678.jpeg
    2.4 MB · Views: 12

alldodge

Moderator
Staff member
Joined
Mar 8, 2009
Messages
42,215
ok, about what I thought the hatch would be open, and also why a cherry picker could not be used. Could use wood across the gunnels to hoist also
 
Last edited:
Top