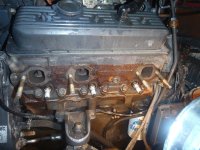
Manifolds (Trying to figure out what I am looking at)

Pmt133

Chief Petty Officer
Joined
Jan 6, 2022
Messages
594
I agree I don't think the shutters are/were the issue in my current situation.

I never got around to testing last night. Ended up getting hung up and now I'm back at work... I will test eventually... it is just difficult right now with the boat not being at my house.

It's still suspect that this is more or less what happened to the engine prior to the rebuild. But I'm not jumping to conclusions until I test. I checked the mating surfaces prior to assembling the elbow/manifold but maybe a defect in the gasket or a smudge of dirt or something.... I will report back.
 

Scott06

Admiral
Joined
Apr 20, 2014
Messages
6,476
I agree I don't think the shutters are/were the issue in my current situation.

I never got around to testing last night. Ended up getting hung up and now I'm back at work... I will test eventually... it is just difficult right now with the boat not being at my house.

It's still suspect that this is more or less what happened to the engine prior to the rebuild. But I'm not jumping to conclusions until I test. I checked the mating surfaces prior to assembling the elbow/manifold but maybe a defect in the gasket or a smudge of dirt or something.... I will report back.
Use the oem merc gaskets they are silver and have I think metal inside vs a paper gasket
 

tank1949

Lieutenant Commander
Joined
Apr 4, 2013
Messages
1,896
I had the manifold-to-riser joint gasket fail one day in the spring when the boat was on a trailer. This failure hydrolocked the motor.

I removed the spark plugs and blew out the water and squirted oil into the cylinders. Then I pulled the manifold and riser and using a piece of plate glass and some emery paper, trued up the joint. I used some of those thick, silver Quicksilver gaskets on the joint, and never had another issue with it.

I do not think your issue was ever the exhaust shutters. My boat was kept in the saltwater, and faced many storms, w/o any exhaust shutters or water infiltration.
I had a sea ray with no shutters and had no problems, but friends with other boats had issues with water coming back into riser. I suspect that boaters who back down a lot have more issues that not. Sierra told me over phone that their riser gaskets do not require sealant. they also sell lots of gaskets and motor parts. I don't see how adding a thin layer of Permatex on gasket wouldn't help.
 

Lou C

Supreme Mariner
Joined
Nov 10, 2002
Messages
12,753
I think the hard part is trying to figure if water intrusion is due to reversion or static water line issues. Two totally different things. Reversion apparently became more of an issue with the introduction of the Vortec engines especially on the V6. In fact Volvo changed the shape of the 90* aluminum down pipes & added check valves to break the vacuum that develops in the exhaust system due to reversion. I have those 90* down pipes on mine since I converted from the old OMC one piece V6 exhaust (similar to Merc’s) and mine still has the original OMC flappers. So far I’ve never had water back up the exhaust on this pre Vortec V6 with either design exhaust system.
You can measure if your static water line is too high & fit taller elbows or riser blocks if needed. If your boat gained weight over the years it can be a cause.
I used the Barr Marine aftermarket exhaust & their gaskets coated with Permatex Aviation & no signs of leaks at all in 4 seasons in salt water. I’ll probably replace the elbows & check the manifolds & replace if needed at the end of the 5th season…..

BTW while Volvo recommended removing the OMC Cobra style flappers in 97 or so they eventually changed the design of the upper Y pipe to incorporate a kind of grate to block the rush of incoming water. So while people think Volvo dropped the flappers there must have been some problems for them to go back & redesign the top of the Y pipe.

you can see the "grate" in this pic....not sure if it works better or worse than flappers, but they can't fail and block the exhaust I guess....
 
Last edited:

Pmt133

Chief Petty Officer
Joined
Jan 6, 2022
Messages
594
The static level is worth measuring as the boat does sit lower with a 4.3l than it did with the 3.0l.

Again, this is all speculation as I haven't gone further but I have a feeling whatever the issue is will reach out and kind of slap me in the face once I actually start looking beyond what my eyes saw...
 

Pmt133

Chief Petty Officer
Joined
Jan 6, 2022
Messages
594
So I'm actually more confused than when I started out. Allow me to explain. This morning I did the following:

Pressure test the block to 18 psi. I lost half a psi in about 20 minutes. I noticed the weep hole on the water pump is dripping as is a small amount of air escaping the plug in the thermostat housing. I sprayed the exhaust ports down with a soapy water mixture and saw no bubbles. So I moved on.

I filled the port manifold, the one that had water in it, with water and let it sit for half an hour. No leaks.

I then pressure tested the exhaust side of the manifold to 12 psi on both pairs for ~20 minutes. No change in pressure. I put clay over and plugged the water ports so only the small weep hole on the bottom of the manifold elbow was exposed and kept bubble checking it. No change.

Now I'm not imagining this... possibly it was all condensation in the exhaust? But it's awfully rusty for just that and that doesn't explain the vapor I'm seeing out the breather when running... which to me indicates at least some water is getting in somehow. Static height explains how it happens in the water but I see it just as much on land. So am I missing something or was it all just coincidental?
 

stresspoint

Lieutenant Junior Grade
Joined
Sep 19, 2022
Messages
1,046
don't discount the exhaust port leaking under a static pressure test ,
bend a bit of coat hanger wire and stab it hard at the top of the exhaust port just on the high bit about 1/2 inch from the valve stem.
according to my head machining guy it happens a bit on salt water heads.
 

Lou C

Supreme Mariner
Joined
Nov 10, 2002
Messages
12,753
When I pulled off the cyl heads on mine to fix the overheat damage I took em to a local machine shop & not only were there cracks from the overheat but you could see the cooling passages were getting eroded from years of raw water cooling. So even if the heads could have been welded replacement was the best option. The last thing you’d want was a hydro lock from a rotted head that bends a con rod esp if you have a chance to avoid it. At the time I did that repair the heads were only $ 550 for the pair; cheaper than new exhaust!
 

Lou C

Supreme Mariner
Joined
Nov 10, 2002
Messages
12,753
So I'm actually more confused than when I started out. Allow me to explain. This morning I did the following:

Pressure test the block to 18 psi. I lost half a psi in about 20 minutes. I noticed the weep hole on the water pump is dripping as is a small amount of air escaping the plug in the thermostat housing. I sprayed the exhaust ports down with a soapy water mixture and saw no bubbles. So I moved on.

I filled the port manifold, the one that had water in it, with water and let it sit for half an hour. No leaks.

I then pressure tested the exhaust side of the manifold to 12 psi on both pairs for ~20 minutes. No change in pressure. I put clay over and plugged the water ports so only the small weep hole on the bottom of the manifold elbow was exposed and kept bubble checking it. No change.

Now I'm not imagining this... possibly it was all condensation in the exhaust? But it's awfully rusty for just that and that doesn't explain the vapor I'm seeing out the breather when running... which to me indicates at least some water is getting in somehow. Static height explains how it happens in the water but I see it just as much on land. So am I missing something or was it all just coincidental?
What about your elbow to manifold gaskets? Is this a wet joint or dry joint?
 

tpenfield

Moderator
Staff member
Joined
Jul 18, 2011
Messages
18,065
Just trying to connect some of the dots . . .

"Manifolds were full of -50 F non-toxic antifreeze" . . . OK from winterization?

"Fresh Rebuild" . . . OK, what cam shaft may have been installed? Marine engines with wet exhaust need really mild cam shafts. In a quick search I was not sure about finding your engine rebuild thread.
 

Lou C

Supreme Mariner
Joined
Nov 10, 2002
Messages
12,753
What I'd want to do, even tho it's a pain, is remove the manifolds & elbows & set them up level, so you can see into the exhaust ports, and fill with water. Let it sit and heat the side of manifold with a heat gun to about 140* or so. See what happens....
Here's a pic of my 4.3 from a long time ago (2011 I think) when I still had the OMC one piece V6 manifolds. I had to change them every 5-6 seasons. Note that there is no rust whatsoever in the exhaust ports and this is a 100% salt water boat, moored in salt water all season. The rust on the cyl head is just from moisture from condensation held against the head by the larger style exhaust gasket.
OMC 4.3 during manifold replacement 6-2011.jpg
 

Pmt133

Chief Petty Officer
Joined
Jan 6, 2022
Messages
594
Just trying to connect some of the dots . . .

"Manifolds were full of -50 F non-toxic antifreeze" . . . OK from winterization?

"Fresh Rebuild" . . . OK, what cam shaft may have been installed? Marine engines with wet exhaust need really mild cam shafts. In a quick search I was not sure about finding your engine rebuild thread.
Yes on the winterization. Raw water + NJ means I have to.

On the rebuild, I don't have the folder near me but it was a sierra PN that crossed to a mercruiser part number for that engine year range. I didn't have a serial number for the engine as it was rebuilt once before so we used the drive serial number to get a date range. My rebuild thread is the popped through the intake thread which was basically me pulling the engine and having the machine shop do it because I didn't have the time. But they did run through everything. This is arguably one of the tamest sounding 4.3Ls I've ever been around. I'm used to them having some chop or rumble being a six cylinder and this thing just idles like a civic... I'm also used to the 3.0l which was quite choppy by comparison.

I'll also add that there appears to only be 2 possible part numbers for the 4.3l. I have the one that crosses to the later number, but is still used in the 4v quicksilver rebuilds if I'm recalling. But that still wouldn't explain why it is only effecting one bank even if it is reversion...

What I'd want to do, even tho it's a pain, is remove the manifolds & elbows & set them up level, so you can see into the exhaust ports, and fill with water. Let it sit and heat the side of manifold with a heat gun to about 140* or so. See what happens....
Here's a pic of my 4.3 from a long time ago (2011 I think) when I still had the OMC one piece V6 manifolds. I had to change them every 5-6 seasons. Note that there is no rust whatsoever in the exhaust ports and this is a 100% salt water boat, moored in salt water all season. The rust on the cyl head is just from moisture from condensation held against the head by the larger style exhaust gasket.
View attachment 393073
The flow test was done on my work bench. I do have a heat gun and could try that and see what happens... or I could also run heated water through them as I have a 160 gallons of heated water just inside the door....

I'm also, with a clearer head, going to go back and retest the manifold in question. I do want to get back on the engine but it hasn't stopped raining since this time yesterday and I'd prefer to keep the inside of the boat as dry as possible for now...

the plan is an extension on the boot off the elbow with a cap to seal the water side. I have the exhaust portion of the manifold/elbow assembly sealed with a plug at the moment that will allow me to only pressurize the water side. I'll take it up to 20 static which should be more than that system would ever see and probe around. I'm also taking my borescope and inspecting the joint itself from inside the port. I'm going to get to the bottom of it. If that don't come back conclusive I'm going to turn back to the block but unless the rain let's up I don't think it's happening.
 

tpenfield

Moderator
Staff member
Joined
Jul 18, 2011
Messages
18,065
Often this type of troubleshooting becomes a process of elimination. So, you should probably check the cam shaft P/N and related spec's to either eliminate it or consider it.
 

Pmt133

Chief Petty Officer
Joined
Jan 6, 2022
Messages
594
Often this type of troubleshooting becomes a process of elimination. So, you should probably check the cam shaft P/N and related spec's to either eliminate it or consider it.
I'll dig through the paper work later and see if I can find the P/N. Then I can rule it out. I have the old cam on the work bench which was the same part number that has a 2d matrix on it I can't decode... chances are it'll cross to the part number/cam card as most GM cores do...

In the meantime, I did as suggested and propped up the manifold and elbow assembly and filled to the top with water. I then heated it through the exhaust port with my heat gun until it was fairly warm to the touch... normal running temp. (I forgot my IR gun). I then let it sit for about 2 hours... not a drop. I then went through the port with my borescope as best I could to inspect the gasket joint surface between the elbow and manifold and didn't see anything of interest. there was a small spec of rust but it looks more like surface rust than a leak down the port.
 

stresspoint

Lieutenant Junior Grade
Joined
Sep 19, 2022
Messages
1,046
Often this type of troubleshooting becomes a process of elimination. So, you should probably check the cam shaft P/N and related spec's to either eliminate it or consider it.
this is why OP needs to be stabbing at known areas of corrosion / rust areas with a sharp object .

most of the time the rusted area cant be seen till it is at operating temp ( as Lou suggested to heat and look for sign of water intrusion).

i find swabbing or scratching with a bent coat hanger wire will push a hole in the rust and make it become obvious .
OP should keep in mind a very small pin hole is all that is needed to create the amount of water he is getting , poking around generally opens the can of worms " sometimes not where we want " but better than it opening up when out on the water.

the next step foe OP after all other steps are taken is a dye penetrant testing kit , this is time consuming , however well worth the investment as it will make fine cracks or pin holes show.

the 4.3 and the SB Chev are much alike when it comes to common corrosion areas , so a google search will be helpful to OP to find where to look.
 

Pmt133

Chief Petty Officer
Joined
Jan 6, 2022
Messages
594
this is why OP needs to be stabbing at known areas of corrosion / rust areas with a sharp object .

most of the time the rusted area cant be seen till it is at operating temp ( as Lou suggested to heat and look for sign of water intrusion).

i find swabbing or scratching with a bent coat hanger wire will push a hole in the rust and make it become obvious .
OP should keep in mind a very small pin hole is all that is needed to create the amount of water he is getting , poking around generally opens the can of worms " sometimes not where we want " but better than it opening up when out on the water.

the next step foe OP after all other steps are taken is a dye penetrant testing kit , this is time consuming , however well worth the investment as it will make fine cracks or pin holes show.

the 4.3 and the SB Chev are much alike when it comes to common corrosion areas , so a google search will be helpful to OP to find where to look.
I would've went back out and took a crack at the block but being we accumulated nearly 3 inches of rain in the last 48 hours all of which occurring while I was awake... I worked on the manifolds as I value being dry and the boat as well.... and the manifolds were already on the work bench. Next step when I am off again Monday is to reassess the block and heads and find the damn paper for the camshaft. I have one of those 3/8 heavy duty pick sets... it'll make short work of anything should there be an issue or rust spot...
 

stresspoint

Lieutenant Junior Grade
Joined
Sep 19, 2022
Messages
1,046
out of curiosity ? ,have you compression tested the cylinders.is so was there anything abnormal on that cylinder.

a long time back i had a L18 Datsun motor that had a weeping/seeping head gasket right beside the exhaust valve , took us a long time to figure why the the thing was going through coolant but no sign of any running issues , being an alloy head the only way we found it was the rust and wash on the cast exhaust manifold.
compression was slightly low on that cylinder like about 2 or 3 psi but we put that down to the 200.000k on the clock.

just thought i would throw that one out there for you to concider when you gety back to your inspections.
 

Pmt133

Chief Petty Officer
Joined
Jan 6, 2022
Messages
594
I actually compression tested it a week or two before my last big trip... so september or so but there were five or six more outings after that. Figured with nearly 50 hours on the rebuild that would be a good A/B to the original test after the first run. I didn't observe any anomalies... 155-160 psi across the board. I'll note that may seem low for a fresh rebuild but my tester reads lower than most... I've put it on 12:1+ big blocks that have high cranking compression on other gauges and I'll only get 175 as a high. I typically look for consistent readings more than what the number is anyway. While a cold compression test may not be the best it would be something else to check against and I'll add it to the list.
 
Top