Looking for some help

Nordin

Commander
Joined
Jun 12, 2010
Messages
2,555
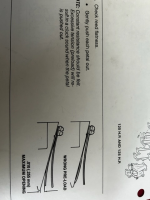
Have all pedals at each V-block a gap of 0,010 in or just some of them?
The pedals should close completely to the mounting V-blocks, some can have a slight gap.
0,010 in gap sounds to much in my opinion, 0,003-0,005 in (0,07-0,10 millimeter) would be acceptable and at some of them.
I use a flash light or just look and see if I can see a gap. Sometimes I use a feeler gauge to measure.
 

The Force power

Commander
Joined
Feb 3, 2019
Messages
2,335
The service manual says;
0.10 (.255mm) maximum opening ALLOWED
Like Nordin asked; are all the pedals having this gap? & check with a flashlight how many?
If the motor is running with "bad" valve reeds it would be spitting fuel out the carb's throat
Do not flip the pedal reeds around! there will be a too strong of preload
***********************TO SET UP THE ENGINE***************************
Here's a old post (from the late Frank) that I have printed out & live by;
1.Disconnect the ball link to the carb cam at the timing tower. Disconnecting at the cam risks bending the cam. Move the cam away from the carb roller.
2. Loosen the screw(s) on the aluminum tie bar and let all carbs close completely, then tighten again.
3. Set the cam so that the scribed line is pointing directly at the black roller on the carb lever. If the cam has two closely spaced lines, set the black roller directly between them.
4. The black roller is held with an offset screw and nut. Loosen the nut and turn the screw until the black roller JUST touches the cam. Tighten the nut and re-attach the ball link maintaining the scribed line at the roller.
5. Adjust the ball link so that at full throttle the bottom carb butterfly opens substantially horizontally. Adjust the aluminum tie bar so all carb butterflies open equally at full throttle. They need not be perfect but should be rather close to horizontal for best performance.
6. Adjust timing to 28 degrees before top dead center at full throttle. ( STATIC TIMING / CRANKING SPEED )
7. Adjust idle speed to 700-750 RPM in the water in forward gear. Do this with the screw on the bottom of the timing tower. Loosen the locknut and adjust. Screwing in increases idle speed. Do this in small increments and let the engine rev and adjust itself before the next adjustment. A little goes a long way here. When correct, tighten the nut. Note that the scribed line on the roller will now be (usually) below the black roller a bit.
8. NOW we adjust the mixture on the carbs. Set all low speed needles to about 1 1/4 turns out from lightly seated. Do not force as this will damage either the needles or the seats.
8A. With the engine idling in neutral, turn each the needles in equally about 1/8 turn at a time. Give the engine a couple of seconds between each adjustment to stabilize. Adjust until the engine either "sags" or stalls. Note this setting.
8B. Now go the opposite direction. Adjust until the engine runs rough, burbles, or stalls. Note this setting.
8C. Set all needles to the average between the two settings: That is, for example, if it stalled at 3/4 turn out and burbled at 1 1/4 out then set all needles to 1 turn out.
8D. Readjust idle speed to 700-750 RPM.
9. Take the boat out on the water and do a "hole shot"--Full throttle acceleration from a stop. If the engine "sags" then recovers and picks-up it is too lean. Open the needles about 1/16 turn at a time until the engine accelerates with no hesitation.
If the engine sputters or coughs or burbles, then clears itself and accelerates, it is too rich. Close the needles about 1/16 turn at a time until the engine accelerates smoothly.

10. I can NOT stress this enough! NEVER set the low speed needles less that 1 turns out no matter how poor the idle or acceleration. To do so will run the engine too lean and detonation and melted pistons at or near full throttle operation will result.
 
Last edited:
Joined
Mar 14, 2024
Messages
23
Have all pedals at each V-block a gap of 0,010 in or just some of them?
The pedals should close completely to the mounting V-blocks, some can have a slight gap.
0,010 in gap sounds to much in my opinion, 0,003-0,005 in (0,07-0,10 millimeter) would be acceptable and at some of them.
I use a flash light or just look and see if I can see a gap. Sometimes I use a feeler gauge to measure.
I dont have a feeder gage only the digital caliper the measurement was with wide open gap they fully close if .010 is to much is there a way to adjust them without damaging the reed? I didn't do the flash light thing I just took off the reed because I don't have flash light and the one of my phone isn't good enough to get a good look. and yeah all of them have this gap wide open.
 
Joined
Mar 14, 2024
Messages
23
The service manual says;
0.10 (.255mm) maximum opening ALLOWED
Like Nordin asked; are all the pedals having this gap? & check with a flashlight how many?
If the motor is running with "bad" valve reeds it would be spitting fuel out the carb's throat
Do not flip the pedal reeds around! there will be a too strong of preload
***********************TO SET UP THE ENGINE***************************
Here's a old post (from the late Frank) that I have printed out & live by;
1.Disconnect the ball link to the carb cam at the timing tower. Disconnecting at the cam risks bending the cam. Move the cam away from the carb roller.
2. Loosen the screw(s) on the aluminum tie bar and let all carbs close completely, then tighten again.
3. Set the cam so that the scribed line is pointing directly at the black roller on the carb lever. If the cam has two closely spaced lines, set the black roller directly between them.
4. The black roller is held with an offset screw and nut. Loosen the nut and turn the screw until the black roller JUST touches the cam. Tighten the nut and re-attach the ball link maintaining the scribed line at the roller.
5. Adjust the ball link so that at full throttle the bottom carb butterfly opens substantially horizontally. Adjust the aluminum tie bar so all carb butterflies open equally at full throttle. They need not be perfect but should be rather close to horizontal for best performance.
6. Adjust timing to 28 degrees before top dead center at full throttle. ( STATIC TIMING / CRANKING SPEED )
7. Adjust idle speed to 700-750 RPM in the water in forward gear. Do this with the screw on the bottom of the timing tower. Loosen the locknut and adjust. Screwing in increases idle speed. Do this in small increments and let the engine rev and adjust itself before the next adjustment. A little goes a long way here. When correct, tighten the nut. Note that the scribed line on the roller will now be (usually) below the black roller a bit.
8. NOW we adjust the mixture on the carbs. Set all low speed needles to about 1 1/4 turns out from lightly seated. Do not force as this will damage either the needles or the seats.
8A. With the engine idling in neutral, turn each the needles in equally about 1/8 turn at a time. Give the engine a couple of seconds between each adjustment to stabilize. Adjust until the engine either "sags" or stalls. Note this setting.
8B. Now go the opposite direction. Adjust until the engine runs rough, burbles, or stalls. Note this setting.
8C. Set all needles to the average between the two settings: That is, for example, if it stalled at 3/4 turn out and burbled at 1 1/4 out then set all needles to 1 turn out.
8D. Readjust idle speed to 700-750 RPM.
9. Take the boat out on the water and do a "hole shot"--Full throttle acceleration from a stop. If the engine "sags" then recovers and picks-up it is too lean. Open the needles about 1/16 turn at a time until the engine accelerates with no hesitation.
If the engine sputters or coughs or burbles, then clears itself and accelerates, it is too rich. Close the needles about 1/16 turn at a time until the engine accelerates smoothly.

10. I can NOT stress this enough! NEVER set the low speed needles less that 1 turns out no matter how poor the idle or acceleration. To do so will run the engine too lean and detonation and melted pistons at or near full throttle operation will result.
the carbs are not spitting out fuel but did find a leak in one of the carb fuel lines fixed it will give results soon
 

racerone

Supreme Mariner
Joined
Dec 28, 2013
Messages
37,836
If motor " cranks and cranks " and refuses to start it is not related to reed valves being open a bit !-----Do some other trouble shooting.
 
Joined
Mar 14, 2024
Messages
23
If motor " cranks and cranks " and refuses to start it is not related to reed valves being open a bit !-----Do some other trouble shooting.
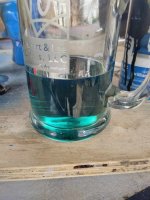
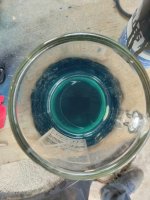
Boat started up today and ran and idled fine I'm starting to suspect the problem was the gas in the old tank will post a photo here within the hour so yall can look and tell me what yall think.
 
Joined
Mar 14, 2024
Messages
23
Boat started up today and ran and idled fine I'm starting to suspect the problem was the gas in the old tank will post a photo here within the hour so yall can look and tell me what yall think.
I don't have very good camera idk if yall can see it but there is black looking pieces in the fuel.
 

Attachments

  • 431350451_710864644460951_4504978980071596437_n.jpg
    431350451_710864644460951_4504978980071596437_n.jpg
    164 KB · Views: 9
  • 430620621_933477651390554_4776454123494593953_n.jpg
    430620621_933477651390554_4776454123494593953_n.jpg
    191.4 KB · Views: 9
  • 431269495_727252046058267_2202607714251360889_n.jpg
    431269495_727252046058267_2202607714251360889_n.jpg
    170.5 KB · Views: 9
Joined
Mar 14, 2024
Messages
23
So today I was going to post a thank you to everyone who helped me on this journey to revive the boat as everything was ready to go. Got out to the lake put boat in water and boom another punch in the face from the boat lol. The issue is strange to me. no power to the key ignition switch, the control center gauges and motor will not turn over. here is what I have check maybe I'm over looking something I checked the control area fuses all look to be intact, I checked the fuse on the red wire that go's to my battery and seems to be intact. I checked my battery it was good I ran down every single wire I could find and it looks to be all good. I jump both the big leads to the start solenoid and it engages the starter and turns the motor over but won't start it. is there a fuse hidden somewhere I don't know about?

I figured it out bad saftey switch and relay
 
Last edited:
Joined
Mar 14, 2024
Messages
23
So today I was going to post a thank you to everyone who helped me on this journey to revive the boat as everything was ready to go. Got out to the lake put boat in water and boom another punch in the face from the boat lol. The issue is strange to me. no power to the key ignition switch, the control center gauges and motor will not turn over. here is what I have check maybe I'm over looking something I checked the control area fuses all look to be intact, I checked the fuse on the red wire that go's to my battery and seems to be intact. I checked my battery it was good I ran down every single wire I could find and it looks to be all good. I jump both the big leads to the start solenoid and it engages the starter and turns the motor over but won't start it. is there a fuse hidden somewhere I don't know about?

I figured it out bad saftey switch and relay
lol found a bigger issue think I just going to replace the lower unit since it seems the broken skeg has a leak really starting to hate force engines parts are somewhat cheap but whats the point if its just a **** made engine.
 

racerone

Supreme Mariner
Joined
Dec 28, 2013
Messages
37,836
Find a priced right ( $500 or less ) Johnson / Evinrude 90 / 115hp---from 1980 to 1990.----Rebuild it and go boating for years to come.
 
Joined
Mar 14, 2024
Messages
23
A broken Skeg, leaking?
Yeah I said the same thing when I first saw it. I took the lower end off to better confirm it and yeah there is a long machine made hole going from one side to the other. so when I put ear muffs on and turn on water the water go's from the vent looking things and right out the bottom of the skeg.
 
Joined
Mar 14, 2024
Messages
23
An outboard in good condition starts right up.----If you need to use quick start then there is something wrong !-----But human nature is to avoid / postpone doing maintenance and simple repairs.
yeah I found the issue I'm still fairly new to outboards and never seen a circuit breaker with a reset button. @TheForcePower I was wrong the skeg was rebuilt before but they did a fine job hiding the rebuild that I though it was the original it is. the rebuilt has the machined hole for sliding it on my friend said. we also checked the the lower unit and the water pump kit I got that said it was for my outboard turns out it wasn't they sent me the wrong one and they are sending me the right one today. so yea thats why it looked like water coming from skeg.
 
Top