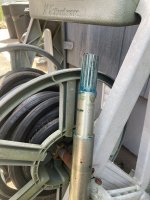
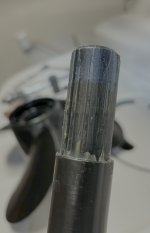
Leak into bilge, bellows?

gsbarry

Petty Officer 2nd Class
Joined
Dec 23, 2024
Messages
115
Well... I was able to get the outdrive installed last night. Thanks all for the help. I'm not 100% certain really what actually helped me get it all the way in. The crowfoot wrench was exactly the right tool for the job as far as adjusting the alignment. However, I think the alignment was pretty darn good to start with. I tried adjusting the alignment both up and down in half turn increments, all the way up to four turns up and four turns down from the original position. It seemed to me like the adjustments only made the alignment tool more difficult to fully seat, so I ended up returning the alignment to its original position. The alignment tool was still a bit tough to insert the last couple of inches, requiring light hammer taps to fully seat. Once fully seated though it did spin freely with only two fingers. Next i test fitted the outdrive again, this time with the three o-rings removed and grease cleaned out of the o-ring grooves and reduced the amount of grease on the splines. It was still difficult to get fully seated despite jiggling/shaking. I gave it a few good kicks on the back was able to get it closer to fully seated, within 1/4". At that point I used the nuts/bolts to seat it the rest of the way with only a minimal amount of elbow torque. Somewhat satisfied with this, I pulled it off again (which had to be done with the trim rams/block of wood method) and installed the o-rings with gear oil only, main gasket, water pipe o-ring, and driveshaft seal. Re-installing the drive again went about the same, got it to 3/4" by hand, got it 1/4" with kicks, and last 1/4" by nuts/bolts. I honestly don't love doing it this way, still seems to me like something is binding, but I can't figure out for the life of me how to resolve it. So it's back together for now. Fingers crossed that there's no leaks in the bellows when I get a chance to take it out on the water. Thanks again everyone for all the help on this thread! Hopefully others find it useful. On to the next job, which will be upgrading the bilge pump setup.
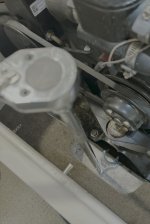
IMG_8026.jpegIMG_8025.jpeg
 
Last edited:

Scott06

Admiral
Joined
Apr 20, 2014
Messages
6,660
Well... I was able to get the outdrive installed last night. Thanks all for the help. I'm not 100% certain really what actually helped me get it all the way in. The crowfoot wrench was exactly the right tool for the job as far as adjusting the alignment. However, I think the alignment was pretty darn good to start with. I tried adjusting the alignment both up and down in half turn increments, all the way up to four turns up and four turns down from the original position. It seemed to me like the adjustments only made the alignment tool more difficult to fully seat, so I ended up returning the alignment to its original position. The alignment tool was still a bit tough to insert the last couple of inches, requiring light hammer taps to fully seat. Once fully seated though it did spin freely with only two fingers. Next i test fitted the outdrive again, this time with the three o-rings removed and grease cleaned out of the o-ring grooves and reduced the amount of grease on the splines. It was still difficult to get fully seated despite jiggling/shaking. I gave it a few good kicks on the back was able to get it closer to fully seated, within 1/4". At that point I used the nuts/bolts to seat it the rest of the way with only a minimal amount of elbow torque. Somewhat satisfied with this, I pulled it off again (which had to be done with the trim rams/block of wood method) and installed the o-rings with gear oil only, main gasket, water pipe o-ring, and driveshaft seal. Re-installing the drive again went about the same, got it to 3/4" by hand, got it 1/4" with kicks, and last 1/4" by nuts/bolts. I honestly don't love doing it this way, still seems to me like something is binding, but I can't figure out for the life of me how to resolve it. So it's back together for now. Fingers crossed that there's no leaks in the bellows when I get a chance to take it out on the water. Thanks again everyone for all the help on this thread! Hopefully others find it useful. On to the next job, which will be upgrading the bilge pump setup.
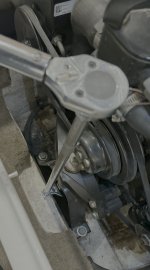
View attachment 405920View attachment 405921
would assume what you are seeing is either previously mentioned grease build up or maybe some burrs on the splines on driveshaft or coupler.

the whole thing is way less precise than some make it out to be. what you describe adjusting up and down only making it worse shows you got it as good as it will go.
 

nola mike

Vice Admiral
Joined
Apr 22, 2009
Messages
5,395
. The alignment tool was still a bit tough to insert the last couple of inches, requiring light hammer taps to fully seat. Once fully seated though it did spin freely with only two fingers.
This is not the test for good alignment. The "2 fingers" mentioned here is to install/remove the alignment tool. Once it's jammed in there it probably won't take a ton of effort to turn it. How hard was it to remove the tool? Were there any witness marks on it?

Re-installing the drive again went about the same, got it to 3/4" by hand, got it 1/4" with kicks, and last 1/4" by nuts/bolts. I honestly don't love doing it this way, still seems to me like something is binding, but I can't figure out for the life of me how to resolve it.

This sounds way off to me.

. what you describe adjusting up and down only making it worse shows you got it as good as it will go.
My concern would be for something else going on affecting alignment: collapsed rear mount(s), rotten transom, bad stringers, uneven front mounts, etc. Could be something simple like you mentioned, but if it's me I'm confirming that. Iirc you had a problem with lateral alignment on yours (me too), but I checked every potential cause that I could think of before throwing my hands up. I also think using nuts to install the drive is in general not a great idea (it's nuts!... Sorry), especially if you don't have experience installing the drive. My 10.5 installation tool is finely calibrated...
 

JASinIL2006

Vice Admiral
Joined
Feb 10, 2012
Messages
5,699
The amount of difficulty you're having getting the drive on and off (especially without the O-rings) would seem to be a sign that something is still not right. Sometimes drives don't want to go on, but having to cinch it down with the nuts is not right.
 

Lou C

Supreme Mariner
Joined
Nov 10, 2002
Messages
12,958
That's a nice one Lou. The beauty of yours is the prop doesn't have to come off. Yours probably has height adjustment also.
Got it from Stumpy's Fab Works. Yes it does have height adjustment, makes it very easy. You know I have never had trouble getting the drive back on as long as I have the height correct and I use the screwdriver to turn the driveshaft to line up the splines. I don't have to force it, kick it none of that, it will just slide up to about 1/8" and I can easily thread the 6 nuts on.
 

Lou C

Supreme Mariner
Joined
Nov 10, 2002
Messages
12,958
Well... I was able to get the outdrive installed last night. Thanks all for the help. I'm not 100% certain really what actually helped me get it all the way in. The crowfoot wrench was exactly the right tool for the job as far as adjusting the alignment. However, I think the alignment was pretty darn good to start with. I tried adjusting the alignment both up and down in half turn increments, all the way up to four turns up and four turns down from the original position. It seemed to me like the adjustments only made the alignment tool more difficult to fully seat, so I ended up returning the alignment to its original position. The alignment tool was still a bit tough to insert the last couple of inches, requiring light hammer taps to fully seat. Once fully seated though it did spin freely with only two fingers. Next i test fitted the outdrive again, this time with the three o-rings removed and grease cleaned out of the o-ring grooves and reduced the amount of grease on the splines. It was still difficult to get fully seated despite jiggling/shaking. I gave it a few good kicks on the back was able to get it closer to fully seated, within 1/4". At that point I used the nuts/bolts to seat it the rest of the way with only a minimal amount of elbow torque. Somewhat satisfied with this, I pulled it off again (which had to be done with the trim rams/block of wood method) and installed the o-rings with gear oil only, main gasket, water pipe o-ring, and driveshaft seal. Re-installing the drive again went about the same, got it to 3/4" by hand, got it 1/4" with kicks, and last 1/4" by nuts/bolts. I honestly don't love doing it this way, still seems to me like something is binding, but I can't figure out for the life of me how to resolve it. So it's back together for now. Fingers crossed that there's no leaks in the bellows when I get a chance to take it out on the water. Thanks again everyone for all the help on this thread! Hopefully others find it useful. On to the next job, which will be upgrading the bilge pump setup.
View attachment 405920View attachment 405921
glad the crowfoot worked for you but I think it's still off.
My engine was last aligned in....2004....I have not had to change it...since....the tool goes in very easily, no need to force it and I hope it stays like that
What do the witness marks look like on the tool?
Here's mine.....
checking alignment.jpg
 

gsbarry

Petty Officer 2nd Class
Joined
Dec 23, 2024
Messages
115
I agree, I still think something is off. When I was inserting the alignment tool it seemed to be hanging up on the inner most lip in the coupler where the splines begin on the top side, and that’s where I would see grease on the tool. If I pushed up on the aft side of the tool, it would then clear the lip and I could push it a bit more, but then maybe half way up the splines i would hit enough resistance that hammer taps were needed to fully seat. I thought this indicated the front of the engine needed to come up, but motor adjustment (without the tool inserted) did not make this problem any better. After the tool was fully seated with the hammer it took both hands and a strong pull to yank it out. Once out though the witness marks looked pretty even all the way around the tool. I don’t think there is an issue with horizontal alignment, it seems vertical to me. As far as the condition of the boat, it’s only 10 years old and very lightly used by all appearances. Hull is pristine. So I have no reason to suspect structural issues with the boat. Also, the alignment tool went in freely before I replaced the bearing. Maybe I have a bad (new) bearing?
 

Stinnett21

Chief Petty Officer
Joined
Jun 24, 2012
Messages
542
Nola Mike may have hit the nail on the head. Take pics of your rear engine mounts and post them. I had one fail. If I looked hard enough I could actually see the engine leaning to one side. If this the case it will never align correctly.
 

Lou C

Supreme Mariner
Joined
Nov 10, 2002
Messages
12,958
I can't remember which forum it was on, but a few years back, there was a guy who had a boat that could not be aligned, no matter what. Eventually what was found was that the boat was built wrong, the engine mounts were out of line with the outdrive opening, so the drive and engine had to be pulled and the engine mounts repaired. And it wasn't an old boat either if I remember right.
Given what you have happening there, I think you're going to wind up pulling the engine anyway, inspecting the rubber mounts in the transom assembly....
 

gsbarry

Petty Officer 2nd Class
Joined
Dec 23, 2024
Messages
115
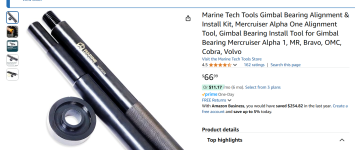
I'll try to get some pics of the rear mounts when i get back home in a few days. I appreciate all the feedback guys. But... I verified alignment before doing the bellows/cable/bearing job and the alignment too and outdrive went in easily as it should have. Sooooo... doesn't it seem like we're going down a rabbit hole as far as rear engine mounts and/or other structural issues? I suppose I could get another bearing and redo that part of the job. And see if it improves. Below is the alignment tool I've been using, which seems to be a decent quality brand from what i can tell. What is the downside to having a small misalignment? I've read about premature bearing failure. Will this cause other problems? If it's just the bearing failure, then it kind makes me think I should just leave it be for now and see how she goes.

1741373406447.png
 
Last edited:
Stinnett21

Chief Petty Officer
Joined
Jun 24, 2012
Messages
542
Good point. You stated back on post 29 that the alignment was good prior to bearing install....so yes the motor mounts is probably a rabbit hole. Admittedly I've never had to install a gimbal bearing. I had one installed 900 hours ago, back when they were still greasable, and it's still smooth. Something sure doesn't sound right. Either the bearing isn't seated right when you think it is, or something is amiss with the bearing itself. My 2cents.
 

Lou C

Supreme Mariner
Joined
Nov 10, 2002
Messages
12,958
The problem with misalignment is the rubber damped coupler, it will put uneven forces on the coupler which will overheat and wear the rubber out and that will result in having to pull the engine.
My boat is going on 37 years old, it is on the original coupler, the gimble bearing has been replaced once in the 22 years I have had it, the only other work done besides maintenance (resealing the drive some years back) was rebuilding both trim rams this past spring.
The way you described having to install the drive just doesn't seem right to me. I've been R & Ring it since 2007 every season and I have never had to do that, once I learned the trick of turning the driveshaft like a fraction of an inch and it slides right on. Before I learned that, the first few times, I did have to struggle with it but that was because the splines weren't lined up. Then I remember having to do something similar after replacing the clutch on one of my Volkswagens, we had pulled the engine to do this job, and it wouldn't go on till we turned the engine crankshaft the same amount, like a fraction of an inch and it just slid on.
 

Scott06

Admiral
Joined
Apr 20, 2014
Messages
6,660
I'll try to get some pics of the rear mounts when i get back home in a few days. I appreciate all the feedback guys. But... I verified alignment before doing the bellows/cable/bearing job and the alignment too and outdrive went in easily as it should have. Sooooo... doesn't it seem like we're going down a rabbit hole as far as rear engine mounts and/or other structural issues? I suppose I could get another bearing and redo that part of the job. And see if it improves. Below is the alignment tool I've been using, which seems to be a decent quality brand from what i can tell. What is the downside to having a small misalignment? I've read about premature bearing failure. Will this cause other problems? If it's just the bearing failure, then it kind makes me think I should just leave it be for now and see how she goes.

View attachment 405931
before you rip out the bearing you just put in turn the engine 90 degrees - every once in a while you see someone with a coupler that is a tad eccentric. keep turning it 90 degrees you may be able to get better witness marks and better adjustment.

What did your grease marks look like? As mentioned my boat when I did the repower in spring 2016 was unable to get textbook perfect witness marks on the tool, and that's where I lightly snugged the bolts to get it in. Since that time have had zero issues with it and only put 400 hours on it pulling tubes, skiiers, and wakeboarders with 6 people in the boat... basically riding it hard.
 

gsbarry

Petty Officer 2nd Class
Joined
Dec 23, 2024
Messages
115
That's an interesting thought that the coupler may be slightly eccentric. Wish I had taken a picture, but from what I recall the grease witness marks looked pretty uniform.
 

Lou C

Supreme Mariner
Joined
Nov 10, 2002
Messages
12,958
If your grease witness marks are uniform but you have to force it that much to get it on, I'm wondering if the gimble bearing isn't fully seated in the housing.
 

cyclops222

Lieutenant Commander
Joined
Mar 21, 2024
Messages
1,839
Burrs or hit marks on the male or female splines ? At the 3/4 inch point ? Piece of grit wedged into a spline at that point ?
I would not loose sleep on it.
 

gsbarry

Petty Officer 2nd Class
Joined
Dec 23, 2024
Messages
115
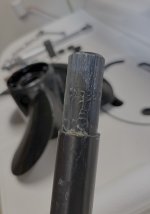
IMG_8033.jpegIMG_8032.jpegI have good news today. I decided to pull the drive yet again to see if I could resolve my issue. The alignment tool went in nice and easy this time without me having to change anything at all. My guess is that the gimbal action of the center race was previously slightly tilted without me realizing it (and likely quite stiff being new) perhaps from installation (there was one or two hammer strikes during installation where the driver may have slipped off center). I think installing the outdrive must have straightened it out. The witness marks on the tool look pretty uniform to me. I slightly smeared a part on the back side as I pulled it out. On the plus side I’m getting pretty good at removing and installing the outdrive!
 
Last edited:
tank1949

Lieutenant Commander
Joined
Apr 4, 2013
Messages
1,904
The amount of difficulty you're having getting the drive on and off (especially without the O-rings) would seem to be a sign that something is still not right. Sometimes drives don't want to go on, but having to cinch it down with the nuts is not right.
ROT
 
Top