Johnson 150 Rebuild by Lectro88

Lectro88

Petty Officer 1st Class
Joined
Oct 24, 2020
Messages
303
Hello everyone.
I am kinda new to site and boating, But I have turned my share of wrenches over the last 40 years.
As promised.. I am starting my own thread.
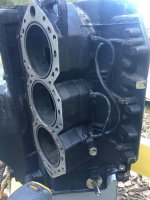
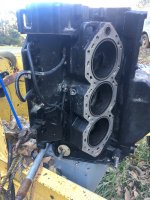
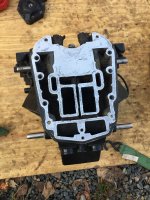
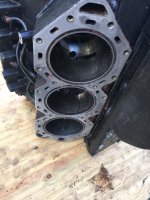
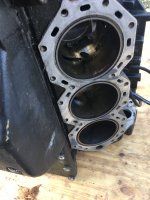
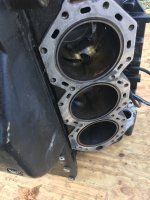
I have 3 of these dinosaur, gas guzzling, smoke poofing, dragon noise makers.
A pair of 150's 25" foot, counter rotating. And A Evinrude 175 20" missing the foot. All are Ocean Runners if memory serves me correct.
none I have put in water yet, so follow along and enjoy the ride and my blunders as I start the 1st. rebuild attempt on one of these obsolete jewels.
I have my own way and quirks of doing things, and probably none of those are normal.
I sadly will apply experience from farm & heavy equipment, aviation, auto, dirt bike, stroker harley, chainsaw and dirt bikes along with 34+ years of electrical contracting and the list goes on... So you know I'm a little/Lot twisted... it will be fun and adventurous to say the least.
Now I say that as the other part of this project is a 1969 Mako total project boat I just obtained.
The plan is a 175 back on it, or a 150, or twin 150 it. oh #ell put the twins on and throw the 175 in the middle for good measure and fun. See, I told you it would be fun...
Pics and progress to follow.
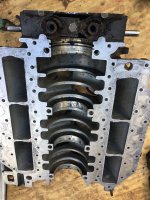
I have the 1st. disassembled already as It was a work in progress while another thread was going on.
I am probably guilty of high jacking on that thread.. But that was not my intent. Just kinda getting my feet wet so to speak. and joining in.
Thank you Mods for stepping in and cleaning up.
 

Lectro88

Petty Officer 1st Class
Joined
Oct 24, 2020
Messages
303
Here are some pics of catastrophic failure.
This is a minimum of a sleeve job in cyl #1.
I didn’t see the crack and distortion in cylinder port til I stuck phone down in there for a close up pic.
I have picked my worst engine to start with.
This cylinder was producing 50psi. Not sure how.
But it’s the lowest of all my cores as I’m going to call them.
 

Attachments

  • B263756D-D0EE-45C1-9876-D54101C53D71.jpeg
    B263756D-D0EE-45C1-9876-D54101C53D71.jpeg
    1.2 MB · Views: 9
  • 4BB935FD-D115-45B7-9C13-31FC1712E920.jpeg
    4BB935FD-D115-45B7-9C13-31FC1712E920.jpeg
    1.5 MB · Views: 9
  • 181D8F3A-B7F1-4387-9644-12097FE90ACB.jpeg
    181D8F3A-B7F1-4387-9644-12097FE90ACB.jpeg
    1.9 MB · Views: 11
  • 8AB24E65-0496-45DF-B5FB-9A2899D790A9.jpeg
    8AB24E65-0496-45DF-B5FB-9A2899D790A9.jpeg
    1.6 MB · Views: 10
  • 510C4E62-7743-470D-900E-63CC96A4ED62.jpeg
    510C4E62-7743-470D-900E-63CC96A4ED62.jpeg
    2.5 MB · Views: 9
  • 7E687BFF-203E-46DB-BDE6-5B6DAA52EF36.jpeg
    7E687BFF-203E-46DB-BDE6-5B6DAA52EF36.jpeg
    1.7 MB · Views: 8
  • D2586663-0C7C-4D9C-AEEE-4D6E2F76822E.jpeg
    D2586663-0C7C-4D9C-AEEE-4D6E2F76822E.jpeg
    2 MB · Views: 8
  • B44486D4-E8F0-4D25-B89E-2A62F49EDDA6.jpeg
    B44486D4-E8F0-4D25-B89E-2A62F49EDDA6.jpeg
    2.1 MB · Views: 7
  • CC491B9F-ABC7-463E-80F6-EAC21082B102.jpeg
    CC491B9F-ABC7-463E-80F6-EAC21082B102.jpeg
    1.5 MB · Views: 7
  • 6C830DED-9599-410A-B4DD-B659F8A9E859.jpeg
    6C830DED-9599-410A-B4DD-B659F8A9E859.jpeg
    1.7 MB · Views: 6
  • E868754A-4E34-44D0-9139-80EAA8E140D9.jpeg
    E868754A-4E34-44D0-9139-80EAA8E140D9.jpeg
    1.9 MB · Views: 7
  • 17C40450-5185-41DF-9B2B-85D780B79362.jpeg
    17C40450-5185-41DF-9B2B-85D780B79362.jpeg
    1.8 MB · Views: 7
  • D73E3F23-AB05-4BB8-83E3-CB40B7FBE7FA.jpeg
    D73E3F23-AB05-4BB8-83E3-CB40B7FBE7FA.jpeg
    1.5 MB · Views: 7
  • 286A5D3C-7C11-42A8-81EF-AB0919A5792B.jpeg
    286A5D3C-7C11-42A8-81EF-AB0919A5792B.jpeg
    1.5 MB · Views: 6
  • FE2F8A02-B131-401B-B88E-967A5EC1A1C7.jpeg
    FE2F8A02-B131-401B-B88E-967A5EC1A1C7.jpeg
    2.2 MB · Views: 8

Lectro88

Petty Officer 1st Class
Joined
Oct 24, 2020
Messages
303
Here is the 1/4-/20 bolt I broke and back yard extracted
It was 1 of the 4 that holds cdi in window to water jacket.
I could heli coil it but it’s not buggared up bad enough for me to worry about.
The bolt hole was a well so I cut while swimming in wd40.
Split it like a piece of fire wood.
 

Attachments

  • 71A637D7-C71B-4509-B84A-A5D96B20622C.jpeg
    71A637D7-C71B-4509-B84A-A5D96B20622C.jpeg
    1.8 MB · Views: 5
  • 24774FF2-6865-4BF8-8397-C47F6EFA1BAC.jpeg
    24774FF2-6865-4BF8-8397-C47F6EFA1BAC.jpeg
    1.3 MB · Views: 3
  • 6BF68541-1487-4F2D-BE27-F9381E305456.jpeg
    6BF68541-1487-4F2D-BE27-F9381E305456.jpeg
    1.3 MB · Views: 4
  • 325F8CED-6B74-4D65-8663-E659D8DFC171.jpeg
    325F8CED-6B74-4D65-8663-E659D8DFC171.jpeg
    2 MB · Views: 4

Lectro88

Petty Officer 1st Class
Joined
Oct 24, 2020
Messages
303
I have cleaned block on machined surface, knocked the rough edges off around the ports and windows breathing down around crank.
Some might call that mild porting but not really.
Just a little rubbing I call it. Mildly changes flow and appearance.
Smoothed the raggedy edges left in mass production.
Some say the raggedy edges cause better attimazation, I just always smoothed those up.
I do all the little quirks that I have before I take anything to the machine shop.
 

Attachments

  • C61D7905-D63A-48F1-98D6-B6D981046016.jpeg
    C61D7905-D63A-48F1-98D6-B6D981046016.jpeg
    2.2 MB · Views: 7
  • 465380D2-B940-4500-9FA9-2EC293F13EBA.jpeg
    465380D2-B940-4500-9FA9-2EC293F13EBA.jpeg
    2.1 MB · Views: 6
  • 43526DC8-6DAD-424E-87A8-B46E5BC3F937.jpeg
    43526DC8-6DAD-424E-87A8-B46E5BC3F937.jpeg
    2 MB · Views: 6
  • BC200D52-3C0C-4809-AA56-84C9EC2C6E58.jpeg
    BC200D52-3C0C-4809-AA56-84C9EC2C6E58.jpeg
    1.6 MB · Views: 6
  • 7AEE843C-4114-451A-ACC0-0DA56B2B88A1.jpeg
    7AEE843C-4114-451A-ACC0-0DA56B2B88A1.jpeg
    1.7 MB · Views: 6

Faztbullet

Supreme Mariner
Joined
Mar 2, 2008
Messages
15,769
From looks needs a sleeve and other 5 bored. Motor has had cooling problems or dogged RPM
 

Lectro88

Petty Officer 1st Class
Joined
Oct 24, 2020
Messages
303
Here are some pics of catastrophic failure.
This is a minimum of a sleeve job in cyl #1.
I didn’t see the crack and distortion in cylinder port til I stuck phone down in there for a close up pic.
I have picked my worst engine to start with.
This cylinder was producing 50psi. Not sure how.
But it’s the lowest of all my cores as I’m going to call them.

From looks needs a sleeve and other 5 bored. Motor has had cooling problems or dogged RPM
Thanks Faztbullet.
the sleeve and boring was my plan, I haven't mic'd it, my telescope T mic set are over at my other place, so just taking it to my machine guy this week or next and then figure what oversize will clean it up. or if worth while at all. I think I trust him.. he's 74 and probably forgot more than I know... esp. on this topic. (i'm still green for long time)
the thermostats were removed from both heads, probably how I would leave things, unless you or others convince otherwise.
Seems biggest thing would be give plenty time to warm up.
My thought was it could at least flow free and no chance of overheating due to faulty stats.
refresh pump and call it done.

Dogged. I don't know... I bought these from a guy that got in over his head for a project. (I can do most the work myself) he was going to have to hire everything and they were worse than he was led to believe, and gave up.
The props frm memory 14.5 x19 SS
They may have been good for fresh motor but in pres. condition maybe easily too much.
Figure everything about this motor was a fast downward spiral.
Thats just a guess or stab in the dark. at best.

Thanks for the help and info.
 

sludgeguy68

Petty Officer 2nd Class
Joined
Jul 16, 2010
Messages
111
I believe if you run without the stats, it won’t be at optimal temperature to properly ignite the fuel mix. Running cold like that could eventually lead to carbon buildup behind rings and poof...
 

Faztbullet

Supreme Mariner
Joined
Mar 2, 2008
Messages
15,769
"the thermostats were removed from both heads, probably how I would leave things, unless you or others convince otherwise.
Seems biggest thing would be give plenty time to warm up.
My thought was it could at least flow free and no chance of overheating due to faulty stats."

You have to runs t-stats in a 60° motor as it runs way to cold...cold seize, carbon buildup and plug problems will occur. Thats likely what killed this motor from pic posted. NOTE...DO NOT HAVE ANY MACHINE WORK PERFORMED UNTILL BLOCK HAS BEEN PRESSURE TESTED!!! ...These are known leakers and no rebuilders /good tech or myself will build one without testing.
 
Last edited:

Lectro88

Petty Officer 1st Class
Joined
Oct 24, 2020
Messages
303
"the thermostats were removed from both heads, probably how I would leave things, unless you or others convince otherwise.
Seems biggest thing would be give plenty time to warm up.
My thought was it could at least flow free and no chance of overheating due to faulty stats."

You have to runs t-stats in a 60° motor as it runs way to cold...cold seize, carbon buildup and plug problems will occur. Thats likely what killed this motor from pic posted. NOTE...DO NOT HAVE ANY MACHINE WORK PERFORMED UNTILL BLOCK HAS BEEN PRESSURE TESTED!!! ...These are known leakers and no rebuilders /good tech or myself will build one without testing.


Thanks Faztbullet & sludgeguy68
I will follow that advise.
T-Stats and Pressure Test.
Noted
And I think I found digging in this forum that temps need to be 140-160.F max.
 

Lectro88

Petty Officer 1st Class
Joined
Oct 24, 2020
Messages
303
It’s been a long time.
But after being at machine shop a little over a year.
I got the block back with a new sleeve installed and all cylinders bored .020” over.
Took a bunch of doing to get the motor mounts out. Had to air hammer them out.
You may remember I posted I was having hard time finding parts.
Well today I tinkered and started some pre-assembly/assembly…
Put pistons on 2 rods and dry fit/no rings or crank in place.
Need to get my engine stand free’d up and back in use.
Anyway I’m not in a hurry just tinkering along and in time it will come together.

Here’s to reviving an old thread. 5A04B646-A3F6-48C0-A9A8-39CDE5791883.jpeg


2DC204E1-25DD-4C3F-80A8-400655959AC5.jpeg
 

Lectro88

Petty Officer 1st Class
Joined
Oct 24, 2020
Messages
303
You may be wondering why in the world is he dry fitting.
Truth is I haven't prepped the crank, meaning I've not cleaned and blown all the holes out or replaced the bearings.
And I was itching to do something and the piston assembly was the bassacwards thing I felt like messing with,.
so there you have it.,
and to give you a little laugh.
I was on the 3rd piston installing the 2nd and final cir clip when it decided to escape,.. $%#@*&!
I could hear it ringing like a bell singing its song of freedom as I heard it land but not sure where in the abyss it landed.
So I'm thinking to myself,. smoldering...
Do I ask my guys to send me some extra new ones or pull from the old stock, as I have 12 0ld ones but mixing old and new just isn't my style when I'm going to the trouble of a rebuild.
If I can get the new without too much trouble thats what I'll do., otherwise I may have to "settle" with an old faithful refurb stepin.
 
Top