Intex Mariner 4 modifications and Tips

mrdrh99

Senior Chief Petty Officer
Joined
Feb 1, 2013
Messages
756
Flukes. I actually ended up going the collapsible dolly route, very similar to what's pictured below. It works GREAT! I'm not using it on rough terrain though, just paved surfaces. The bottom fits perfectly between the arms of the motor transom and I attach there with a small bungee. The dolly lays on the ground under the boat and I secure it with a ratchet strap connected to the top of the handle around the boat. Easily allows me to move the boat by myself. I have been using my Mariner exclusively on the lake by my house, A LOT, and tomorrow I will take my first trip away from home, packing the boat up in the vehicle and doing a full packed-to-ready deployment at a camp ground. We'll go from the camp ground across a lake to a state use cabin.
I use the same hand truck for my Saturn! It works really well
 

flukesofnature

Petty Officer 2nd Class
Joined
Mar 9, 2014
Messages
122
MRDR
Just out of curiosity...does that dolly handle the boat , motor, battery and all the stuff in it in one trip? Or do you dolly the boat to wherever, and then repeat with battery and motor...etc.
AK are you breaking down after each trip...seats, floor, motor etc?
 
Last edited:

mrdrh99

Senior Chief Petty Officer
Joined
Feb 1, 2013
Messages
756
I'm only using it for my Saturn.... Boat only.... Mariner I carry inflated strapped to the top of my blazer.... All accessories in the back
 

CopperFox

Petty Officer 2nd Class
Joined
Jan 13, 2012
Messages
169
OK. Here's my 2 cents worth on how to find a water leak in the bottom of an inflatable: Outside, on a dry, relatively flat surface (eg. driveway), spread newspaper (~5'x ~12'). Place your inflatable on top of this and inflate it. Start adding water to your boat. Keep an eye on the newspaper to see where it starts to show wetness beyond the edge of the boat.

This won't give you the exact spot but it will narrow down where you should look, particularly if you keep a close eye on it. Smaller holes will likely require a little more water to get more pressure. You might try putting only a little water in at first and then removing the boat before you see the newspaper getting wet by the edge of the boat. This could more accurately pinpoint a small hole that is not near an edge. Experiment. A small hole will obviously take longer and more water to wick out past the edges of the boat. Good luck.

Still lovin' my modded Mariner 4!
 

dancour

Cadet
Joined
Jun 22, 2013
Messages
20
No Title

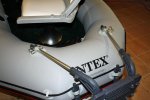
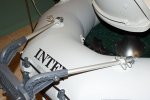
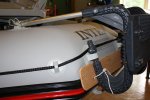
I'm planning on a using a 2.5 Lehr on my mariner 4, so I tried firming up the motor mount. Some narrow 3/4" washers might of worked too. I used 4 - 5/32" x 3-5/16" hair pins. Seems to work. Any other suggestions appreciated.
 

Attachments

  • photo202942.jpg
    photo202942.jpg
    69.7 KB · Views: 29
  • photo202943.jpg
    photo202943.jpg
    71.4 KB · Views: 29
  • photo202944.jpg
    photo202944.jpg
    166.8 KB · Views: 27

mrdrh99

Senior Chief Petty Officer
Joined
Feb 1, 2013
Messages
756
You'll need to find a way to brace up the bottom of the motor mount ...... A lot of flexing will be going on down there.... Some have used bumpers
 

Brusac

Seaman
Joined
Dec 25, 2013
Messages
67
Hello all, I've been following this thread for awhile now. I purchased the M4 last year and have had a lot of fun with it so far. Primarily I can be found using it near Madison, WI and up by the in-laws near LaValle, WI. I've had a lot of people show interest as I was setting up waterside preparing to launch, that has made for some interesting conversations! The first thing I did was rig up a fishing seat. My first few attempts were not too stable but after reading what you guys have done I was able to put together a temporary and very stable solution using a surplus piece of OSD I had laying around so thanks for the inspiration! I am planning on doing a more permanent mod to have 2 seats in but it may be some time before I can get to that (will be ditching the OSD in favor of better quality material). @Dancor and mrdr99 I also found the tubes to be squishy where the bottom of the motor mount bracket presses against them. I solved this with a short length of 1/2" PVC and some velcro straps, this completely eliminated the squishy factor and made the whole mount feel much firmer. I will try to get some pictures of that for you guys.
 

dancour

Cadet
Joined
Jun 22, 2013
Messages
20
Brusac, I'd love to see those pics when you have time. I got the idea for shortening the play on the top of the motor mounts from shadow_cruiser's post. I did see somewhere that someone hung a board in front of the lower motor mounts. I'll look for something thin, strong and waterproof - may 4" x 18".
 

Rakumi

Petty Officer 2nd Class
Joined
Aug 23, 2013
Messages
102
Hey Copper, thanks for the advice on finding a leak. I will give it a try. In the mean time, I have been thinking. I will not be able to do the solid boat thing because it is pretty hard to travel. My car will not support a trailer anyway. Inflatable is just the easiest way for me, so I am now considering the M4. I am not going to do another hard wood floor because I am just tired now. How well does the slate floor that comes with it work? Can you stand up and cast with no problem? It appears the durability of the M4 is much greater (from what I am researching) compared to their other boats.
 

Brusac

Seaman
Joined
Dec 25, 2013
Messages
67
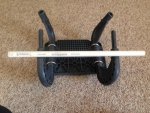
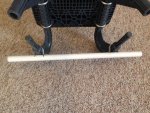
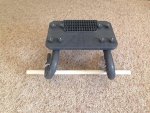
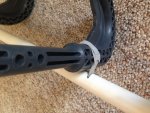
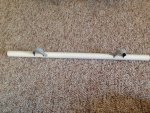
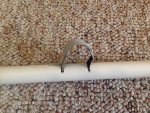
Here are some pics of the mod I did for my motor mount. I inflated the boat and installed the mount (stock) and then took a piece of 1/2" PVC that I had laying around from a prior home improvement project and held it across the mounts arms where I wanted it to go between the arms and tubes. I took a pencil and marked on the PVC where the arms would be and then using a saw I cut to slits in the PVC for each arm, I took velcro straps used for cable ties and passed them through the slits cut into the PVC and use these to strap the pipe to the bracket. The pipe rests between the mount and the M4 tubes and does a fantastic job of making the mount much firmer and more stable when the weight of the motor is pressing it into the tubes. Hopefully I will be able to get out on the water again this weekend and get some pictures of the mount on the M4. This took about 30 minutes to do (not including time to inflate/deflate the M4). The velcro straps I picked up at Wal-Mart. Cost maybe $3 for 2 rolls of 50 straps (I used 2 for the bracket).

Mount mod 1.JPG Mount mod 2.JPG Mount mod 3.JPG Mount mod 4.JPG Mount mod 5.JPG Mount mod 6.JPG
 
Last edited:

Brusac

Seaman
Joined
Dec 25, 2013
Messages
67
Here are some pics of the mod I did for my motor mount. I inflated the boat and installed the mount (stock) and then took a piece of 1/2" PVC that I had laying around from a prior home improvement project and held it across the mounts arms where I wanted it to go between the arms and tubes. I took a pencil and marked on the PVC where the arms would be and then using a saw I cut to slits in the PVC for each arm, I took velcro straps used for cable ties and passed them through the slits cut into the PVC and use these to strap the pipe to the bracket. The pipe rests between the mount and the M4 tubes and does a fantastic job of making the mount much firmer and more stable when the weight of the motor is pressing it into the tubes. Hopefully I will be able to get out on the water again this weekend and get some pictures of the mount on the M4. This took about 30 minutes to do (not including time to inflate/deflate the M4). The velcro straps I picked up at Wal-Mart. Cost maybe $3 for 2 rolls of 50 straps (I used 2 for the bracket).
 

dancour

Cadet
Joined
Jun 22, 2013
Messages
20
No Title

Brusac, that's a nice, clean install. I like your use of Velcro strips.

Here's my prototype. I need to find a small piece of lexan.
 

Attachments

  • photo203076.jpg
    photo203076.jpg
    183.3 KB · Views: 39

ford 250

Recruit
Joined
Jul 9, 2014
Messages
5
Just modified the Pvc cage for bimimi top. Also mounted fish finder mount. Modified my cooler for battery and seat
 
Last edited:

new_mariner

Recruit
Joined
May 28, 2013
Messages
2
Hi Ford 250,
I would like to see some pics and details of your bimini mod .. Please share any details of how you did it and how it is working.
Thanks
 

intexbros

Recruit
Joined
May 9, 2014
Messages
5
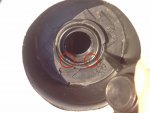
Help! Dents in my boston valve! I took my boat out yesterday and when I inflated the first chamber I noticed air leaking from the boston valve. After much analysis I found out there are two very small dents or marks in the soft part of the boston valve that the threaded screw cap screws against. Because of the slight dent, air escapes between the fixed side of the valve and the detached threaded part. To make matters worse, I found another slight mark in a second valve in another chamber. I don't know how this can be fixed. Has this ever happened to anyone else? Any ideas on how to repair this? See attached photo (also found here: http://images2.snapfish.com/2323232...66=ot>2437=<84=52:=XROQDF>2;6;8:2<44245ot1lsi). Thanks in advance! 232323232%7Ffp83232%3Euqcshlukaxroqdfv5466%3Dot%3E2437%3D%3C84%3D52%3A%3DXROQDF%3E2%3B6%3B8%3...JPEG
 
Last edited:

flukesofnature

Petty Officer 2nd Class
Joined
Mar 9, 2014
Messages
122
rdiddy
two things to try.....small bead of silicone directly around the rim where the dents are..let it dry..don' t be hasty....then double wrap the threads of the male part of the boston valve with teflon tape(plumbers section ..any hardware store) If that stops the air leak you may have to repeat in a month or so...cheap fix...
The boston valve is the most common of valves in most inflatables...any reputable inflatable sales outlet( kayaks, river rafting etc) will replace the boston valve..real easy....you could do it...see videos from NRS rafting.("how to replace a valve on an inflatable raft)...but they can do it pretty cheap. You can order the boston valve from rivergear.com, or google replacement valves for rafts.I actually saw a boston valve set for replacement at BIMART
http://www.nrs.com/boating_tips/how_...boat_valve.asp
 
Last edited:

kenny25271

Cadet
Joined
Apr 9, 2013
Messages
9
I think I would go to hardware store buy a o ring that would fill the space around the damage part of the valve and get it just a shade bigger in thickness so it will seal when you screw valve down tight.
 

Brusac

Seaman
Joined
Dec 25, 2013
Messages
67
Rdiddy, As bad as Intex customer dis-service is I would not count on them assisting in any way other than to sell you a replacement boston valve. The silicon bead might work but I would suspect it would only last 1 or 2 uses so you would be doing that alot. Putting tape thread on the valve is probably your best bet next to replacing the complete valve assembly.

I meant to take pictures when I went out this weekend, however I wound up going on my friends little pond-hopper instead. Maybe I will have another chance next weekend.
 

intexbros

Recruit
Joined
May 9, 2014
Messages
5
Wow, Intex customer service is really bad. That phone call was a terrible experience. I'll try the plumber's tape and also see if I can get an O-ring. It does not appear that the part of the boston valve that is attached to the boat can be replaced. Has this valve issue happened to anyone else? Since I've got the issue on two of my valves it seems like more than just a random occurrence...

Thanks for the responses!
 
Top