Intex Mariner 4 modifications and Tips

Starkonian

Petty Officer 2nd Class
Joined
Jul 8, 2009
Messages
156
Anyone ever heard of/try this patch? The Type B patch works on PVC material I'm told by the company. Watch the video under Video - Application Hints...Link below

I picked up 10' of 10 AWG wire today to extend the reach of my Minkota trolling motor wires. I'm going to move the battery up to the middle of the boat. I weigh 210 lbs, the battery is close to 70 lbs which means presently I have close to 300 lbs on the stern portion of the floor. After reading the above posts on floor seam issues I'm worried I might blow it out in the rear.
 
Last edited:

flukesofnature

Petty Officer 2nd Class
Joined
Mar 9, 2014
Messages
122
starkonian
I have tried the tear aid and it seemed to work OK. I confess I went back later and put a patch with adhesive on the spot. I think in an emergency the tear aid would be a good first response to the leak. It comes with pretty good reviews. I will say this..find some way to keep it 100 percent dry if you use it as an emergency repair kit item. Carry some alcohol swabs with it( any drug sore or grocery store has them) I never got the type A and B down, B being the underwater? patch..which I don't give a lot of credence to. I blew a hole like that and lost all air once on the keel while rafting a river and hit a rapid sidewise and there was this large stick....but it went PFFFFFFFSSSST..oddly the two side tubes got me to the end of the day..and I patched it all at home I now pull out of the river/lake, dry off the area as best as possible and then wipe down with alcohol pad( twice )from the tear outward in small circles to cover at least an inch on each direction away from the hole, apply adhesive( I carry a small tube of LOC-tite pvc/vinyl cement..7.95 at home depot)let it dry for about 10-15 minutes, apply another coat of the adhesive to the same spot, and to the patch,let both dry 10 more minutes..then press the patch on the hole, use something..the blunt end of a fishing knife, a spoon whatever, and press the bubbles out from the center out ward..re- inflate and be on my way..only a small 30 minute excursion at worst, But here's the rub..At the end of that day, I would go home -reclean the area with acetone,extending out another inch to inch and a half from the edge of the first patch, and then repeat the patch process, this time with the hh66, and let that sit..uninflated( put a weight of some kind on it) and let the whole thing sit for at least 24 hours, reinflate,test the patch spot with soapy water and then I trust it is a done deal...maybe over kill..and maybe the tear aid would hold permanently.....Just sayin

Bibby
I have too agree with scottish on the two piece set up...I haven't read too much enthusiasm on the three piece set up...movement,unequal pressures at the joining edges, and a loss of the original intent, which would be stability when standing or moving in the boat.
I did use carpet, and it did get wet, and stay wet with the wet OSB, but it also has a heat breaking effect( all day long in glaring sun reflecting off of bare wood or worse...wood with shiny polyurethane coating....makes for a really hot floor and boating day.) Scottish hasn't seen the sun for 150 years(LOL) in that lattitude so heat and glare may be foreign concepts to him(LOL) eventually the rug has to be cleaned up..fish blood, power bait, dried ham sandwiches,etc, and it does add extra weight....your call.
The 3X3 section attached to the swivel chair.....think of leaning back real hard , while setting a hook on a fish, or if the boat hit a swell,etc....is that 3x3 section gonna stay down , secure , under the side tubes, when you put that kind of sudden pressure on it backwards.....?????

The HH66 is multi purpose...it can be used as above mentioned regular patching with PVC patch, OR( drum roll...) it can be applied directly to a hole where air is leaking out or water is leaking in( after drying, cleaning..as above) as an "adhesive membrane" of sorts, which does provide leak stoppage(sp?)It, in this application should be repeated several coatings( at least three)..with appropriate dry time between coats a necessity, and extending each coat a little farther away from the "centerpoint"where the hole is located. I use it because it probably has the best cost/amount value, and at one time I used about a quart of it to coat an area of blown side tube/floor seam leakage.

In reference to the difficulty in inflating the keel...I usually inflate my m-3 about 1/2 full in all chambers.with a 12 V coleman pump, from the cigarette lighter...then I carry it like a folded sandwich to the water( have gone 100 yards in this fashion) at waters edge I insert the floor pieces, swivel chair mod , and everything else...motor mount, trolling motor( you will find the motor mount is much easier to attach when the tubes are about 1/2 full) then I hand pump up the two side tubes and the floor, with the boat about 7/8 in the water( Again scottish nailed it when he describes the value of a larger keel hole). Then I shove off.The change from warm air( pump) to cool water usually causes a need to top off everything( the mariner 3 has three chambers)about 15 minutes in the water with the hand pump>NOTE always take the hand pump with you..Always....

**added note. Some never experienced a pressure drop after entering the water. They may have followed the Intex manual to the tee , by only hand inflating the M3/M4( yes there is paragraph warning not to use inflators battery or otherwise)...and the physics seems to make sense..compressed air is warmer, then cools..thus the pressure drop.I am used to a couple of top offs a day...but the first time I did that , undid the boston valve top to be able to use the hand pump, I thought I would for sure fly around in the air backwards for thirty seconds and be in the center of the lake draped in PVC watching my trolling motor submerged and dragging me farther into the abyss.....but it all turned out just fine.** I even notice a pressure drop when the wind changes, and just before dusk. WHO-KNEW???????

.The boston valves will allow you to inflate without any subsequent air loss..a nice , handy feature..the keel valve is supposed to allow that also, but even if it leaked a little while you inserted the hand pump, you could make up the difference..don't tempt fate though ..the keel valve is the easiest to unknowingly dislodge, and with a little pressure....PFFFFFFT..just sayin Also, the keel valve cover is the easiest to rip from the base of the valve, and then easy to lose during tear down,when putting the boat away....HMMMM how do I know this????? Pre think what to do and how to re-attach this cover/plug now while you are in the safety of your warm home (LOL)

The keel is easier to do in the water, yes, but if you don't like that method, turning it on one side will take the pressure of the ground pushing the keel upwards while inflating, and on its side you can pretty much inflate the whole keel no problem. Again..you will find out what works for you after a few set ups..no hard and fast rules...

Deflating the keel is easier, without having to squeeze it the whole time, by getting a 10 inch length of 8 or 10 guage wire(definitely rubber coated) duck tape the ends, fold it in half, and twist the bottom of the fold on itself about 5 or six turns. then fold down the two duck taped ends( it will resemble a "T") insert the twisted, bottom of the "T" into the keel valve, where it opens the flapper valve. The two ends of the wire( the top of the "T") prevent the wire from falling or being pushed accidentally too far into the valve(ask me how I know this!!!!) The air will rush out on it's own, you can do other things while it deflates. and it will stay in the hole , even while you are doing your final fold up( this helps get all the air out of the keel. Then remove the wire, and replace the valve cover( prevents air from working its way back into the keel..so that you (OF COURSE YOU CAN).....chuckle chuckle....) get the M4 back into its little bag, all folded nice and tight.
When you are done with the frustration of the fold into the Intex Bag game....get a 8x10 tarp. Fold the M4/M3 as tight as you can without having a stroke, place that folded bundle on the tarp that is folded in half lengthwise. Making it 4x10. Place the m4 bundle about 2/3 down the tarp. take that section ( the 2/3 length) of tarp and fold it to the edge of the M4.fold the short section of the tarp(The 1/3 section)to where is meets the edge of the folded 2/3 section( usually about the center of the M4 bundle. where these two edges of the tarp meet can be easily grabbed , and used like a sling to carry the M4,all bundled up to your car( without the slat floor in it..pack that in a separate area/smaller bag..or even in the "O-SO" useless Intex bag) and then place in your trunk area or back seat or fold down space. This tarp will protect the M4 and it can easily be carried to place of storage or next destination, like a sling,in most cases by one person. The slatted floor is what makes it too bulky and heavy to handle by one person.
If that doesn't work for you , just use the folded tarp to drag the bundled M4 to where ever you need to pack it into your car/truck....still easier that trying to handle the bundle by carrying like a big sand bag.....
 
Last edited:

sadarahu

Banned
Joined
Jul 20, 2014
Messages
13
Rule 6 - . You may not post in the forum to promote any personal enterprise, advertise a business or product, or to solicit responses for contests, polls, or similar. This includes directing members to social networking sites.
 
Last edited by a moderator:

flukesofnature

Petty Officer 2nd Class
Joined
Mar 9, 2014
Messages
122
Sadarahu..A lot of us have had bad bad experiences with Facebook foolishness...........I concur with ScottishScript
 

KingPhoenix

Seaman Apprentice
Joined
Oct 18, 2014
Messages
33
"Scottishscript~ so what did you end up doing with the floor situation. Greg_S said he uses two unconnected boards and did not report any stress issues with the boat. Was it the hinge which caused the boat to stress and rip? I was thinking of doing as Greg_S advised but don't want to trash the boat."

When I used two unconnected sections from day one I had zero problems. Here's a pic of one I made the other day and these work perfect.


It was only once I tried to turn the two separate sections into two sections that folded on hinges that I ran into trouble. The hinges made for easier transportation because I could fold them down, but the boards would never sit flat again when in the boat. This meant the weight of me, my seat and battery where transferred to two acute areas where the hinged sections joined. See photo below.

Hey Scottish thanks for the detailed report, I was wondering if you could post a pic of the otherside of the hinged floor if you still have it (would like to see the type of hinge and spacing you used). I was wondering if a piano hinge with ~half inch gap between the boards (to allow swelling) would keep it folding nicely. I feel like the unconnected boards could end up "pinching" a section of boat and wearing it down over time. (but i havent even taken the boat on the water yet so I have no basis for that assumption)
You made me realize i cannot store everything under the back seat so im going to make up a centre console to store the battery and mount a fish finder as many others have done. I may try to mount some proper rod holder on it as well. Kudos on trolling 4 rods off this boat!! Ill start with 2 for now, I expect to be fishing solo most of the time anyhow.
Just keeping my eye out for a set of seats and a decent trolling motor over the winter to pick up cheap.
Im having a hard time resisting buying it all now so i can get out on the water before the ice comes. Luckily the steelhead are keeping me distracted... for now.
 

Brusac

Seaman
Joined
Dec 25, 2013
Messages
67
Took the M4 out today for what will most likely be the final trip of the year. I was out in Cherokee Marsh on the Yahara River. The wind pick up a bit, it wasn't strong but it was enough to put some light chop on the water and that was pushing me the opposite direction of the rivers current. It also made it a challenge keeping the boat pointed in the direction I wanted once I anchored up in a spot I wanted to fish so I got to wandering if a drift sock would have been useful in this scenario. Anyone out there use one or have experience with one in an inflatable?

Also have the plywood to make my floor now and putting thought into that. A lot of new info. posted on that recently. Something that has been on my mind for that, has anyone considered how doing a flat floor can stress the boats seams? Just as an experiment I set up the M4 in my garage with the stock floor but I only inflated tubes 1-4 and left the keel flat. I then walked around the floor. When I stayed in the 6 foot center portion before the ends start to taper I could tell the slates were solidly against the garage floor, but as soon as I stepped into either end of the M4 where the sides taper in and the ends taper up it was obvious that the floor of the M4 was no longer on the garage floor due to the natural upward turn of the tubes. If I now insert a solid sheet of flat plywood in place of the flexible floor that prevents the boat from taking it's natural shape it seems to me that can cause stress the boat is not designed to have or deal with.

Just more for me to consider while I decide how exactly I want to build my floor. I cannot do a 2 piece as seems to be the most popular due to the limited cargo space in my vehicle. I am restricted to maximum of 3 foot lengths so a little extra engineering my be required on my part...
 
Last edited:

Brian B.

Seaman Apprentice
Joined
Apr 8, 2014
Messages
42
I use a small drift sock on my M4 bass fishing, it is an absolute MUST HAVE. It changes everything.

I have the "drift control" brand i bought off Amazon. Its very robust.

I bought the smallest one, and im confident it is the correct one, i have total control once it deploys and corrects itself/ balloons up with water..

The one i have is fabric reinforced blue vinyl, it has a heavy nylon eye loop at the end of the cone, i tie my fish basket here, it is absolutely the very best way i have found to manage and keep fish, days of grab ass with aerators are in the rear view mirror. (The weight of the basket at stopped cont... Well im not going to write a novel, just try itonce you get your sock.. Its awesome..)

(Now understand, i pull my boat while fishing, drift sock at opposite end being drug behind..)

Honest to goodness, as far as fishing solo, i can thing of no other vessel i would choose to fish from for a number of reasons..

Heres the bass i caught Sunday, from a Pelican not my M4,.. With a buddy.. My gosh was that thing squirrley!
 

Attachments

  • image.jpg
    image.jpg
    38.9 KB · Views: 3

flukesofnature

Petty Officer 2nd Class
Joined
Mar 9, 2014
Messages
122
Brusac
I can say from my experience....seams and seam/ floor junction are definitely stressed with wood floor. Without a doubt ...that is where the water leaks started to appear. Centering as much weight as possible( making mod so that , if you are solo most of the time, you can have your seat close enough to the middle to act as a centering balance) and then if you have a friend, mod your boat so that this function can be used to spread the weight fore and aft.
Maybe two set of holes where the seat can be moved, and then re- bolted down in second position.
I have re-sealed a lot of seam area in the last year....frustration.
But the trade off is having the floor, and the resultant stability, as opposed to no floor..or the original slatted floor????
I also think that the smaller size of the M3 just increases the pressure in the seams with me and the floor in place, whereas maybe the extra square footage of surface area in the M4 is enough to spread it out and and reduces the pressure just enough at the floor/side tube junction. I also am wondering if some of the original posts....may have been correct to add a PVC pipe frame( 1/2 inch or 1 inch diameter)under the floor may in fact remove the downward stress of the wood against the floor seams. I think if you raised it up( the height of the pvc pipe..say 1/2 inch) you might lose the advantage of having the wood floor "tuck" under the inflated side tubes, and all the stability that that affords. Just sayin
 
Last edited:

ScottishScript

Petty Officer 3rd Class
Joined
Oct 19, 2014
Messages
79
"Hey Scottish thanks for the detailed report, I was wondering if you could post a pic of the otherside of the hinged floor if you still have it (would like to see the type of hinge and spacing you used)."

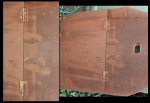
In response to KingPheonix, here's a pic of the underside of the disastrous hinged floor experiment.
BBH-01.jpg

I'm also attaching a photoshopped concept of what I feel may be the only way to use hinged floors. See below.
BBH-02.jpg

This is meant to represent two steel/metal runners that slide on to each side of the hinged board to prevent it bending and thus preventing pressure point issues on the hull floor. Hope this helps.
 

Starkonian

Petty Officer 2nd Class
Joined
Jul 8, 2009
Messages
156
I saw a you tube video where the guy making the wood floor cut a slot about half way through the wood thickness and all the way across both sections of the floor, width wise, near the front and rear section where the floor naturally starts to slant upward. I presume this is to relieve stress. I don't know how this works out. It seems to me however, the wood floor naturally spreads the weight over a larger area. Without it, siting or standing centers the weight on a couple slats and accordingly, a smaller area of the floor seam. At least that's the only way I can conceptualize it.
 

wwron

Cadet
Joined
May 26, 2011
Messages
9
"Hey Scottish thanks for the detailed report, I was wondering if you could post a pic of the otherside of the hinged floor if you still have it (would like to see the type of hinge and spacing you used)."

In response to KingPheonix, here's a pic of the underside of the disastrous hinged floor experiment.


I'm also attaching a photoshopped concept of what I feel may be the only way to use hinged floors. See below.


This is meant to represent two steel/metal runners that slide on to each side of the hinged board to prevent it bending and thus preventing pressure point issues on the hull floor. Hope this helps.


Scottish, If u have not already, go to page 19 post 283 this looks like what you might have in mind. Hope this helps.
WWR
 

wwron

Cadet
Joined
May 26, 2011
Messages
9
Came across this link looking at ribs. Might be of some interest for metal sides and connection of boards.
WWR
 

ScottishScript

Petty Officer 3rd Class
Joined
Oct 19, 2014
Messages
79
Few days ago someone messaged me for measurements on my custom motor mount. I told him I'd post details on the main board in case anyone else was interested.

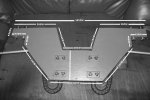
So I took a few pics to outline what's involved. First of all here are the overall measurements.
MM - 001.jpg
MM - 002.jpg
MM - 004.jpg

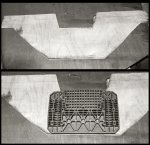
And this is how I usually start out. Once I've cut a base board to the right dimensions, I use the original Intex motor mount plate to mark out where all the holes for the u-bolts sit.
MM  - 000.jpg

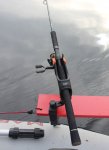
As regards the extension arms, it all depends on what kind of rod holders you go with. This was my solution for using Savage Gear holders.
MM - 005.jpg MM - 007.jpg

I also drill holes at the ends of each extension arm so I can fit a bungee which attaches to rung on side of boat giving extra stability.
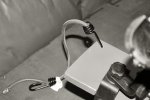
MM - 008.jpg

This next bit is probably the trickiest part.
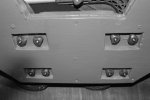
MM - 009.jpg

Let me explain what's going on here. I originally built this unit using just half inch ply to try and keep the weight down, but found it was a little flimsy, especially if you bumped something with the extension arms. So I just cut another half inch thick template and doubled up the plate for strength. However 1 inch of ply means you can barely tighten the motor mount nuts, as most of the u-bolt threads are recessed inside the two sheets of ply. To get around this I cut holes in one sheet of the ply so that the nuts and u-bolts are really only coming through one sheet. This way you can loosen nuts to fold everything flat and never have to take them off again.

It's important to use quality hardwood for the strips where your extension arms will bolt on. I used decking, you can usually find lengths of the stuff in the bargain bin of your local hardware store.

MM - 006.jpg

I use plain white wood for the extension arms which is weaker. The idea being, if there's a catastrophic collision out on the water, the extension arm will rip off at the bolts, leaving the motor mount, engine and everything else intact. Better to lose a rod and reel than your engine, sonar etc.

And this is what it looked like on the water yesterday ready to set off.
MM-011.jpg
Now please note the extension arms are actually angled outwards. If you don't angle them, your rod butts will be digging into both your thighs. In this position both rods are by your side and within easy reach should you hit a fish while trolling. The best way to figure out your angles is to build the back plate first, attach to your inflated boat, then place your extension arms on top and mark off your preferred angles.

Here's a view from inside the boat showing where the sonar sits.
MM-012.jpg

Having the sonar position here with it's shaft pressed against the rear side of the boat eliminates the one major flaw these all- in-one sonar units have. When moving at any speed with a trolling motor, the Humminbird will begin to vibrate in it's holder and try to pop out. By positioning it here, between the motor mount and boat side, you can troll full speed with no issues.

View of a rod holder from my chair.
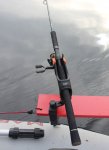
MM-013.jpg

Shot showing where the bungee cord goes.
MM-014.jpg

This motor mount is a work in progress, this design being the latest in a line of seven, I'm constantly tweaking.

Two issues. One the strength of the attachable extension arms. Right now I'm using two bolts for each arm, I may upgrade to a triangular arrangement of THREE if they start to move around too much. However, I recently caught a 22lb northern pike while trolling this way and there were no issues.

Second possible issue is the bottom nut of the rod holder rubbing against the boat. In the above pic you can see it's touching the boat. I've tried raising the height of the motor mount base board a few inches, but depending on condition this contact can still occur. The solution is to place a small towel there, or glue on a reinforcing patch.

A final thought. This custom motor mount is designed for my needs using specific fishing gear.

I troll for big pike and use baitrunner reels which I've been told are not used much in the States. Is this true? These are often used for carp or pike fishing from the bank in conjunction with alarms. Here's a pic.
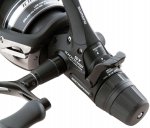
SHIMBAITRUN.jpg

I've been using them for trolling as I find their second free running gear can be tightened so that the trolling lure no longer pulls the line off. When a fish strikes it's not as hard on the custom motor mount extension arms, but more importantly, if your lure catches an underwater tree, the free runner will give out line.

I once snagged up at speed and realised I'd forgotten to engage the freerunner. Fortunately the custom motor mount and it's extension arm held firm, but the boat did turn sharply though.(I use braid of 30lbs up)

I can't think of anything else. If anyone has questions feel free to ask.
 

Attachments

  • MM-013.jpg
    MM-013.jpg
    81 KB · Views: 32
Last edited:

Starkonian

Petty Officer 2nd Class
Joined
Jul 8, 2009
Messages
156
I haven't seen the baitrunner reels much but they are available in the States. Typically used for live bait fishing. Walleye fisherman in the States often troll with live bait and plugs but typically hand hold the rod with the bail open and a finger on the line. When a fish is on they let go of the line for a period of time and then set the hook. I can see where it would be useful when trolling two rods. I've done a lot of pike fishing myself in Wisconsin but trolling is illegal in most lakes.
Nice set up and pics.

I've finished my floor, seats are mounted and I added extra padding. I'll try to post some pics soon.
 

KingPhoenix

Seaman Apprentice
Joined
Oct 18, 2014
Messages
33
I'm trying to decide what type of motor to get. I was thinking of the minn Kota maxx50, it's $300from amazon, but I was looking at the Endura 30 and it's half the price. I thought the 50 would be good for if I take the wife and kids out and for the future when I get a bigger boat. But the price on the 30 is nice.
I have no boating experience, so I have no idea how well either will work.
What size engine are you guys running?
Thanks

Also thanks for the pic Scottish. I think you should get some kind of award for the detail in your posts!!
 
Last edited:

Moneymakin

Cadet
Joined
Dec 28, 2012
Messages
8
Hey Kingphoenix,

I Do use a 40 Lbs C2 Minn Kota and it worked well when i used it last time.

As last time was 2 years ago, can only tell u, that If there will bw much Wind and u are on a big Lake, YOU will Be lucky to have more power :)
 

wwron

Cadet
Joined
May 26, 2011
Messages
9
I'm trying to decide what type of motor to get. I was thinking of the minn Kota maxx50, it's $300from amazon, but I was looking at the Endura 30 and it's half the price. I thought the 50 would be good for if I take the wife and kids out and for the future when I get a bigger boat. But the price on the 30 is nice.
I have no boating experience, so I have no idea how well either will work.
What size engine are you guys running?
Thanks

Also thanks for the pic Scottish. I think you should get some kind of award for the detail in your posts!!

King, I do not have a boat but am following this thread for future use. If u can save money and buy as much power as u can,either gas or electric. Better to have more power and not need then to have not enough and need more.
WWR
 

ScottishScript

Petty Officer 3rd Class
Joined
Oct 19, 2014
Messages
79
"I'm trying to decide what type of motor to get. I was thinking of the minn Kota maxx50, it's $300from amazon, but I was looking at the Endura 30 and it's half the price. I thought the 50 would be good for if I take the wife and kids out and for the future when I get a bigger boat. But the price on the 30 is nice. I have no boating experience, so I have no idea how well either will work.
What size engine are you guys running?"


Hi Kingfisher,

It's been a year since I bought my engine and I did a lot of research before doing so. And I can say without a doubt I do not regret my final choice.

I went for a 40lb Minn Kota Endura Max. The Endura Max not only extends your battery life, but it also gives you far greater speed control if you're trolling.

Cheaper Minn Kota's (the plain old Endura) have notches for speed 1-5 or 6. The Endura Max allows you to set speed between the notches for more control. My friend has another brand of motor and it has fixed speed notches and he feels his best trolling speed would be between two speeds, which he cannot access.

My advice is to spend more up front for the motor and buy an Endura Max. Not only does it come with a built in battery meter, it will save you money on marine batteries as it drains them far less.

As regards which lb thrust to buy, as I recall from my research, the more lb thrust your engine has the more it will drain your battery, and you will see little or no difference in speed between a 40 and 50. What WILL make a difference to speed is to buy a Minn Kota Weedless Wedge prop to replace the one that comes with the motor.

My 40lb Kota pushes the Mariner 4 with its ply floor, boat seats, custom motor mount, bowboard laden with crates, with 2 people trolling 4 rods and at 50% speed I can get between 4-6 hours from a 110 AH battery depending on wind speed.

Hope this helps.
 
Top