Intex Mariner 4 modifications and Tips

Big Sur

Recruit
Joined
Jul 21, 2014
Messages
2
Well, I could not find my original post but I finished my modifications. I have uploaded pictures and a detailed list of all materials. Feel free to ask any questions.

The 1/4 - 20 X 1 1/8 Allen head cap screws go through the wing nuts to provide infinite adjustment to prevent screws from going through t-nuts and causing sharp edges.

My down loads apparently did not work, sorry.
 
Last edited:

skierbri10

Recruit
Joined
Jul 5, 2013
Messages
1
I've had my Mariner 4 for a year now. I don't get it out much, but thought these pics would be of interest. This boat is bone stock with an intex motor mount and an Endura Max 55 motor. I would like to put a wood floor in and get a trailer. Dealing with the setup and breakdown with two boys 6 and 4 years old is not a joy, but it gets done.

Ul8Aq69.png


kGimeG8.png


7vGfQGy.png
 

Slayer33

Seaman Apprentice
Joined
Jul 22, 2014
Messages
47
The holes were at the beginning of the hull, below the handle (on each of the brand new M4s)
Did you notice a slow leak? I had my new mariner out a couple days ago for about 5 hours but did not notice any lower pressure in any chambers..
 

Slayer33

Seaman Apprentice
Joined
Jul 22, 2014
Messages
47
Can anyone recommend where the best place is to mount a transducer on the mariner? I just picked up a lowrance elite-4x HDI fish finder that has the combo (sonar/di) transducer. I know there is a trolling motor mount available, but I'm curious to know if there any other locations on the boat that may work?
 

GraysonAC

Recruit
Joined
Aug 12, 2014
Messages
3
Hi Al - Another new member. I picked up a used Mariner 4 (in great shape, no patches), and it's the older, yellow-stenciled version. My big concern with this one is that it's got 3 chambers instead of 5 - port and starboard, plus the 3rd (bottom). If one of these pops a sizable hole, I think i'm seriously screwed out on the water. Has anyone else got this older version, and if so, any thoughts about this? I've got a foot-pump that inflates it fast, so maybe I'd be ok.

Looks like this:
http://www.intexcorp.com/old_site/images/cert_origin_boats/image-11.jpg

I've seen yellow-stencil versions that *do* have the 4 chambers, so I'm confused about the development progress.

Also, anyone with the older version - any other differences you're aware of? Only obvious one I can see is that the fishing-rod mounts aren't diagonally set like the new version, and it's got the round seats (which are awful). Wondering if this older model has any other issues (or maybe advantages) that I should be aware of.
 

mmperry

Recruit
Joined
Jul 28, 2014
Messages
2
I'm away from my mariner 4 for a few days so I'm hoping someone with one setup could give me the dimensions from oarlock to oarlock and water level(floor) to top of the tube. thanks for your help.
 

Landohour

Cadet
Joined
Jun 26, 2014
Messages
10
No Title

There was no loss of air or pressure. Kept the M4 inflated for two days and only water I took on was within the area where the holes were, thankfully it was NOT part of the hull air chamber.
Did you notice a slow leak? I had my new mariner out a couple days ago for about 5 hours but did not notice any lower pressure in any chambers..
 

Attachments

  • photo205766.jpg
    photo205766.jpg
    12.1 KB · Views: 7

Slayer33

Seaman Apprentice
Joined
Jul 22, 2014
Messages
47
hmmmm interesting.. I had a little bit of water under my floor after the trip on Sunday, maybe mine is taking on a little bit of water from there? Only about a couple ounces tho, and that could've been from splashing water up from boating around?
 

flukesofnature

Petty Officer 2nd Class
Joined
Mar 9, 2014
Messages
122
Landohour
Since you have found the holes, and from your description are on the outside, Loc-tite Plastic/vinyl cement works great. Dab a drop on each of the holes(doesn't take but a very small amount) wait about 20 minutes and repeat, then repeat again. It dries clear...let it cure for 24 hours. that is 3 new layers on the original that will stop the leak from outside to inside.
It has been suggested that you can fill the boat up with air in all chambers, and then fill the bottom section (with valve closed..lol) with water about two inches deep....this will show some of those minute leaks that seem to come from the seams between the side chambers and the floor section, as shown by the stream of small bubbles in the water.....mark the location and use the above LOC-tite on those also. Or ...a couple of tubes of the above( 3.95 ea at home depot) and proactively seal the out side seams on the bottom where the sides are stitched to the floor section.....which many comments seem to indicate the highest probability of leakage. Sail-rite dot com offers a cement hh-66 , well recommended, which is a little more expensive but comes in a larger quantity...up to a quart.
Or send the boat back..( on your dime for shipping) and wait 6 weeks for Intex's award winning customer-no-service policy to get a new boat to you( sarcasm)
 
Last edited:

flukesofnature

Petty Officer 2nd Class
Joined
Mar 9, 2014
Messages
122
Grayson
Never heard of a three chambered Mariner 4...but I have the Mariner 3, and it is designed with the three chambers. If there is such a horrific rip in one of the upper chambers, the two others will get you to land. I suggest ( I do this) you carry a small zip lock bag with a repar kit...the above mentioned Loc-tite vinyl and plastic cement..small tube( goes a long way) , PVC patches...wall- mart has them, and a pack of what is called "tear - aid"...available on line( amazon) or some out door stores. This whole set up is about the size of a pack of cigarrettes..and wil get you back afloat in about thirty minutes. Always carry the hand pump.....good for pressure drops and top offs.
 

flukesofnature

Petty Officer 2nd Class
Joined
Mar 9, 2014
Messages
122
slayer
hope your fishing trip was great....maiden voyage sounds like a success. If you will google " Amazon - Garmin 150 fish finder- reviews" you will find a number of ways to mount your transducer. One of those was to just securely zip tie it to the bottom of your rear handle( carrying handle), but there was a comment on how the bubbles from the motor may affect what you see on the screen.
This guy( EASTTennesseeFishing) video has a pretty cool idea...
http://www.youtube.com/watch?v=U53gpRg1fCk
 
Last edited:

Slayer33

Seaman Apprentice
Joined
Jul 22, 2014
Messages
47
Thanks flukesofnature. The trip was a quick test of the mount and motor, the big trip is this weekend, so I hope to be able to make my floor in the next couple days. I picked up 5/8" plywood and am going to seal it with thompsons water seal after I cut and router it, also picked up some foam pipe insulation to go around the edges.

From what I get, I need to cut it 1" inside from the slatted floor template? I haven't measured the length yet, but is 1 4x8 sheet enough?

I just got back from my local fishin shop, they recommended the minn kota universal mount for my transducer, its really robust, but I am worried that once its on, the transducer will be really close to the prop.
 

GraysonAC

Recruit
Joined
Aug 12, 2014
Messages
3
Thanks Flukes, that's the plan. Finding this stuff in Vancouver has been a royal PITA, which makes no sense to me since we're on the friggin' coast!

The old Mariner that I've got has 2 main chambers (port/starboard), the third chamber is just the one under the floor.
 

flukesofnature

Petty Officer 2nd Class
Joined
Mar 9, 2014
Messages
122
Grayson
There was some talk when Mariner 3 was changed from Seahawk II that the older Seahawks had a floor valve the same size a a beach ball or air raft, the mariner 4 is a bigger version of the M3( used to be Seahawk) so it follows that the Older M4 might have the same close to useless valve...the newer ones have a larger valve that has the same diameter as the Boston valves , so if you can see the difference you might have some problems if you are using a newer hand pump, and it is a PITA to deflate.

Slayer
I don't have an M4....but one guy in the thread, seeing that he did not need a floor all the way to the very ends of the boat, used just one piece of 4X8....I think you lose 4 inches on each end( check the length yourself..but I think I have read it is 106 inches)...most every one else..and there are many thread references, using two pieces would have to use (2) 4x8 plywood sheets.If you can live without the 4-5 inches at each end( my thought is how many times do you actually stand in those areas???) one sheet would do it.See post number 556 for pics.
The other thought is using the new floor over the old floor..most comments are in the range of not using the double floor..only using the new one. If you decide on this course, when I measured mine( same concept) I measured about 1 inch under the edges of the inflated side tubes , and then took about 3 inches off( 1 1/2 inch from each side) figuring about 1/2 inch for the pipe insulation thickness on each side.(original measurement under tubes was 37 inches for the M4..)
THIS TURNED OUT TO BE TOO SNUG, AND SEEMED TO CAUSE EXCESS PRESSURE ON THE FLOOR / SIDE TUBE JUNCTION... as shown by the sudden discovery of the same amount of water on the floor which you described above. It started small..but got progressively more, the more I used the really tight floor. I ended up taking another 3/4 inch off each side.
 
Last edited:

Landohour

Cadet
Joined
Jun 26, 2014
Messages
10
No Title

Landohour Since you have found the holes, and from your description are on the outside, Loc-tite Plastic/vinyl cement works great. Dab a drop on each of the holes(doesn't take but a very small amount) wait about 20 minutes and repeat, then repeat again. It dries clear...let it cure for 24 hours. that is 3 new layers on the original that will stop the leak from outside to inside. It has been suggested that you can fill the boat up with air in all chambers, and then fill the bottom section (with valve closed..lol) with water about two inches deep....this will show some of those minute leaks that seem to come from the seams between the side chambers and the floor section, as shown by the stream of small bubbles in the water.....mark the location and use the above LOC-tite on those also. Or ...a couple of tubes of the above( 3.95 ea at home depot) and proactively seal the out side seams on the bottom where the sides are stitched to the floor section.....which many comments seem to indicate the highest probability of leakage. Sail-rite dot com offers a cement hh-66 , well recommended, which is a little more expensive but comes in a larger quantity...up to a quart. Or send the boat back..( on your dime for shipping) and wait 6 weeks for Intex's award winning customer-no-service policy to get a new boat to you( sarcasm)
Thankfully I bought my M4 directly from rubberboats dot com. With first boat, they had a replacement to me within a week. The newest one (the replacement) I have to cut a section out and the will reimburse my purchase. Must say, I spent a lot of time and money making modifications (floor and seats) because I enjoy fishing and wanted this boat to last for a while.
 

Attachments

  • photo205893.jpg
    photo205893.jpg
    167.2 KB · Views: 36
  • photo205894.jpg
    photo205894.jpg
    83.9 KB · Views: 38
  • photo205895.jpg
    photo205895.jpg
    163.8 KB · Views: 36
  • photo205895.jpg
    photo205895.jpg
    163.8 KB · Views: 37

flukesofnature

Petty Officer 2nd Class
Joined
Mar 9, 2014
Messages
122
Landohour
Yep....The bare bones Mariner has an addictive appetite for cash once you start doing modifications!!!! That is why they call it a boat...
BO rrow A nother T housand.......LOL
Like a small whiney child.....Daaaad ...I'M LEAKING.........FIX ME ! FIX ME!
 
Last edited:
Joined
May 21, 2013
Messages
15
Thanks flukesofnature. The trip was a quick test of the mount and motor, the big trip is this weekend, so I hope to be able to make my floor in the next couple days. I picked up 5/8" plywood and am going to seal it with thompsons water seal after I cut and router it, also picked up some foam pipe insulation to go around the edges.

From what I get, I need to cut it 1" inside from the slatted floor template? I haven't measured the length yet, but is 1 4x8 sheet enough?

I just got back from my local fishin shop, they recommended the minn kota universal mount for my transducer, its really robust, but I am worried that once its on, the transducer will be really close to the prop.
If you are going with a trolling motor transducer mount, use this one http://www.amazon.ca/Rig-Rite-Manuf...407882136&sr=8-1&keywords=rig+rite+transducer . It's MUCH more robust and solid compared to the minn kota one. I have banged it up so many times it's still going strong.
 

Slayer33

Seaman Apprentice
Joined
Jul 22, 2014
Messages
47
No Title

If you are going with a trolling motor transducer mount, use this one http://www.amazon.ca/Rig-Rite-Manuf...407882136&sr=8-1&keywords=rig+rite+transducer . It's MUCH more robust and solid compared to the minn kota one. I have banged it up so many times it's still going strong.

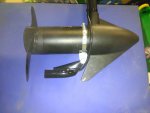
Thanks Shadow Cruiser, this Rig Rite actually looks like a less expensive version of the Minn Kota universal one I picked up. I ended up using the transom mount bracket on the trolling motor, I had to make a couple bends, but its on, the one nice thing with this one is #1 its free (included in the FF kit) and it locates the transducer a little further away from the propeller. The bad thing is that its probably not that durable and it actually sits pretty low, but not the lowest point of the TM.

I didn't try the Minn Kota universal mount yet, but from what I can see, it will mount the transducer higher up closer to the body, but it will also move it closer to the prop than the bracket I used....

So in your opinions whats better?

lower down and further away from prop on a free/not as robust mount

or

higher up and closer to prop on a more robust mount?

I've attached a pic of the included transom mount (the transducer on the elite 4x is quite large in comparison since it does both sonar and down imaging).
 

Attachments

  • photo205941.jpg
    photo205941.jpg
    58.9 KB · Views: 14
Top