Installing new bellows

nnl1987

Seaman Apprentice
Joined
Sep 20, 2016
Messages
43
Anything else I should know before I change the bellows in the omc cobra? I've read the manual and seems fairly straightforward:

Coat the outer surface of the gimble bearing flange, watch for the grooves.
Watch the positioning of the clamps mentioned in the manual.

Anyone else have any tips or anything to add? I've done a lot of my own work to the boat at this point engine rebuild, resealed lower gearcase, a lot of gelcoat work, countless hours cleaning. But changing the u joints bellow by far makes me the most nervous.
 

Scott Danforth

Grumpy Vintage Moderator still playing with boats
Staff member
Joined
Jul 23, 2011
Messages
48,097
U-joints only need changing if they are bad. Usually a long with an upper seal and bearing.

How is the gimbal bearing?

@Lou C can offer pointers
 

Lou C

Supreme Mariner
Joined
Nov 10, 2002
Messages
12,138
I have found that the OMC Cobra bellows will last about 10 years before small cracks start forming in the folds, that's a good time to do it before you have a failure.
Suggestions:
Use an OEM bellow, I think they fit better and last longer.
While some people try to avoid removing the pivot housing by removing the exhaust bellows first, I don't think that's a good short cut, because you really want to make sure that the end of the bellows that fits on the gimble housing is on correctly.
so this means you have remove the pivot housing....there are 2 half in hex bolts (IIRC) that have to be removed, and there are plastic washers between it and the swivel housing.

What I did to avoid having to re-adjust the shift cable:
I go up top on the engine bracket and just pull the cotter pins that are holding the shift cable in the engine shift bracket, and tape the threaded cylinder in place so the adjustment can't change. This allows you to pull the pivot housing back without stressing the shift cable but leaving the adjustment as it were.
Start with removing the exhaust bellows, watch out for the snap ring on the stern end, wear eye protection. Remove the other end of the exhaust bellows and put it aside.
Then next, I remove the stern end of the D/S bellows from the pivot housing then I tie a length of twine around the opening in the pivot housing and run it up to the ski rope hook up on the boat, that will hold it in place but let you move it as needed. Then remove hex pins and pull it out from the swivel housing. Now you can get at the DS bellows at the gimble housing end and unscrew the clamp
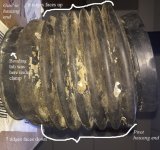
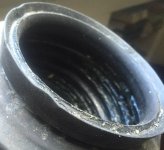
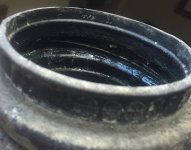
after you get it off clean up the flange on the gimble housing. You'll see a groove in it and there is a raised lip in the bellows flange that fits into that groove.
also the bellow is asymmetrical, there is one more fold on one side, this should face down, so it gives it more stretch when you tilt it up, makes it last longer.
I put some Evinrude gasket sealer on the flange for the bellows and oriented the screw clamp at about the 2:00 position.
Then use triple guard grease on the other end of the bellows and pop in into the pivot housing.
Next install the gimble end of the exhaust bellows with the clamp
put some grease on those plastic washers to hold em in place and maneuver the pivot housing back in place so you can reinstall the hex bolts. Tighten up the hex bolts and re-install the other end of the exhaust bellows with the snap ring.
go back up by the engine bracket and re-install the shift cable.

This way works pretty well, just take your time to make sure the DS bellow is installed right on the gimble flange end.
Here's some pix from the last time I did it.
in the last pic you can see the ridge in the lip for the bellows, that fits into the groove on the gimble housing flange.
 

Attachments

  • Cobra bellows asymetric design.jpg
    Cobra bellows asymetric design.jpg
    266.8 KB · Views: 5
  • Cobra bellows pivot housing end.jpg
    Cobra bellows pivot housing end.jpg
    106.2 KB · Views: 5
  • Cobra bellows ridge.jpg
    Cobra bellows ridge.jpg
    99.6 KB · Views: 5

dubs283

Vice Admiral
Joined
Jul 27, 2005
Messages
5,308
Nice write up, Lou

Would add that you should ensure the threads for the hinge pins/bolts and pivot housing are clean upon reassembly. Use blue loctite on the threads and torque to 100 lb/ft max (same as alpha style)
 

Lou C

Supreme Mariner
Joined
Nov 10, 2002
Messages
12,138
I used OMC Gasket sealer on the threads because of salt water moorage on mine. That way they WILL come out even though you gotta get em bubba tight.

BTW this procedure will also work for a Volvo SX because the design is very similar, except for the shift cable, I'm not sure if my trick with the OMC Cobra cable will work on a Volvo.
In fact at one point the Bellow was the same part IIRC. Then later on Volvo changed to a different style for these models.

PS forgot to mention about the bonding tab that goes under the clamp, see the first pic above.
 

dubs283

Vice Admiral
Joined
Jul 27, 2005
Messages
5,308
Volvo made it easy for the shift cable. Just loosen the clamp tab (3/8" wrench) and bobs yer uncle
 

kenny nunez

Captain
Joined
Jun 20, 2017
Messages
3,141
The inside of the bellows is tight where the outer surface of the universal joint coupler passes through. Put some grease on the coupler and rotate the coupler with a suitable tool until the shaft engages the engine coupler, by then the drive should be able to go all the way in.
 

nnl1987

Seaman Apprentice
Joined
Sep 20, 2016
Messages
43
My bellows are cracked but still watertight. I was in such a rush last summer to get the boat into the water after the engine rebuild at the end of the year (less then 20 hours on the new hour meter) that I didn't change them. Kinda kicking myself that I didn't since I had the drive off to reseal it. Not many more steps to change the bellows. I will be changing the seal and the gimble bearing along with the lower shifting cable, have the tools to change the gimble bearing and seal (plus check alignment), and the tools for setting lower shifting cable.

I went and checked my new OEM bellows and you are correct about the asymmetrical design I will definitely be installing it the way you do Lou C it only makes sense for stretch. Thanks you all for your input very much appreciated.

Will make me feel better floating the boat again in the spring without it having a leaking bellows that I created.
 

Lou C

Supreme Mariner
Joined
Nov 10, 2002
Messages
12,138
The las time I changed mine was 8 years ago and it still looks like new as far as cracks etc. Every year I pull the drive & really check it.
 
Top