Inline 6 serial 5314656

demarko210

Senior Chief Petty Officer
Joined
Jan 2, 2015
Messages
655
On the port side at the bottom near cylinder 6 there is water spraying out. Can someone tell me the correct part or gasket to buy to fix this? My compression reading are 100 100 110 110 110 95 thanks. The entire cover where the throttle arm is will need to come off. Can someone tell me the name of the gasket ?
 

Attachments

  • photo225883.JPG
    photo225883.JPG
    56.4 KB · Views: 0
  • photo225884.jpg
    photo225884.jpg
    112.1 KB · Views: 0

Chris1956

Supreme Mariner
Joined
Mar 25, 2004
Messages
28,550
Is the leak in the cylinder head water jacket or the exhaust cover? The Crowley marine web site will allow you to look up parts by serial number.

My advice is to try to stop the leak with a touch of silicone. It is a lot less work. Those bolts holding the cover on easily break when you try to remove them. That is a real PIA to fix.....
 

demarko210

Senior Chief Petty Officer
Joined
Jan 2, 2015
Messages
655
Chris1956
Its coming from one of those bolts at the bottom. I took the close up from the back of engine.
 

emckelvy

Commander
Joined
Jan 16, 2004
Messages
2,506
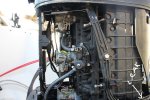
That's the exhaust manifold cover and baffle plate. As Chris said, it's a real pain to work on, especially if those 5/16" stainless bolts have seized in the aluminum block. You have to use a combination of shock on the bolt head, and heat to remove. And if they don't want to move with just normal force on a wrench, they're stuck.

Sometimes stuck so bad that you have to drill the bolt head off, then once you've gotten all the bolts out and covers removed, grab hold of the bolt stub, heat the heck out of it, and hope it breaks loose. At least with the covers removed, you can apply heat to both sides of the block where the bolt threads into.

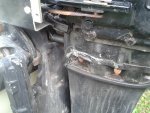
Now, back to your external leak, as long as you're not getting water in the cylinders (gaskets leaking/spraying internally), you could attempt a stop-gap repair by attempting to seal with RTV. Don't use Ultra Copper; black or Hi-temp red work well. Make sure the area is clean & degreased so the stuff will stick.

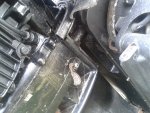
One other thing you might try, it to very carefully lay a wrench upon the couple of bolts nearest the leak, and see if they will move (in the tighten-direction only!).

If the bolts will move, snug them down. Just don't force them, as you don't want to break off a stainless bolt in an aluminum block. That is, unless you like doing Heli-Coil repairs! It's just about impossible to drill out a stainless bolt busted-off in aluminum, and just tap out the hole. The left-over shards of stainless foul the tap, sometimes breaking it off in the hole or shredding the alum. threads. Making it worse than when you started!

Give the tightening thing a shot and if that doesn't work, just seal 'er up with RTV until you're ready (if ever!) to take the Big Plunge (pulling powerhead for good access to the cover/plate and replacing gaskets).

HTH..........ed
 

demarko210

Senior Chief Petty Officer
Joined
Jan 2, 2015
Messages
655
emckelvy
Thanks. I was hoping this side was the transfer port cover, so i was wrong looking at the diagram. So the transfer port cover is under the ignition mounting plate correct? My engine has been cut on the sides to remove the sides to get to the bottom. i do not think i would need to remove the engine to get to this.
 

demarko210

Senior Chief Petty Officer
Joined
Jan 2, 2015
Messages
655
Can you tell me what parts I need to order from the parts website so I can get started? Is it just gasket 72507 or 72509
 
Last edited:

emckelvy

Commander
Joined
Jan 16, 2004
Messages
2,506

demarko210

Senior Chief Petty Officer
Joined
Jan 2, 2015
Messages
655
emckelvy

Thanks man I will order them today. I tried to post a link where it show the diagram of the engine but the website would not like it show. I really thanks for the help. Where are you from? Im in Maryland.
 

Chris1956

Supreme Mariner
Joined
Mar 25, 2004
Messages
28,550
If you are going to try to replace those gaskets, which is a dumb idea IMHO, you will want to pull the powerhead, and lay the block on the bench. You will need heat, prayer and impact to get those bolts out.

Since you are in Maryland, what are the odds that the motor was run in saltwater? If salty, prepare for 1/2 or more of the outer cover bolts to break, no matter how careful you are. Most if not all of the inner cover bolts will break, as well.

You will need a drill press, a punch, Cobalt drill bits, taps and lots of time to drill out the old bolts, and retap the holes.

All of that work, rather than a smear of silicone.....
 

demarko210

Senior Chief Petty Officer
Joined
Jan 2, 2015
Messages
655
2015-07-24 12.16.02.jpg

2015-07-24 12.15.33.jpg

Chris1956

Chris the why my engine is set up its not to much work. Yesterday it took me about an hour to remove the exhaust plate. Here is an image of the work. The bolts came out easy. Since emc told me that it is an aluminium block i will use some anti-seize with on the bolts when i replace. Its oily should I clean out the inside with something or just clean the gasket surfaces?
Also there is an image of the #6 piston ring can you tell me if they look ok? this is the cylinder that was at 95 psi when i did compression check. As you see there is a little water in there as it about a half cup ran out when i open the bottom bolts.
 
Last edited:

Chris1956

Supreme Mariner
Joined
Mar 25, 2004
Messages
28,550
Well you had better luck with the cover bolts than I had expected. Good for you. That motor has likely never seen saltwater, or she was well flushed after daily use in saltwater.

You must make sure all gasket surfaces and the exhaust baffle are flat and clean, or it will leak again. Antisieze is generally not recommended as the metallic components can interact with the aluminum block. Permatex #3 is a good choice, in my opinion.

The rings look OK. Pull the lower transfer cover and inspect the cylinder for scratches, which contribute to the low compression.

Make absolutely sure the inner water jacket cover is not leaking, or your repair will not work. It makes sense to replace the lower crank seals at this time as well.
 

demarko210

Senior Chief Petty Officer
Joined
Jan 2, 2015
Messages
655
2015-07-24 12.15.33.jpg
Chris1956

The inner water jacket cover, is that what the arrows are pointing to 24 bolts? and where is the the crank seal? i am not a mechanic but if i can find it and see how it comes off i can do it. Thanks for the help!
 

emckelvy

Commander
Joined
Jan 16, 2004
Messages
2,506

Chris1956

The inner water jacket cover, is that what the arrows are pointing to 24 bolts? and where is the the crank seal? i am not a mechanic but if i can find it and see how it comes off i can do it. Thanks for the help!

If you can positively determine that there are no leaks coming from the inner water jacket, it's best not to mess with it. Any water leaks would wash away the carbon in the area of the leak.

Note that the inner bolts are epoxied in place with a special compound called Resi-Weld. If you do have to remove the cover, it's best to heat the area around the bolts to soften-up the stuff and prevent bolts from breaking. You can use Loctite Red 571 on the bolts when you reassemble.

If you see no leaks, one good thing to do is check the inner cover for any cracks. If everything looks good, leave it alone. It can be a Big Bag of Worms, thus the recommendation.

Ditto what Chris said on the Permatex #3 for the bolts. Permatex will seal the bolt and prevent any salt/deposits from ever forming around the bolts and causing them to seize.

If the gaskets you get are dry, use Permatex No. 3 as a gasket dressing. Just a thin coat, no need to slather the stuff on. If the gaskets have glue on them (they'll be shiny & sticky), don't use any dressing. Be sure to torque all bolts to the proper values.

If you don't have a manual, check out this online resource:

http://www.boatinfo.no/lib/mercury/m...40-115.html#/0

And the crankshaft seal can only be accessed by pulling the powerhead. You don't have to split the cases to remove the lower end crankshaft end cap, where the seals reside.

If you find that you're sucking water into #6 after replacing the exhaust manifold gaskets, likely the lower crank seals are bad and water is getting in from there.

HTH.........ed
 
Last edited:

demarko210

Senior Chief Petty Officer
Joined
Jan 2, 2015
Messages
655
emckelvy, Chris1956

Hey guys i removed the inner water jacket and 1 bolt did break sad to say. So i replaced the 3 gaskets and put it back together. I did not start it I will go back to the marina and start it today. I will let you know how compression and the the leak is. Thanks
 

emckelvy

Commander
Joined
Jan 16, 2004
Messages
2,506
Did you repair the busted bolt on the inner water jacket cover? If not, it's gonna leak!
 

demarko210

Senior Chief Petty Officer
Joined
Jan 2, 2015
Messages
655
emckelvy

Actually I did not, gosh now you are going to have this on the back of my mind. Hopefully it will get me through till fall and then I will try to do some more work to it.
 

demarko210

Senior Chief Petty Officer
Joined
Jan 2, 2015
Messages
655
emckelvy

I wanted to ask you how important are those ground wires that are connected between the lower exhaust housing and the engine body? And i checked my fuel, is this water in my fuel?
 

Attachments

  • 2015-08-08 09.25.02.jpg
    2015-08-08 09.25.02.jpg
    138.6 KB · Views: 2
  • 2015-08-08 09.25.15.jpg
    2015-08-08 09.25.15.jpg
    138.9 KB · Views: 2
  • 2015-08-08 09.39.48.jpg
    2015-08-08 09.39.48.jpg
    102 KB · Views: 2

Chris1956

Supreme Mariner
Joined
Mar 25, 2004
Messages
28,550
The ground wires might be important or there may be sufficient clean metal-to-metal contact. You can check it with a meter, or just replace the ground wires. A piece of SAE 12 wire and a couple of crimp-on connectors will fix it....easy stuff.

I would say you have water in your fuel. It is best to get is out. Siphon the bottom of the fuel tank into a Jerry can. Use the siphon hose like a pool vacuum to get all the bottom layer of fuel. Let her sit, and then siphon the bottom of the Jerry Can into a clear gallon container. Pour off the good fuel and discard the water.....
 

demarko210

Senior Chief Petty Officer
Joined
Jan 2, 2015
Messages
655
Chris1956

Thanks Chris I just found a you tube video for a product called "Mr. Funnel" that filter out water from fuels. I will be buying it from Amazon today. Check out this address:
 
Top