

ignition/spark

chris812

Cadet
Joined
Feb 5, 2011
Messages
24
Hi, I am not too smart when it comes to electrical systems. I have a 1964 28 hp johnson that I have already spent a lot on already so i am not about to give up. So my dilemma is I am trying to put everything back together. Now I don.t have a timing tool. I have the points spaced right at .020. Now when I use a multimeter ant test for open or closed circuit between end of spark plug wire and the points open and closed I still get a reading. Is it supposed to read. How do i be sure everything is right? HELP please.

Ok I am editing this post. Let's try explaining it a bit more. When I put the red test lead in the plug wire end and connect it to the frame or any part of the points on either side I get a reading, points open or closed. One Why does it do that two is that normal? If I just put it together is it going to work. I am having trouble trying to understand the theory of how the "spark works and how to test for "spark" with the tester when the points open and close. Am I supposed to have the tester leads connected a certain way?
 

cajuncook1

Chief Petty Officer
Joined
Sep 3, 2009
Messages
559
Re: ignition/spark

Here is a set of instructions that will get you on your way to trouble shooting and resolving your ignition troubles. Read carefully and follow the steps. If the flywheel is off, then all you need to set your timing is a screw driver and a feeler gauge.


Your going to need to inspect your point, condenser and coils. They are located under the flywheel. Hopefully all you need to do is clean and regap your points and you might be in business. Still check your coils and condensers and plug wires.


Here is how to pop your flywheel off and it gives you information about re-torquing you flywheel nut.

How to Change Coils and set points on old OMC's?/ 294072


Here are two link to show you how to test your coils and condensers.

How to test a coil in an antique outboard engine - YouTube

Antique Outboards and all about condensers - YouTube


How to replace your coils, points and condenser. Please take digital pictures as you go, so it will help you return everything back in the right order. Keep cheap zip lock bags available to put your parts in so you don't lose them. They are small.

If your coils are good, but your points and or condensers are bad, then you can certainly order a set of points and condenser here from iboats. Easy breezy.

Here is some information I put together for a guy on another forum, but the information should help you out just the same.


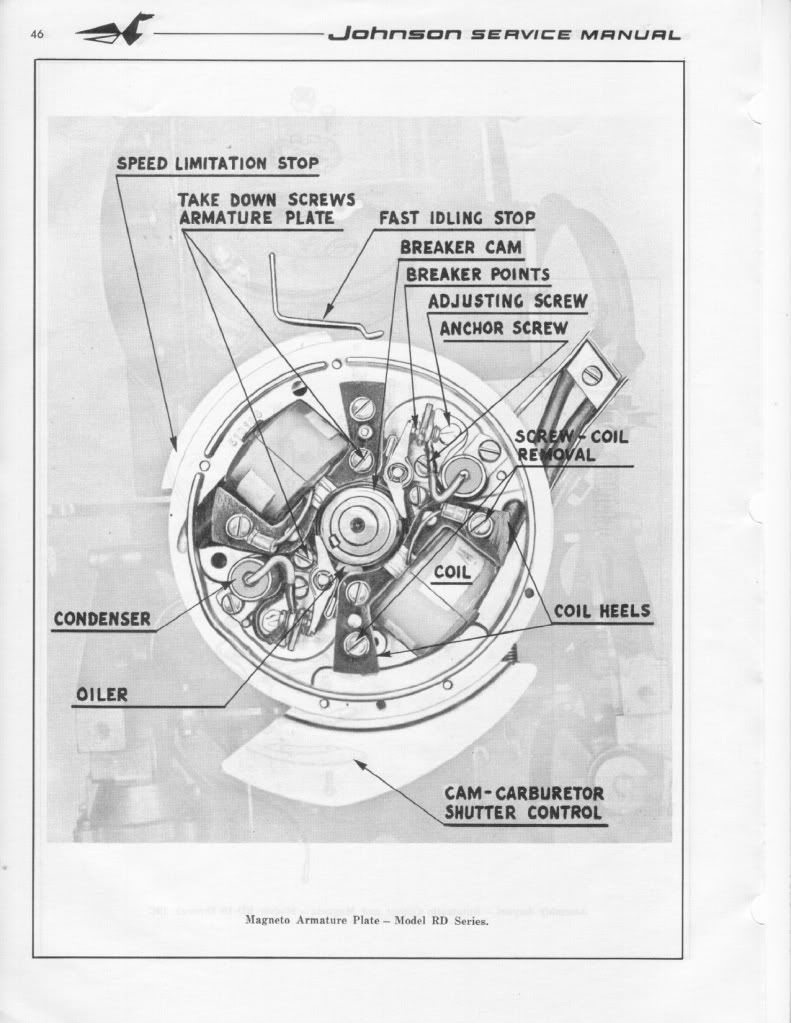
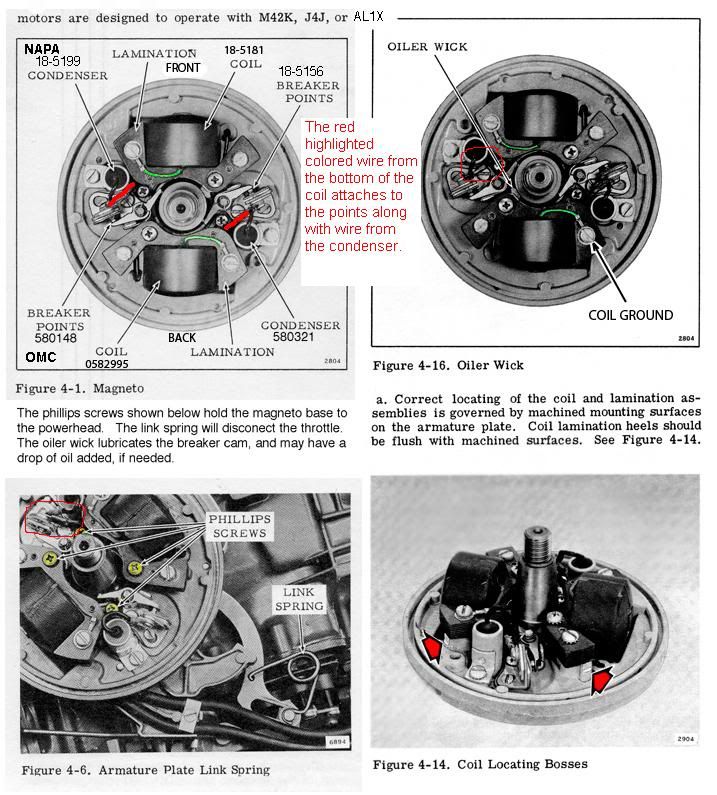
Here is a diagram of a generic OMC (Johnson/Evinrudle/Gale) ignition assembly. You will have to remove the coil designated for the top cylinder and put the oil wicker in. It should be already be coated with a very light oil. (not grease). The purpose of the oil wicker is to lightly lubricate the outside riding surface of the cam so the point shoes do not prematurely wear. If you look at the points they have little shoes that ride along the cam. Please make sure the (breaker)points cam is on the correct side or the ignition will be out of timing. It should have the word [highlight]top[/highlight] machine written on the side facing up.

Ignitionplateandoilwick.jpg


FYI: You can only set(gap) one set of points at a time. Put the flywheel nut back on(turn with a wrench or ratchet clockwise) to allow you turn the crankshaft. (Please remove both spark plugs to make it easier to turn the crankshaft and prevent accidental starting)

You gap the point to 0.020 when the point shoes is at the top(high point of the cam). It should have a mark along with the word top. Then you will turn clockwise to the next set of point 180 degrees and set those points the same way. You will notice that the point of the previous set will be closed and when you come around again they will open up. *** When they are open no current is allow through. This is how you set your timing with the points.***

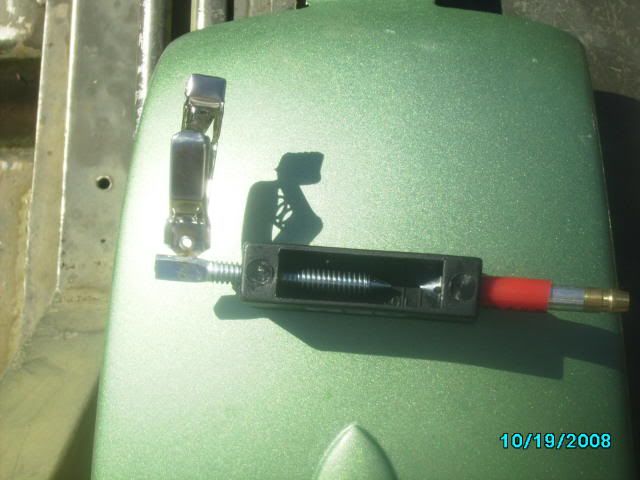
When you go to set the point's gap. Very gently snug the anchor screw, then adjust the gap with adjusting screw and the feeler gauge until the feeler gauge is sliding through with slight resistance only. Then tighten the anchor screw. Repeat procedure with second set of points. Please make sure your hands are clean and the feeler gauge is clean, because oil on the points can foul them up and create resistance....poor or no no spark. ALways use a spark check to evaluate spark. It should jump minimum 1/4 inch. Blue sharp snappy spark.

Here is a picture of a spark check...Cheap $6

sparktesterpic.jpg


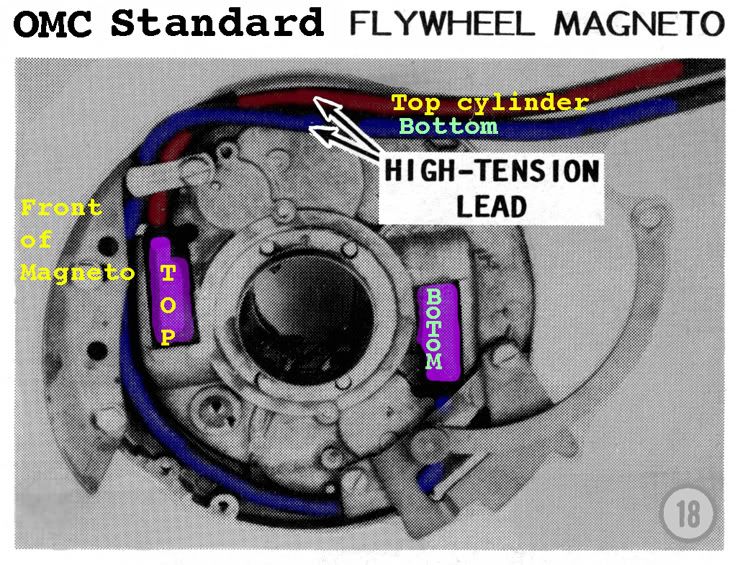
Here is a picture of how to tell which wire is going to the correct cylinder. Thanks to Garry for providing the picture on other post.


TopCyl.jpg


If your using the existing wires then cut about 1/4 inch of end going the coil, so you have clean un-oxidized copper contacting the spiking in the coil. Twist the end of the spark plug wire onto the coil spike. If you have replaced the wires, make sure they are 7mm copper metal core and not the automobile stuff.

***** Please make sure two things*****

1.) Make sure all the wires are tucked away under the flywheel and not rubbing up against the cam or crank, because with will eventually get damage and create a short, then no spark!!

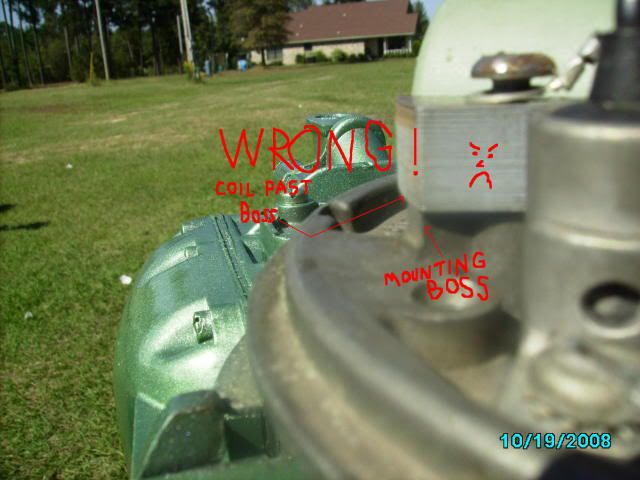
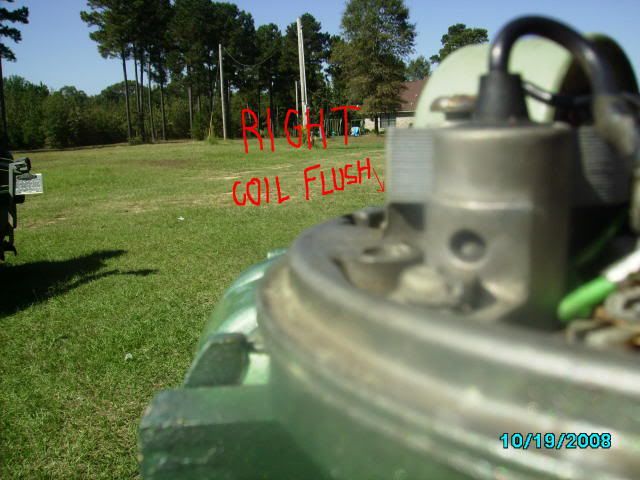
2.) Make sure the coil heels (ends) are evenly lined up with the mounting boss.

Here are some pictures. (Compliments of JBJennings..nice fella)

wrongcoilmount.jpg


rightwaytomountcoil.jpg


Lining up the coil heel with the mounting boss prevent damage of the coils and the flywheel magnet, prevent rubbing as the flywheel turns.

[highlight]*** Make sure the throttle is advanced to that start position***[/highlight]


Here is another picture that Garry (thanks Garry!!) supplied on another post with some modification.

OMC_Stdwithwirecolors.jpg


Both diagrams, should answer your questions.
 

cajuncook1

Chief Petty Officer
Joined
Sep 3, 2009
Messages
559
Re: ignition/spark

Here is a good example of how your ignition plate should look and the how the wire should be oriented. Look you can even see the oil wicker.


7eb1ba68-9fcb-4006-b734-47221a9199d7_zps088dfea5.jpg
 

chris812

Cadet
Joined
Feb 5, 2011
Messages
24
Re: ignition/spark

Thank you very much for the help with the pics. As hard as I try I never would've found those detailed pics myself.
 
Top