How to separate Gunnel from Hull? (1990 Ebbtide Riviera project boat)

ChronoFish

Cadet
Joined
Oct 26, 2015
Messages
27
Hi - I started this project last year and focused on getting the motor running and then winterized it.. began removing rotten floor because it was soft in the back corners... but the damage turned out to be throughout the boat.

So tore up the floor, removed the foam all the way up to the bow seats. Had to stop there because the bow seats are attached to the gunnel as one big insert - so in order to remove the floor, you have to remove the entire cap. Shored up the boat, blocked the keel and edges of the boat (while leaving it on the trailer) and removed the rub rail and all the screws underneath.

Started lifting the gunnel and discovered, to my horror, that gunnel is fiberglassed to the transom. (yes old boat, who knows how many fixes it's been through)

So just for my own understanding, this isn't normal right? I mean Ebbtide wouldn't have done that - would they? I'm guessing my only recourse at this point is to cut the fiberglass along what should be the seam.

Attached pictures:
1. Outside boat shown the how the gunnel is separated from the bow, but not the stern.
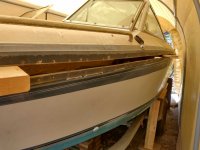
IMG_20210813_134137504_HDR.jpg


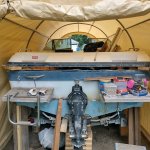
2. Inside looking at port side (transom corner) to see gap between gunnel and hull
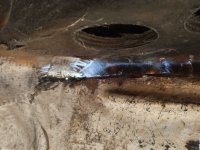
IMG_20210813_154149609_HDR.jpg

3. Inside looking at top of transom - notice no gap - just smooth fiberglass
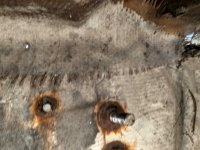
IMG_20210813_154153574_HDR.jpg
 

ryan 98

Petty Officer 3rd Class
Joined
Jun 23, 2013
Messages
80
It's not too hard once your in there. It's still the two individual pices of the cap and hull. Just with 1 or 2 layers of cloth glassed on it. Eye up where you think the seam is and mark it out with a sharpie. Then go in there with a thin cutting disk and just slice shallow through the cloth but try not to get in to the actual molded cap or bottom. And trust me on the sharpie first. Seems super easy to see where your cutting until your goggles are fogged up and there's dust flying everywhere. I've had a few cuts that I've looked at after the dust settles and I'm like an inch or 2 off
 

ChronoFish

Cadet
Joined
Oct 26, 2015
Messages
27
Go underneath and cut the fiberglass to separate

It's not too hard once your in there. It's still the two individual pices of the cap and hull. Just with 1 or 2 layers of cloth glassed on it. Eye up where you think the seam is and mark it out with a sharpie. Then go in there with a thin cutting disk and just slice shallow through the cloth but try not to get in to the actual molded cap or bottom. And trust me on the sharpie first. Seems super easy to see where your cutting until your goggles are fogged up and there's dust flying everywhere. I've had a few cuts that I've looked at after the dust settles and I'm like an inch or 2 off
thanks for the added advice!
 

Lectro88

Petty Officer 1st Class
Joined
Oct 24, 2020
Messages
303
My 69 Mako was attached at stern and transom, also the gunnel and hull were filled solid with foam further adhering things together.
It took 3 people prying and jacking along with excavator lifting to separate,
It's my understanding the hull and cap tied together like this adds additional strength to transom.
I think you will find many older boats are built like this, I couldn't comment on newer vessels.
And it's probably safe to say you need to figure a way to put things back the way they were to be safe.
It's been said many times on here by others how things are tied together almost like a grid to work as a larger displacement of loads.(everything works together)so 1 place left weakened could cause failure/s elsewhere causing a cascade of failures.
I hope that made sense or had good reason.
For "Me" I will be putting my build back the same if not stronger than original.
best of luck.
 

ryan 98

Petty Officer 3rd Class
Joined
Jun 23, 2013
Messages
80
My 69 Mako was attached at stern and transom, also the gunnel and hull were filled solid with foam further adhering things together.
It took 3 people prying and jacking along with excavator lifting to separate,
It's my understanding the hull and cap tied together like this adds additional strength to transom.
I think you will find many older boats are built like this, I couldn't comment on newer vessels.
And it's probably safe to say you need to figure a way to put things back the way they were to be safe.
It's been said many times on here by others how things are tied together almost like a grid to work as a larger displacement of loads.(everything works together)so 1 place left weakened could cause failure/s elsewhere causing a cascade of failures.
I hope that made sense or had good reason.
For "Me" I will be putting my build back the same if not stronger than original.
best of luck.
I think in this case it was more of just a backup so over the years of the rear end flexing around a small gap wont open up anywhere along that seam. Then every time you fall off plane it would take on a bit of water. So for a boat like this I would just put back 1 layer of heavy chop strand and a top it off with a layer of the woven cloth. From the inside of course. If you ever want to add a stupid amount of strength you can build them like I do. Round off the top edge of the new transom and wrap your glass right over and about 6 inches down the back of the transom so it's all tied in to the glass of the hull and water proof. Then along the whole back edge of the cap and about 2 feet up the sides bevel it all in and glass the cap to the hull. So basically the last 2 or 3 feet of the boat cap and hull become one solid pice. You could do the whole seam but I think that's over kill even when putting too much motor on them. I just do it since everything I build ends up with a big jacking plate and a bunch of motor on a pretty small transom. For this boat here a nice strong transom will easily hold up well and that glass on the inside will just keep everything lined up so no gaps ever form.
 

ChronoFish

Cadet
Joined
Oct 26, 2015
Messages
27
It's not too hard once your in there. It's still the two individual pices of the cap and hull. Just with 1 or 2 layers of cloth glassed on it. Eye up where you think the seam is and mark it out with a sharpie. Then go in there with a thin cutting disk and just slice shallow through the cloth but try not to get in to the actual molded cap or bottom. And trust me on the sharpie first. Seems super easy to see where your cutting until your goggles are fogged up and there's dust flying everywhere. I've had a few cuts that I've looked at after the dust settles and I'm like an inch or 2 off
This ended up being much easier than I had anticipated. When starting it felt like it was going to be impossibly tight to get the angle grinder in - but it fit just right. There was no issue cutting against the cap - I don't think I touched it. Thanks for the sharpie advice - it helped not only keep me relatively straight but also gave me confidence that I was doing it right.

Thanks!
 

Scott Danforth

Grumpy Vintage Moderator still playing with boats
Staff member
Joined
Jul 23, 2011
Messages
49,566
Post pics or it didnt happen.......lol
 

Lectro88

Petty Officer 1st Class
Joined
Oct 24, 2020
Messages
303
This ended up being much easier than I had anticipated. When starting it felt like it was going to be impossibly tight to get the angle grinder in - but it fit just right. There was no issue cutting against the cap - I don't think I touched it. Thanks for the sharpie advice - it helped not only keep me relatively straight but also gave me confidence that I was doing it right.

Thanks!
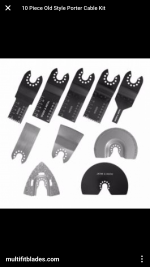
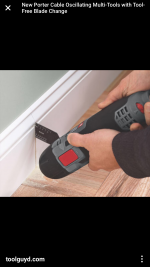
You would probably find that an oscillating vibratory tool would help make a lot of things much easier.
Not only for boat related, but many uses around house and jobsite.
I would hate to be without 1 now...
They don't kick back when in a bind, don't have to worry about cutting wheel shattering or the discharge of dust near as much.
And they cut well with the oop's effect being much less aggressive.
They can be annoying in sound like sitting in the dental chair is my only complaint.
If you do spring for 1, I can tell you slowing down the variable speed will help slow the wear of cutter blades. high speed and alot of long cuts like deck removal or stringer removal can go through blades, titanium helps and I choose the finer blades for fiberglass and the coarse aggressive blades for wood cutting/trimming.
They really make things MUCH easier.
 

Attachments

  • 1182B373-3B3E-4527-8304-B2289F7BC2E9.png
    1182B373-3B3E-4527-8304-B2289F7BC2E9.png
    1 MB · Views: 1
  • B037A0B2-8C4F-4A2A-BF69-B4AE4961A415.png
    B037A0B2-8C4F-4A2A-BF69-B4AE4961A415.png
    1.6 MB · Views: 1
Last edited:

Lectro88

Petty Officer 1st Class
Joined
Oct 24, 2020
Messages
303
It is a sigh of relief when you get the cap loose, I know it was for me.
Now you can get to everything, and the fun and real work begins.
As it was told to me, now you are really committed.
Congrats.
 
Top