Re: How to Revive a 1958 Merc Mark 78 Super Marathon?
Yes, Indeed, go thru the carbs. You can get inexpensive "carb packing" kits which will have the gaskets you need for a simple disassemble/reassemble. Recommend replacing the carb floats with newer-style ethanol-resistant-type. Otherwise it's likely the old plastic/foam floats will swell from alcohol exposure.
Fuel pump diaphragms will likely be dried-up and useless.
Impeller will definitely have to be replaced. Also pull the lower unit's oil drain plug and see what comes out. If it's black or brown, you're good, just change the gear oil (use Hi-Vis marine oil). If milky-looking, the driveshaft seal is a likely suspect. Not so easy to service on these, as you need special tools to remove the water pump cover and the cartridge (for seal replacement).
This site has parts diagrams and still shows some parts as available, but other parts are getting harder to find:
http://www.mercruiserparts.com/selectDocs.asp?doc_nbr=32912
This site has either old-stock or reproduction impellers and other parts, along with some tune-up information:
Old Mercury Outboard Timing, Adjusting, and Testing 1966 & Earlier -- Mastertech Marine Outboard Motor Parts
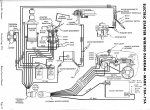
Outboard Motor Wiring Diagrams from Mastertech Marine!
Mastertech Marine: IGNITION & CARB PARTS FOR MERCURY "MARK" & "A" MOTORS
Anyway, poke around that site and there's a wealth of info available.
Likely the points will be "hazed-over" inside the distributor, at minimum you'd want to pull the distributor body (held onto the distributor drive assy by four 1/4-20 bolts), open 'er up and clean/degrease the points. You can do this without disturbing the points' gaps. If you do have to replace the points or remove them in order to clean 'em up, you have to re-synchronize the 2 sets of points, since the first set must have 90 degrees of dwell, and the 2nd set must open exactly 60 degrees after the first set opens (fires). Otherwise, cylinders 1-3-5 and 2-4-6 will be firing a bit off, which has been known in the past to break crankshafts!
I did the "quick-and-dirty" points cleaning trick to a '64 100 hp a few years back, the guy ran the heck out of it for the entire summer and it didn't miss a lick! If you do need to synch the points, there are downloads to print a degree-wheel to lay on the distributor. Then all you need is a test light and a piece of stiff wire to serve as a pointer!
Be careful when pulling the distributor. The side coil wire fitting (held on by 2 screws) must be removed before pulling the dist cap. The bottom coil wire pulls straight out of the coil and unscrews from the distributor. All the spark plug wires screw in as well.
The rotor is supposed to have a drop of Loctite holding it to the rotor shaft, and is quite fragile. There's a special rotor removal tool and you probably don't have that! Grab the mid-section of the rotor and pull smartly, hopefully it'll come loose. After that, 4 screws remove the phenolic cover and you'll see the "guts".
Clean points & put a couple of drops of oil on each points cam wick, if they're still there. If they have deteriorated to "gum", you'll need new ones.
Clean the inside of the dist. cap (carb spray works well to flush any crud/junk in there) and check that the carbon center contact is "springy" and not all gunked-up. Be careful with the dist cap mounting screws, as you can easily bust the cap if you don't put the correct-length screws back where they came from (or position the cap properly before cinching down on the screws). A good idea to take pictures with the digital camera before disassembly!
The distributor is "keyed" such that it can only go one way back into the drive assembly, just line up the flat spot on the rotor shaft to the dist. drive.
Here's one thought, before opening up the dist and doing a bunch of work, you could check to see if the points are still conducting. Disconnect the 2 points wires coming out of the distributor, the connection point should be at a terminal block. Be sure to note which wire goes where. With these wires disconnected, and your meter on Rx1 or the lowest scale you have, take one meter lead to a points wire, and connect the other to the distributor's metal body. Pull the motor over slowly with the recoil starter (helps if the plugs are out!), and you should alternately get Zero (0) ohms (continuity) when the points are closed, then a very large value of resistance when the points open and the meter is just reading across the condenser. Check the other wire the same way, and if you get good readings, it'll probably spark.
Of course you could just crank the motor over and see if it sparks! But I would put the lower unit in water (trash can, etc) before spinning the motor over.
Heck, you might even try putting gas to 'er and see what happens, if you find you have spark. You can tell if the carbs are badly gunked by removing the main jet plug in the bottom front of each carb. If there is nasty, green gunk or other trash on the inside of the jet plugs, the carbs will have to come apart. If it the jet plugs look clean, it would be safe enough to give 'er a try. You could even flush a little fresh gas thru the carbs with the main jet plugs removed, to see if anything bad-looking comes out. If it comes out clean, I'd give it a shot.
The impeller likely won't pump after all these years, and will have taken a set, so don't start it in Reverse.
She'll take a mix of 50:1 TCW-3 oil and regular unleaded. The proper plugs for this motor are Champion J6C.
Well, that's long-winded enough, Hope it Helps and let us know when you bring 'er back to life.......ed


