Honda 40, no telltale flow

carlazzomark

Cadet
Joined
Jan 15, 2014
Messages
7
Despite changing impeller, impeller housing and gaskets, a good thermostat, and making sure all lines are clear, I still do not have telltale output. I have placed a hose on the upper unit intake with the lower unit off, and the flow/telltale are fine. I have put the lower unit in a water tub and spun the shaft with a drill safely connected to the spline, and all is normal.

What else could it be? How long can I run the engine without a telltale to warm up and test?

Thanks
 

ahicks

Captain
Joined
Sep 16, 2013
Messages
3,957
This issue is USUALLY caused by something in the tell tale (pisser) hose itself. Mud daubers LOVE to build nests in the outlet for instance.

The hose fitting in the block is another trouble spot as it acts like a big restriction point, narrowing down considerably to the size of the hose. Sand will frequently build up on the back side of that.

I generally clear them with short bursts of compressed air, and doing that while the engine is running is easiest. You may have to give it several shots before you get a nice steady stream. Without compressed air, weed wacker line works nearly as well.
 

MattFL

Master Chief Petty Officer
Joined
Oct 20, 2010
Messages
856
Pop the thermostat cover off and start it briefly with the hose attached or the lower unit in water, if you get water pouring out then water is reaching the motor. If you've got water there, then put it back together and while it's idling stick a long, maybe 1 1/2 foot long, thick weed whacker string (0.08 size-ish) as far in as you can and wiggle it, stick it in and out, then pull it out and see what comes out. I've got a 99' Honda 50 and with old age that part clogs up frequently.

I saw a reference in another forum that the anode under the exhaust plate is likely shedding chunks causing the problem, but I'm too chicken to try removing that plate after 20+ years in salt. Some of the bolts are below the enclosure, so if they break off that means pulling the power head off to fix them and that brings us right back to more bolts that likely wouldn't cooperate after 20+ years in salt. ;)
 

ahicks

Captain
Joined
Sep 16, 2013
Messages
3,957
Pop the thermostat cover off and start it briefly with the hose attached or the lower unit in water, if you get water pouring out then water is reaching the motor. If you've got water there, then put it back together and while it's idling stick a long, maybe 1 1/2 foot long, thick weed whacker string (0.08 size-ish) as far in as you can and wiggle it, stick it in and out, then pull it out and see what comes out. I've got a 99' Honda 50 and with old age that part clogs up frequently.

I saw a reference in another forum that the anode under the exhaust plate is likely shedding chunks causing the problem, but I'm too chicken to try removing that plate after 20+ years in salt. Some of the bolts are below the enclosure, so if they break off that means pulling the power head off to fix them and that brings us right back to more bolts that likely wouldn't cooperate after 20+ years in salt. ;)
Been there a couple of times now. There's just one, the bottom rear, that's a major bugger. If you break that one, you very carefully measure, then drill a 1/2" hole in the pan for access. An unobtrusive plastic plug is easy to find. Makes it look like Honda put it there. The forward bottom requires you to remove the tilt switch to access. Lazy man finds an easy way to do anything....

Anyway, the passage over to the pisser is actually located below this cover. Tell tale passage is cast into the adapter that sits just below the engine block. -Al
 

Sea Rider

Supreme Mariner
Joined
Sep 20, 2008
Messages
12,345
Out of curiosiy how old is that motor, was run always in salt water ? The issue started gradually or from one day to another ? Tilt the motor fully up and squirt an overdose of WD-40, Carb Cleaner up the peeing port with the provided red cannula, let soak/penetrate/dissolve for say 15 minutes, run the motor at fast idle in a barrel or geared F applying throttle on muffs and check if the obstruction was finally cleared ?

Happy Boating
 

MattFL

Master Chief Petty Officer
Joined
Oct 20, 2010
Messages
856
Been there a couple of times now. There's just one, the bottom rear, that's a major bugger. If you break that one, you very carefully measure, then drill a 1/2" hole in the pan for access. An unobtrusive plastic plug is easy to find. Makes it look like Honda put it there. The forward bottom requires you to remove the tilt switch to access. Lazy man finds an easy way to do anything....

Anyway, the passage over to the pisser is actually located below this cover. Tell tale passage is cast into the adapter that sits just below the engine block. -Al

Thanks for the excellent idea! I'm at that point where the motor is so old I'm debating on what's more likely to shorten what's left of the service life, running it essentially without an anode (that old one is surely worthless by now), or the damage that would be caused by trying to replace the anode when the bolts break off. The motor gets sprayed with silicone spray after every use, but I'm not sure if any of that would have seeped into the threads to do any good.
 

ahicks

Captain
Joined
Sep 16, 2013
Messages
3,957
Geez, I've done a bunch of these. Worst ones might break 2-3 bolts. More often than not though, there's enough left to get some vice grips on solidly (3/8" or so). In that case, I've found that if you warm the block up immediately adjacent to the bolt in question with a propane torch (the block NOT the bolt!/doesn't take a lot!), THEN try removing with the vice grips, it will most often release for you. You may have to do that a couple of times as the block is going to disperse that heat quickly.

Point being, that cover gasket is going to start leaking eventually. It needs to be replaced. Project needs to be approached as something to be done when you aren't in a big hurry. There's going to be a fair amount of cleaning involved too. You'll have access to the passages leading to the head, and they're very likely going to be full of sand/crud. And the screw holding the anode, it needs to be approach with an impact driver. If that gets you nowhere, it's another vice grip job, possibly involving that propane torch as well.

You might just as well replace the head gasket as well. That's another ticking time bomb. I do both routinely, have never had to scrap a motor because of this work, and I've no doubt increased the life expectancy of every one of them dramatically. I can turn these over to a new owner with confidence..... -Al
 
Last edited:

MattFL

Master Chief Petty Officer
Joined
Oct 20, 2010
Messages
856
Thanks for the boost in confidence, I'll have to tackle it one day when we have some down time, hopefully before it's forced downtime. ;) The bolt heads still look new, chrome and shiny as they've been coated with silicone spray after every use since the motor was new, so maybe there's enough metal to work with without breaking the heads off. But heating the block is a good idea too, I'm guessing the aluminum of the block expands more than the steel in the bolt allowing some movement. Maybe I'll do that even before trying to loosen them at all. I haven't heard of these motors blowing head gaskets before, do you see this often?
 

ahicks

Captain
Joined
Sep 16, 2013
Messages
3,957
Re: head gaskets, Oh hell yes! They're the #1 cause of engines being sold for scrap (the ones I see/purchase for refurb. most often). Many sold as mixing water and oil can be repaired with a careful cleaning and head gasket replacement. It's only about 1 in 10 that have an actual hole allowing this, and it's usually located in the exhaust outlet area.

If an engine is overheated it can/will destroy the head gasket. Pulling them down early allows for a thorough cleaning of most cooling passages, as well as a chance to clean up corrosion issues in the critical area around each cylinder on both the cylinder side and the block side. Those pits can occur on one, or both sides of the gasket surface.
 

ahicks

Captain
Joined
Sep 16, 2013
Messages
3,957
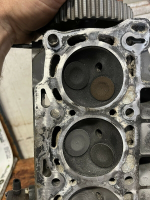
This head is currently listed on ebay. Check out the corroded area at about 7:00, right where the gasket must seal. That ain't gonna happen with this head in the shape it's in now. It may clean up if carefully resurfaced removing no more than the required amount. Exact same thing can happen on the block side - only they would be much more difficult to fix. That would warrant a new (different) block or short block in my shop.

1651623193046.png
 

MattFL

Master Chief Petty Officer
Joined
Oct 20, 2010
Messages
856
Thanks much for the info. That's interesting about the head gaskets, it makes sense that corrosion could be a problem there over time. I'm probably cursing myself by saying this, but having grown up around boats here I guess I've been fortunate to not have to deal with a bad head gasket yet. We're also very anal about flushing and keeping the pump and thermostat in good shape (no overheats). My fear of removing the head is the block or head may not be flat anymore and I would have to have them machined before re-assembling. The head is easy, but the block would be much more work. Kind of a let sleeping dogs lie kind of thing. ;) I've ordered the parts for the exhaust side anode and I'll give that a shot as soon as time allows.
 

ahicks

Captain
Joined
Sep 16, 2013
Messages
3,957
Matt, I've never had one leak after a careful inspection and cleaning - and the rare need to send the head out to have a shallow pit removed. Anything is possible of course, but I wouldn't be too concerned about the potential warpage. These guys have proven to be really sturdy IMHO.
 
Top