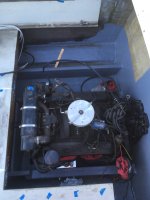
Help with 5.7L front motor mount bracket location.

skunkedskippy

Petty Officer 2nd Class
Joined
Apr 30, 2017
Messages
130
You are exactly correct. The motor mount is at the angle shown by your ruler.

Rick
OK, just to be clear, my plan is to bolt the brackets to the motor mounts, and the motor mounts to the motor (adjusted to mid-height). Lower it all down to the rear mounts, raise/lower the front to the correct level. Mark the bracket holes, drill, seal stringer wood, bolt, etc. Is there a better way to do this?

Also, the rubber bushing inside the mounts might allow for a bit of "pivot". Is there anything that I need to watch out for, or will the pivot just give me a little "room for error"? I might be overthinking with this.
 

Rick Stephens

Admiral
Joined
Aug 13, 2013
Messages
6,118
I pretty much did it that way. Bolted the mounts up to the motor so while installing motor it sits on them.

Once the motor is in place, which is determined by dropping rear mount bolts in as you set the motor, then move to alldodge's post #10:

When you do final alignment, the motor sits on the rear mounts with bolts in place just snug. The front of the motor is lifted just enough from the thermostat housing bracket so the bottom nuts can be run up against the bottom of the motor mounts, finger tight. The motor is lowered on to front mounts and the adjustments from there on moving both front mounts up or down equally
I found that once the motor is sitting on the back mounts with the rear bolts barely snug (basically finger tight), supported by your lift with weight off the front mounts, you can grab the front of the motor and shift it side to side and it will sit, and feel, straight.
 

skunkedskippy

Petty Officer 2nd Class
Joined
Apr 30, 2017
Messages
130
I pretty much did it that way. Bolted the mounts up to the motor so while installing motor it sits on them.

Once the motor is in place, which is determined by dropping rear mount bolts in as you set the motor, then move to alldodge's post #10:


I found that once the motor is sitting on the back mounts with the rear bolts barely snug (basically finger tight), supported by your lift with weight off the front mounts, you can grab the front of the motor and shift it side to side and it will sit, and feel, straight.
Makes sense, thanks again for everyone's input.

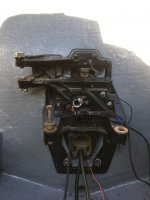
I have the installation manual and I'm going through it to visualize the process. It shows the steering rack being installed BEFORE the engine. If I drop the engine first, it seems like I'd have a bit more clearance. Any issues with this? Or is there more than enough clearance with the steering rack installed? Might be over-thinking again.

Besides the exhaust y-pipe, is there anything else that must be installed before I drop the motor in? This is where I'm currently at:

IMG_6556.JPG
 

Bondo

Moderator
Staff member
Joined
Apr 17, 2002
Messages
70,506
Makes sense, thanks again for everyone's input.

I have the installation manual and I'm going through it to visualize the process. It shows the steering rack being installed BEFORE the engine. If I drop the engine first, it seems like I'd have a bit more clearance. Any issues with this? Or is there more than enough clearance with the steering rack installed? Might be over-thinking again.

Besides the exhaust y-pipe, is there anything else that must be installed before I drop the motor in? This is where I'm currently at:

View attachment 329543*
Ayuh,....... A non-issue,....... put it on,......
 

skunkedskippy

Petty Officer 2nd Class
Joined
Apr 30, 2017
Messages
130
Ayuh,....... A non-issue,....... put it on,......
Roger that. Another question if y'all don't mind. The new gasket for the raw water inlet fitting (that feeds to to the impeller) has an adhesive side. Does it matter which way the adhesive faces?

IMG_6575.JPG

IMG_6573.JPG

IMG_6574.JPG
 

skunkedskippy

Petty Officer 2nd Class
Joined
Apr 30, 2017
Messages
130
Got the engine in yesterday!! Thank you all so much for the help. It whole process was much easier than I thought. I ended up removing the steering rack BEFORE dropping the motor because it gave me a bit more clearance.

Now I'm in the process of reconnecting everything, which leads me to another question. I don't remember where my negative battery cables were grounded. My understanding is that anywhere on the block will work. Do you guys have any suggestions? And would you connect both batteries to the same grounding point?

This is a Mercruiser 5.7L. I plan to have a dual battery setup - separate starter and house batteries with Blue Sea Systems switch (on/off/combined).

IMG_6703.JPGIMG_6709.JPG
 

alldodge

Moderator
Staff member
Joined
Mar 8, 2009
Messages
40,705
Normally it's connected to one of the flywheel housing bolts. The bolt is also a stud where the grounds from the bat and transom assembly grounds are connected. Can also be another one on each side for connection trim pump and engine harness ground
 

skunkedskippy

Petty Officer 2nd Class
Joined
Apr 30, 2017
Messages
130
Normally it's connected to one of the flywheel housing bolts. The bolt is also a stud where the grounds from the bat and transom assembly grounds are connected. Can also be another one on each side for connection trim pump and engine harness ground
YES!! I have two of those. I ended up putting both of them on the port side, but I might move one to the other side. Thank you!

...Actually, I recall one of the flywheel housing bolts being longer than the others. I didn't think much of it, but maybe that one was used as a ground.
 
Last edited:
Top