Help! Trying to build a deck on a V-Hull

Mattg8414

Cadet
Joined
Feb 1, 2016
Messages
21
Need a little helpful suggestion from some previous experience.
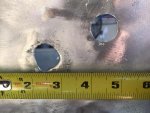
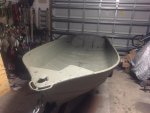
I got a 12 ft v-bottom boat I got as a first boat and am trying to restore it. I have already completed the hull restoration and used gluvit on all the rivets and seams so that brings me to phase 2 of the restore, putting in storage/decks.
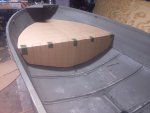
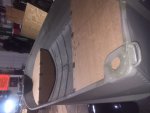
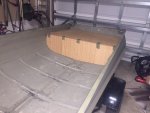
When purchased, the boat didn't have any seats/benches in it, basically just a bare hull. I want to build a small deck up front (anchor/ life jackets) and one in the back (seat/gas tank compartment).
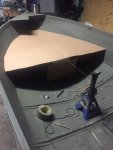
My question is, how do I go about measuring the front of the boat so I get the correct curve of the deck matching up with the curve of the boat. I have tried the trial and error method with cardboard but I cant seem to get it quite right.
I am not trying to build large casting decks (tipping/ stability) but rather a storage compartment/seat for the front and rear.
Any suggestions would help.
 

gm280

Supreme Mariner
Joined
Jun 26, 2011
Messages
14,605
:welcome: aboard Matt8414. nice to have you join us here at iboats...

Every boat has its own issues and no two are really alike. But one thing I did with my boat to get a nice level floor installed was to take a piece of string and pull it tight from the very front center of the hull to the very back center of the transom. That give you a starting place to do some measurements from. Then I marked off about every 6 inches on the center string and measured from center to side and plotted that on some paper. Graph paper worked really good for this.

Measure from center to Port Side (left) and center to Starboard Side (right) every six inches and plot all those measurement on the paper. If you install the string at the height you want the platform installed, you will have a scale drawing of it after make those measurements. Then you can simple transfer those measurements to the plywood and cut it out.

And if you make a center line down the center of the plywood and plot the measurements from the paper, it will fit nicely. Hope that helps you a little. Post some pictures of your boat for us to see. We love pictures on these forums. :thumb:
 

Mattg8414

Cadet
Joined
Feb 1, 2016
Messages
21
So I did the string thing and I think it worked out pretty good. Here are some pics of where I am at now
 

Mattg8414

Cadet
Joined
Feb 1, 2016
Messages
21
No Title

Some of the holes I had to fix. Used Alumiweld and a propane torch
 

Attachments

  • photo237236.jpg
    photo237236.jpg
    79.1 KB · Views: 1

Mattg8414

Cadet
Joined
Feb 1, 2016
Messages
21
No Title

This is what I have after phase one of the build
 

Attachments

  • photo237237.jpg
    photo237237.jpg
    80.9 KB · Views: 5

jbcurt00

Moderator
Staff member
Joined
Oct 25, 2011
Messages
25,135
You can post 6 pix per post. No need to post 1 at a time
 

Mattg8414

Cadet
Joined
Feb 1, 2016
Messages
21
No Title

So this is what I got out of using the string method for measuring the front deck. I made a mark on the center string every 3 inches and measured at a right angle (as close as I could eyeball) off of the string to the side of the boat. It was a little difficult but came out pretty nice I think. Hopefully it will pay off in the end. Now I just got to trace it onto some plywood and make the cut.

Any insight on how to attach the frame to the hull without having to drill through the hull. I bought some framing brackets at Lowes and was going to try and rivet them to the ribs of the boat but I don't think they will be stable enough. I am going to use 1/2" plywood for the deck so it might be heavy enough not to move around. Just don't know.

And sorry for all the posts, I guess the pics are too large to post multiple on one post.
 

Attachments

  • photo237246.JPG
    photo237246.JPG
    112.9 KB · Views: 4
Last edited:

gm280

Supreme Mariner
Joined
Jun 26, 2011
Messages
14,605
Matt, I can't see for certain, but it looks like there is a ridge going around the hull. Maybe you can fashion some brackets to attach the deck to that ridge without drilling through the hull. NEVER drill through the hull to attach anything like that. You could also make some brackets to attach to the cross ribs to support the deck as well. If I were there and could see the project first hand, I am pretty sure I could come up with something that would work and not destroy the integrity of the hull. JMHO!
 

jbcurt00

Moderator
Staff member
Joined
Oct 25, 2011
Messages
25,135
Aluminum angle support frame, thru riveted to the hull would be the only way I'd mount that deck


Exactly what brackets did you buy at Lowes?
 

gm280

Supreme Mariner
Joined
Jun 26, 2011
Messages
14,605
Aluminum angle support frame, thru riveted to the hull would be the only way I'd mount that deck


Exactly what brackets did you buy at Lowes?

jb, the only reason I didn't suggest doing that is because with a tapered hull like he has, angle aluminum will not offer a nice plat surface to rivet or bolt the floor in. If you drill the hull and use rivets to install angle aluminum, the angle will be pointing in the air and not flat level. Now if he can get some angles made to fit the hull taper and allow a flat surface for the floor, that would the best solution. JMHO!
 

Ned L

Commander
Joined
Sep 17, 2008
Messages
2,268
Your boat is looking good, nice work!
A couple of suggestions..... If you need to define a shape like that again you should look up "joggle stick" and how to use it. That method is how it's easily done.
If you want a smooth curve on the outside of your deck; when you mark your dots that define the curve, drive a small brad into the plywood on each dot then bend a thin batten around the brads to create a fair curve that you can trace with a pencil.
For attaching your deck I would go with some wooden cleats attached with hmmm, here something like 3M5200 would be appropriate. High viscosity, flexible and a good adhesive. (In this usage "cleats" are small blocks of wood to fasten other woodwork to, , not something you tie a line to)
 
Last edited:

gm280

Supreme Mariner
Joined
Jun 26, 2011
Messages
14,605
Your boat is looking good, nice work!
A couple of suggestions..... If you need to define a shape like that again you should look up "joggle stick" and how to use it. That method is how it's easily done.
If you want a smooth curve on the outside of your deck; when you mark your dots that define the curve, drive a small brad into the plywood on each dot then bend a thin batten around the brads to create a fair curve that you can trace with a pencil.
For attaching your deck I would go with some wooden cleats attached with hmmm, here something like 3M5200 would be appropriate. High viscosity, flexible and a good adhesive. (In this usage "cleats" are small blocks of wood to fasten other woodwork to, , not something you tie a line to)

Ned L. I understand your arc option to get a nice smooth outer edge. But when you are connecting dots every three inches, and then sand a little, I can't see that being objectionable when finished. I used the marking option to cut lots of plywood for my boat, and I can tell you generally cutting around the drawn line doesn't look like a bunch of straight lines connected together. It looks rather curved. But I can see your suggestion making a different if the curved area was really sharply curved. JMHO

I also can see cleats installed under the floor for something to attach the floor to. That way he can cut the cleats so that the top is level and not sticking up. I would make such wooden blocks and then try to get some metal made to the same angles. But that is just me. I like solid metal over wood. But that is how I do things and either idea is good. :noidea:
 

Mattg8414

Cadet
Joined
Feb 1, 2016
Messages
21
No Title

So here it is all mocked up. Next step is transferring it to plywood and cutting, then to make the supports and try to attach it to the hull somehow.
 

Attachments

  • photo237357.JPG
    photo237357.JPG
    88.1 KB · Views: 5
  • photo237358.JPG
    photo237358.JPG
    83.2 KB · Views: 4
  • photo237359.JPG
    photo237359.JPG
    97.3 KB · Views: 4

Ned L

Commander
Joined
Sep 17, 2008
Messages
2,268
Looking good. Will you be installing a couple of mid seats / thwarts? You should see if you can fit in some Styrofoam somewhere.
 

Mattg8414

Cadet
Joined
Feb 1, 2016
Messages
21
I thought about putting in a detachable pedestal seat in the middle just for transport but I want to leave the center open as much as possible. Why styrofoam?
 
Top