Grandad's Johnson Seahorse 10

JB

Honorary Moderator Emeritus
Joined
Mar 25, 2001
Messages
45,907
Re: Grandad's Johnson Seahorse 10

Got a PM from you, Chris. The correct oil to use in your 16:1 mix is any outboard oil certified TC-W3.

BTW, I grew up in Southern Pines, NC, just outside Ft. Bragg, where the Screaming Eagles trained before deploying to Europe in 1943. Had many many close friends in the 101st. Lost a bunch at Bastogne.:(

Thank you for your service. Guys like you keep us free, and we appreciate it. :)
 

sgtck72

Cadet
Thread starter
Joined
May 22, 2011
Messages
16
Re: Grandad's Johnson Seahorse 10

Jim, thanks for the PM reply! I appreciate your reply and am sorry for all the losses we have suffered in all our battles. We had some GREAT warriors back in those days and sme of the Soldiers of today could never comprehend what our troops went through back in Bastogne and all those other conflicts of WWII. Thank you also for the info on the oil! I am definitely going with the 16:1 mixture as it seems that more oil is better than less for lubrication in these oldie but goodies!

BTW, I am not finding a carbuerator rebuild kit for this motor... any ideas???
 

Tim Frank

Vice Admiral
Joined
Jul 29, 2008
Messages
5,354
Re: Grandad's Johnson Seahorse 10

Also, I read that I need to make sure the "points are set on the high side"... I have no idea what that means. What is the "high" side and the "low" side? The point gaps are correct, I just need to make sure they are in the correct position? Is that right? Thanks guys! -Chris

The way I would interpret that is "because over time the heel on the points wears and effectively results in a diminishing gap, set them at a "large" 0.020". " ;)
That may be more a theoretical idea rather than a practical one.

I've personally never had any problem with just setting at 20 thou as best as I could.
 

Tim Frank

Vice Admiral
Joined
Jul 29, 2008
Messages
5,354
Re: Grandad's Johnson Seahorse 10

Now, I know this may sound like a stupid question to those of you who are uber experienced, but how do I make sure I have the proper 1:24 fuel mixture in the tank and what fuel/oil do I use?

Hopefully there is no old, original gas in the tank now....if there is, dump it and clean the tank and lines well.
The best way to do the gas mix is to get yourself a dedicated gas can...2 or 5 gallon depending on how much use you will make of the motor.
Also a funnel and filter cloth for transferring gas to the motor tank..
Make sure that you determine the correct ratio, I've seen 24:1 and 16:1 thrown about so far; I don't know which is correct, but would lean towards 16:1 because of the vintage. The new oils are vastly superior to what was available at time of its manufacture, so maybe 24:1 would be OK, but make 100% certain.

You can use regular grade fuel and as pointed out, TCW-3 oil is the right one.
Buy a precise amount of gas, to an even 1/2 gallon for ease of calculation, and just add the correct amount of oil and mix well. The easier translation of 16:1 is 1 gallon of gas to 1/2 pint of oil....24:1 is 1 gallon gas to 1/3 pint oil.
Most containers of O/B oil have a graduated scale on the side that allows you to determine how much oil you have added.

I hope that is what you meant by your question and that this answers it reasonably.
 

sgtck72

Cadet
Thread starter
Joined
May 22, 2011
Messages
16
Re: Grandad's Johnson Seahorse 10

Thanks Tim! That was exactly what I was looking for. At this point though guys, I feel like throwing in the towel! I bought the spark tester, new plugs, reinstalled EVERYTHING to spec, double checked all gaps after cleaning the points AGAIN, had coils, resistors, and plug wires ALL tested... and after reinstall still NO spark via the spark tester! I don't know where to go from here, other than trying to see if maybe one or both of the coils is slightly out of position? I am frustrated :mad:
 

charliehorse

Recruit
Joined
Jun 5, 2011
Messages
1
Re: Grandad's Johnson Seahorse 10

I am restoring a 55 10 hp qd-16. I know what your feeling. DON'T GIVE UP! I have Grandpa's old motor runing like a clock. I can't get the darn thing to seal and I get water in the gear case. I have the seals but keep procrastenating as I have torn it down about 4 times. When I first tried to start the thing, I pulled til I was blue in the face. I found that I did not have the throttle in the start position. It would be nice if that was your problem. Keep us posted.
Charlie Horse
 

kfa4303

Banned
Joined
Sep 17, 2010
Messages
6,094
Re: Grandad's Johnson Seahorse 10

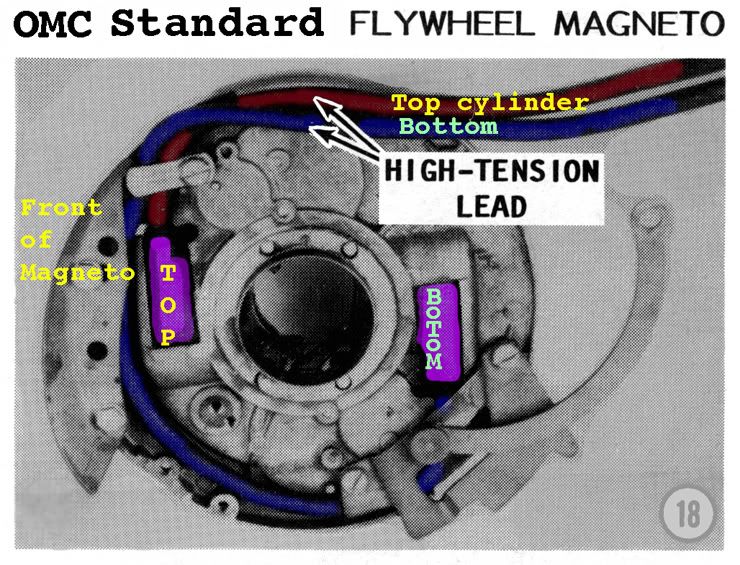
Hello again Sgt. I agree hang in there. You're super close. Since the coils checked out, double check that you TWIST the copper core spark plug wires on to the needle post of the coils. You want to set the points such that they are at the .020" gap when the rocker arm is on the "O" in the word TOP stamped on to the crankshaft cam. You'll notice that the cam is elliptical is shape and not perfectly round. This is so that one set of points is opened, while the other is closed. Once you have set the points to .020" in the TOP position, rotate the engine CW 180 degrees so that the rocker arm of the second set of point is on the "O" in TOP and set the points to .020". The points act like alternating castanets. One set clicks shut as the other set is open. Once you've got the points set rotate the engine CW a few times to see that the points are opening and closing in a smooth, alternating manner. Once you're happy with them, replace the fly wheel and lightly seat the flywheel nut. No need to tighten it down fully at this point just incase you need to get back at the magneto plate. Again, rotate the flywheel CW a few turns (with spark plugs out). Check for and rubbing or scarping. Sometimes the magnet of the flywheel can scrape the coils. If the rotation is smooth and has a nice lub-dub sort of feeling that's great. Now connect the s'plugs to the wires. I know you have a proper tester, which is great, but let's check it old school style by grounding the plugs to the body of the motor. It's a little tricky , but find some where to rest them in contact with the eingine block and rotate the flywheel CW a few times. You should see/hear a snapping blue spark coming from the s'plugs. If you have a friend you don't like, you can just get them to hold them. IF they get a good zap, you know they're working :) Assuming you have spark, disconnect them from the wires, squirt a bit of fuel into the cylinders and install the spark plugs and reconnect the s'plug wires. Make sure you have the correct wire to the correct cylinder. The front coil on the magneto should go to the top cylinder and usually has a little metal clip on it. The other wire goes to the bottom cylinder. Now try to fire her up. Assuming you have good fuel flow, compression and spark, she will fire up. Give it a shot and let us know. You can do it!
 

sgtck72

Cadet
Thread starter
Joined
May 22, 2011
Messages
16
Re: Grandad's Johnson Seahorse 10

kfa: THANK YOU for your reply. I was lining up the rocker arms with the key because that was what I read in another area of this forum. I will try it tomorrow the way you said exactly as you have described, and hopefully this will result in me finally seeing a spark! Thanks for the great and specific details... that is exactly what I need to get me through this process. And THANKS to Charlie for the added inspiration! Knowing that there are others here who have taken on, and conquered, thier own challenges, helps to keep those of us who are struggling, going. I will repost my findings and progress again, hopefully by lunchtime, tomorrow. Thanks again guys... I was really close to putting the tools away and sending the motor back to my dad to store for another 30 years! I appreciate the encouragement. I'll give her another go.

soundchaser: Tried opening the attachments, but eror message said it was an invalid link, not sure what that's all about???
 

slickster2

Seaman
Joined
Jun 16, 2010
Messages
74
Re: Grandad's Johnson Seahorse 10

hi there I have the same engine only trouble is mine shuts off when put in gear need help with that issue so no nothing about them sorry

EDIT: You need to read our rules, slickster. Hijacking is very rude. Start your own thread.
 

sgtck72

Cadet
Thread starter
Joined
May 22, 2011
Messages
16
Re: Grandad's Johnson Seahorse 10

Well, I hate to say it, but I really think I am done at this point. I did everything this morning that kfa had suggested and still no spark. Feeling overwhelmed and out of options, I took the motor to an actual marina and boat shop that has been in the community forever. The shop owner spent some time with the motor and told me the same thing the last shop told me: Not able to find any problems with the quipment itself, not finding any false grounds, but still can't get any spark. They said to give it up and move on. Right at this moment it sounds like pretty good advice. Gonna have to take a few days off from the motor and really think about it. Plans at this point are to take it back to my dad's place. I really do appreciate all the help though, just sorry none of it bore any fruit!
 

freddyray21

Commander
Joined
Jun 10, 2006
Messages
2,460
Re: Grandad's Johnson Seahorse 10

have you checked or replaced the condensers? it will not fire with bad ones. Also the cam the points ride against cannot be on upside down. It will be marked "top" on one side. To set the points rotate the motor so the points are resting at the spot where it says "top" set the points there at .020. I PM'd you my phone number call me.
 

cajuncook1

Chief Petty Officer
Joined
Sep 3, 2009
Messages
559
Re: Grandad's Johnson Seahorse 10

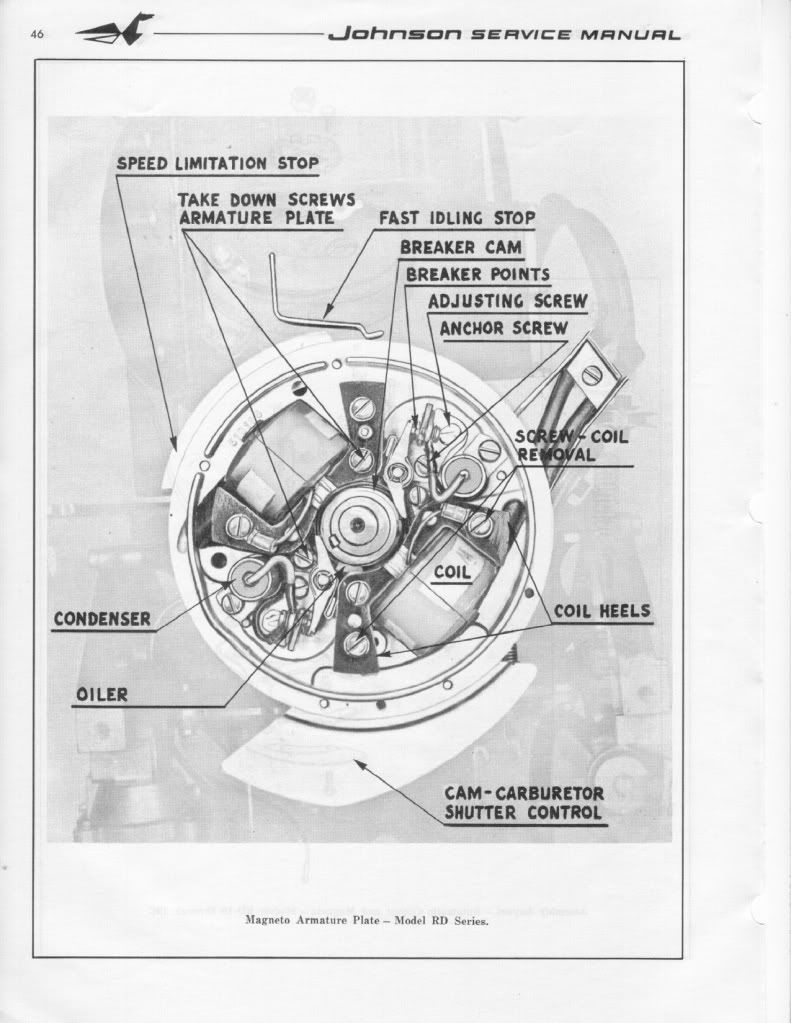
Here is a diagram of a generic OMC (Johnson/Evinrudle/Gale) ignition assembly. You will have to remove the coil designated for the top cylinder and put the oil wicker in. It should be already be coated with a very light oil. (not grease). The purpose of the oil wicker is to lightly lubricate the outside riding surface of the cam so the point shoes do not prematurely wear. If you look at the points they have little shoes that ride along the cam.

Ignitionplateandoilwick.jpg


FYI: You can only set(gap) one set of points at a time. Put the flywheel nut back on(turn with a wrench or ratchet clockwise) to allow you turn the crankshaft. (Please remove both spark plugs to make it easier to turn the crankshaft and prevent accidental starting)

You gap the point to 0.020 when the point shoes is at the top(high point of the cam). It should have a mark along with the word top. Then you will turn clockwise to the next set of point 180 degrees and set those points the same way. You will notice that the point of the previous set will be closed and when you come around again they will open up. *** When they are open no current is allow through. This is how you set your timing with the points.***

When you go to set the point's gap. Very gently snug the anchor screw, then adjust the gap with adjusting screw and the feeler gauge until the feeler gauge is sliding through with slight resistance only. Then tighten the anchor screw. Repeat procedure with second set of points. Please make sure your hands are clean and the feeler gauge is clean, because oil on the points can foul them up and create resistance....poor or no no spark. ALways use a spark check to evaluate spark. It should jump minimum 1/4 inch. Blue sharp snappy spark.

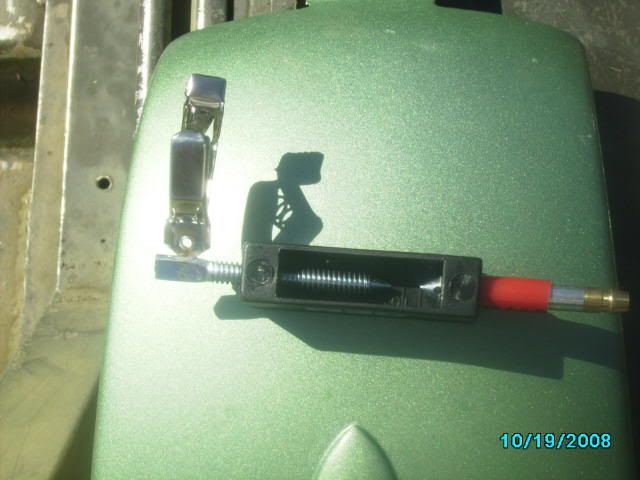
Here is a picture of a spark check...Cheap $6

sparktesterpic.jpg


Here is a picture of how to tell which wire is going to the correct cylinder.


TopCyl.jpg


If your using the existing wires then cut about 1/4 inch of end going the coil, so you have clean un-oxidized copper contacting the spiking in the coil. Twist the end of the spark plug wire onto the coil spike. If you have replaced the wires, make sure they are 7mm copper metal core and not the automobile stuff.

***** Please make sure two things*****

1.) Make sure all the wires are tucked away under the flywheel and not rubbing up against the cam or crank, because with will eventually get damage and create a short, then no spark!! Be sure to reconnect the stop wires back on correctly.

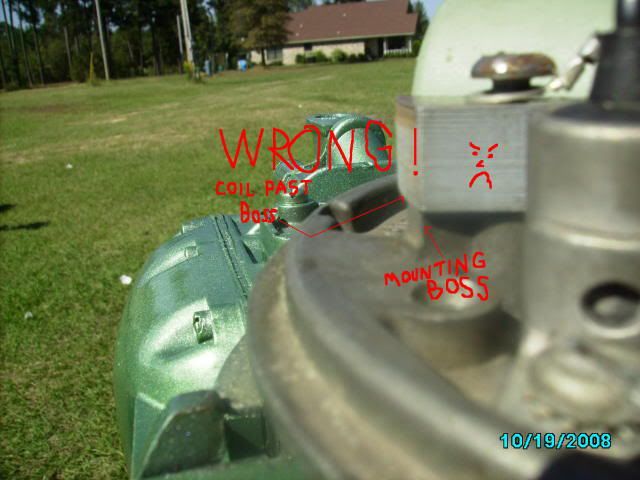
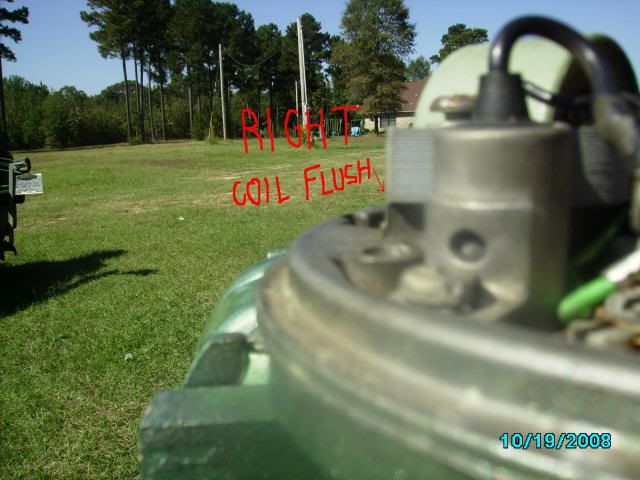
2.) Make sure the coil heels (ends) are evenly lined up with the mounting boss.

Here are some pictures. (Compliments of JBJennings..nice fella)

wrongcoilmount.jpg


rightwaytomountcoil.jpg


Lining up the coil heel with the mounting boss prevent damage of the coils and the flywheel magnet, prevent rubbing as the flywheel turns.


I hope this helps ya out! Might have gone overboard a bit but wanted to make sure you had a good idea.
 
Top