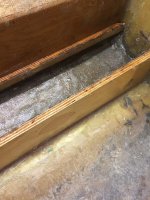
Glassing Stringers - First Time

76SeaRay

Lieutenant Junior Grade
Joined
Aug 24, 2017
Messages
1,071
Does anybody have an end picture showing the profile on how much radius to put on top edges of the stringers before laying 1708 over the top?
 

solar7647

Lieutenant Junior Grade
Joined
Apr 23, 2009
Messages
1,218
I used a 1/4inch router bit, just enough to take of the sharper corner and give it a good rounded profile so that the glass contoured to it nice but I still had a flat surface on top.
 

todhunter

Canoeist
Joined
Sep 15, 2020
Messages
1,316
Agree - 1/4" router bit worked well for me. It will still take some time and patience to get the 1708 to do a full 180 degree bend. I found a chip brush with the bristles cut to ~1" long worked the best for me. Mix your resin on the slow side and work in short (~24") strips at first until you get the hang of it. The wider you make the glass strips the better it will hold/stick and not try to peel up while it's curing. For 3/4" plywood stringers, I would do 6" wide strips of 1708, minimum.
 

76SeaRay

Lieutenant Junior Grade
Joined
Aug 24, 2017
Messages
1,071
I found an old thread from Woodonglass about using 1708 up to the top of the stringer and then using CSM over the top to make it easier to bend. Not sure if he meant CSM over top then 1708 overlapping up the sides or the other way around with 1708 up the sides and then CSM overlapping from the top.
 

AShipShow

Lieutenant Commander
Joined
Jul 8, 2016
Messages
1,802
He was saying to run 1708 up to the top of the stringer but not over... The 1708 only really needs to run up to the top of the stringer but not over because all of the strength of the glass is from the vertical component... The only reason to even run CSM over the top is to help with any delamination and to waterproof the tops of the stringers.
 

76SeaRay

Lieutenant Junior Grade
Joined
Aug 24, 2017
Messages
1,071
Thanks. I guess I will go that route. It certainly is easier. By the way, I ran into a delay on glassing over the stringers after setting them with peanut butter and coating them with clear polyester. How long can polyester laminating resin be left curing before having to sand it to put the glass on it?
 

76SeaRay

Lieutenant Junior Grade
Joined
Aug 24, 2017
Messages
1,071
Disregard question on polyester. Moving it to its own thread.
 

76SeaRay

Lieutenant Junior Grade
Joined
Aug 24, 2017
Messages
1,071
I have searched a lot of threads but haven't found an answer to this question. I ran into a delay on glassing over the stringers after setting them with polyester peanut butter and pre-coating them with clear polyester. No wax was used. Some of them have been sitting for a month or so and others a week or so. How long can polyester laminating resin be left to cure before having to sand it to put the glass on it?

Thanks.
 

f_inscreenname

Commander
Joined
Aug 23, 2001
Messages
2,591
Thanks. I guess I will go that route. It certainly is easier. By the way, I ran into a delay on glassing over the stringers after setting them with peanut butter and coating them with clear polyester. How long can polyester laminating resin be left curing before having to sand it to put the glass on it?
If you didn't use wax it should be good for a few days. If the surface still feels a little sticky you are good. As for stringer corners I just knock off the corner with my disk grinder. It don't have to be perfect just no sharp edges.
 

f_inscreenname

Commander
Joined
Aug 23, 2001
Messages
2,591
IMHO if it's still slightly tacky on the outside you are good to go but a good sand would get rid of any mistakes and start you off fresh.
 

JASinIL2006

Vice Admiral
Joined
Feb 10, 2012
Messages
5,678
Personally, I'd give them a light sanding and a good wipedown with acetone to get the best bonding.
 

jhande

Chief Petty Officer
Joined
Jun 26, 2010
Messages
442
Non-wax poly resin stays tacky for a long time. If it's still tacky to the touch DON'T try to sand it, the sandpaper will clog up within a second or two. If it's still tacky apply for waxed poly over it.

Of course if it's dry and hard sand it.
 

todhunter

Canoeist
Joined
Sep 15, 2020
Messages
1,316
An acetone wipe should wake it right back up and make it sticky again. If it doesn't, then you probably need to sand some.
 

76SeaRay

Lieutenant Junior Grade
Joined
Aug 24, 2017
Messages
1,071
So, I dove right in this afternoon. Of course I started with a difficult area for my first time glassing. I should have started with something more simple and easier to get at. I started with the engine mount "steps" on the starboard side. I laid glass on the tall stringer and then the short stringer with the 1708 overlapping on the floor of the hull. I ran into a few problems.

First the glass wanted to "pucker" at the top and bottom edge of the glass strip. I cut the point where it buckled up and overlap them. Don't know if that was correct. I think I caused the problem by allowing the edges to get stretched a bit. The problem occurred on both the tall and short stringer.

Second, I had the strips a little too long for the opening which meant they overlapped the transom and the bulkhead at each end. That created another "pucker" of too much glass at the corner. I again had to cut the buckled piece and overlap the ends.

Third, I added thickened resin to the board that supports the motor mount on the tall stringer. I had it beveled at 45 degrees on the underside and laid one piece of 1708 from the edge, then underside on the 45, across the hull, and up the inside of the short stringer. I layered the second layer of 1708 fairly soon after laying the first piece. When trying to roll it out with the serrated metal roller, it wanted to lift off the first layer of 1708.

Finally, I had problems getting the air bubbles out. I think that was because the hull wasn't smooth enough creating small pockets in places. It seemed the more I tried the work them out the worse it got. What a pain...
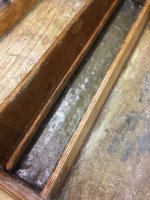
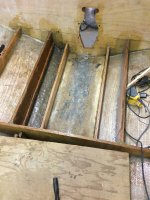
Stringer Glass Engine Bay 2.jpg

Stringer Glass Engine Bay 1.jpg

Stringer Glass Engine Bay 2.jpg

Stringer Glass Engine Bay 3.jpg
 

tpenfield

Moderator
Staff member
Joined
Jul 18, 2011
Messages
18,069
If you are using stitched cloth, which it looks like you are, making cuts and overlaps at corners and around shapes is normal and fine.

As for the air bubbles, it is usually a symptom of not wetting out the underside of the fiberglass cloth before you put it into place. The surface you are glassing should be soaked with resin as well as the underside of the cloth. Then the resin has no place to go but outward to the exposed surface of the cloth, which forces the air out of the cloth.

So, if you are not using such a method, then you might want to try it and see if air bubbles are remedied.

If you apply resin to the outer surface of the cloth (particularly biaxial stitched cloth, like 1708) you will be trapping air that is within the cloth.
 

76SeaRay

Lieutenant Junior Grade
Joined
Aug 24, 2017
Messages
1,071
Thanks for the info. I coated the surface first but did not soak the 1708 due to the difficulty in getting it into the small space without sticking it all together. Rather messy in a tight space. So, will try to wet out the 1708 first on the next stringer portions. At least it should still be stronger than the original design. From the factory, that tall stringer was floating and didn't attach to the hull at all with peanut butter and none of the inside of the stringers had any fiberglass on them at all, just floatation foam underneath them. The only glassing they did was to glass the floor from the edge of the hull across the floor and down the face of the stringers.

Also, I forgot to put wax in the last layer. Will it cure fine without the wax, just take longer, or should I coat it again with waxed resin?
 

todhunter

Canoeist
Joined
Sep 15, 2020
Messages
1,316
My method for tabbing is as follows.

First you must cut out your pieces of 1708 and dry fit them. Make sure they aren't too long or you run into issues where you're trying to force a long piece into a short area and you risk it buckling like you experienced. Trim the dry cloth as required.

Next, use a 4" roller and roll out some resin onto the stringer and hull where the tabbing will go. Doesn't have to be so much it runs everywhere, but don't do a super light coat either. Next, pipe in your PB for the fillet and smooth it out some.

Lay out the 1708 strip on a thick plastic sheet with the mat side up. Pour resin onto the mat surface and use a 4" roller to push the resin around and wet out the entire piece of 1708 all the way to the edges. You'll know when its fully soaked.

Peel the wet-out strip of 1708 off the plastic and fold/flop it in half about where the glass will transition from hull to stringer. Lay the folded-in-half strip of 1708 where it will go.

Starting from the center of the piece of tabbing, use a chip brush with bristles cut to about 1 inch to start tapping the glass into the wet PB of the fillet, working out towards the edges of the strip. At the same time start gradually working thr glass down onto the hull and up onto the stringer, again working from the center out. The key is to not have all the glass laying in contact with the hull and stringer at first or it is harder to push around with the brush. Once you have the center worked down onto the PB fillet for the entire length, you can switch to the 4" roller and push the glass down onto the hull and stringer.

I haven't used my fin roller at all on my whole restoration other than the first time I tried it. I didn't like it, and find that the 4" nap roller works just as good and is one less tool to clean up.

A few other things. After dry fitting your cloth if it is bowed up, smooth it out before wetting it out. For glass work that's under the deck and will be inside a foamed compartment, you don't need to fully cure the last layer of glass.

Keep at it. It will get easier and less frustrating the more you work with it.
 

76SeaRay

Lieutenant Junior Grade
Joined
Aug 24, 2017
Messages
1,071
Well, I tried the wet out first then laying the glass and still was a pain.. Not sure if I am cutout for doing glass work. It went a little better with a strip that I was careful not to stretch during cutting (using an electric scissors for cutting). It did lay down better and fewer pucker spots. For some reason though this pass doesn't seem to be curing.. I bumped my shop up about 3 degrees to about 74 so will see if it cures with that. We are about to go into the 80's here this coming week so less effort to keep the shop warm.
 

jhande

Chief Petty Officer
Joined
Jun 26, 2010
Messages
442
I've done some glass work in my automotive career.
What worked for me was to lay a somewhat think coat of resin down. Then set the fiberglass cloth down. Top with another coat of resin and work it all into the cloth with a stiff brush. Then roll over it with a small metal J roller.

Possibly the key to my success was working with smaller pieces at a time.
 

76SeaRay

Lieutenant Junior Grade
Joined
Aug 24, 2017
Messages
1,071
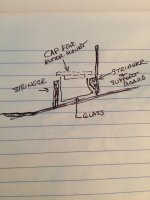
Stubbornly moving forward. Have had some better success but last night trying to use a single piece of 1708 to cover the inside of the port engine mount area (U shaped) including lapping it under and up the side of the deck support board proved a bit too complex. I almost pulled the glass back out to start over but was eventually able to get in into place. Not the prettiest job in the world but hopefully good enough. Next time I will use two pieces and overlap them on the bottom of the hull so I don't have too many bends in a small space.

Quick sketch of the glass in the motor mount "well".

Glass Tight Space.jpg
 
Last edited:
Top