Gimbal Bearing Noise?

jonny rotten

Petty Officer 1st Class
Joined
Jan 8, 2012
Messages
345
Sorry for the late response - thanks for the tips and video!

I've already ran into that shift arm set screw - wouldn't budge. In order to get the bell housing off I ended up sawzalling through the shift cable - definitely overkill but it worked. I'll be dealing with that shift arm towards the end of the rebuild. I think I'll probably do that shift cable last.

After much persuasion from the slide hammer I was able to get the old gimbal bearing out. That was much harder than I expected. I don't think anything back there has been touched in the last 35 years.

I'm slowly but surely moving forward - have to wait for parts anyway so I'll keep you guys apprised. I'm most definitely going to need more advice / tips in the future.
Put new gimbal bearing in the freezer overnight before installing. It shrinks and makes a noticeable difference installing the new bearing. And believe me its a tight fit.

There are you tube videos on removing the shift lever. I believe you take a chisel and hammer and split the lever in 2. That screw will never come loose. Then use a bolt and nuts to crank off the shaft

Soak the crap out of the lower shift cable nut with PB Baster on the bellhousing for a day or two. Mine was crusted in there big time and stripping it seems like a massive headache you don't need
 

Twhjelmgren28

Petty Officer 3rd Class
Joined
May 31, 2016
Messages
85
Thought I'd give you guys a quick update since you've been so helpful.

I've got pretty much everything off and torn apart. I was able to get the lower shift cable nut out by soaking it in PB blaster and using a 9/16 socket and breaker bar as recommended by you guys above.

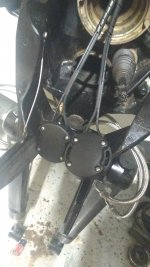
Also, against Jonny Rotten's recommendation and my better judgment, I did decide to change the trim limit and send switches. The reason being the sheathing around the wires had disintegrated in places. I was able to get that difficult top bolt out of the bracket with a perfectly-sized 7/16 wrench. Here's a picture with the new ones in (sort of):

IMG_20210711_191854080.jpg


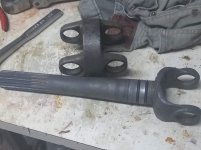
Also worked on cleaning up the yoke and couplers for the U-joints - they turned out pretty good; I was able to get most of the rust off:

IMG_20210711_191826712.jpg


Now just waiting for the rest of the parts to trickle in. One part I'm not certain on is the U-joints. Sounds like there are 2 separate types of U-joints depending on year of the out drive. I've got an older R / MR / Alpha One Gen 1. I checked out the U-joint sticky and it mentions an alpha gen ii but not the gen 1. Ended up ordering the Moog 315G's as recommended above. I'm really hoping these are correct. I kept my old u-joints and circlips to confirm that everything is matching.
 

Twhjelmgren28

Petty Officer 3rd Class
Joined
May 31, 2016
Messages
85
Thanks for the kind words Paintman!

I'm thinking about spraying the yoke end and coupler with rust reformer since I have some laying around. Any reason for / against doing that?
 

Twhjelmgren28

Petty Officer 3rd Class
Joined
May 31, 2016
Messages
85
Merc's spec for impeller replacement is 2 years or 200 hours. Here is an attached photo of Fishermark's bellhousing with the upgraded seal/bushings so you can see the difference
Can you confirm that I've installed the shift shaft bushings/seal correctly? If i understand your post above, the top bushing/fitting has the seals in it and the bottom fitting is just the bushing - no rubber seals or anything. Is that correct?

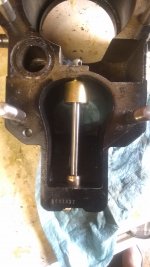
Here is a photo of what i did:

IMG_20210712_201500031.jpg
 
Joined
Mar 27, 2010
Messages
3,008
Yes, you got it.. the top one looks like there's a little gap where it could go up a bit more but maybe just the angle of the picture. Looks good.
 

nola mike

Vice Admiral
Joined
Apr 22, 2009
Messages
5,362
Yes, you got it.. the top one looks like there's a little gap where it could go up a bit more but maybe just the angle of the picture. Looks good.
Yeah there's a gap. Should do the job though. I never replaced my lower, not sure what the point of replacing is.
 

Twhjelmgren28

Petty Officer 3rd Class
Joined
May 31, 2016
Messages
85
Yes, you got it.. the top one looks like there's a little gap where it could go up a bit more but maybe just the angle of the picture. Looks good.
Yeah there's a gap. Should do the job though. I never replaced my lower, not sure what the point of replacing is.

Yes there is a gap. The pitch on the bell housing doesn't exactly match the pitch on the bushing. I tightened it as far as i could with a nut and threaded rod then lightly tapped it to try and get it all the way in. When i look at it, part of the bushing is touching the housing. I'll try and get it a little more snug but hoping it's okay as nola mike mentioned
 

Twhjelmgren28

Petty Officer 3rd Class
Joined
May 31, 2016
Messages
85
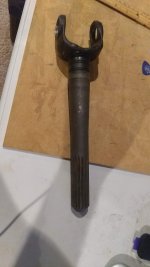
Well I ran into a problem putting my new U-joints in. The yoke assembly bent - I'm guessing when I took the old ones out. I didn't realize it so when I put the new U joints in, it bent even more.

From what I understand, it should probably be replaced. Is it possible to get this at an auto parts store?

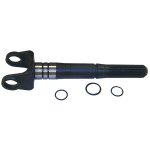
When I search my serial number, it shows a yoke assembly with an extra O-ring and a skinny part of the shaft - part #: 59830A. Some of these have a 7 at the end and some have a 1:

18-2146.jpg

My yoke only has 2 o-rings and looks like this:

IMG_20210716_141611251.jpg

Is it just how they look now?

Anyone know an auto part equivalent?
 

nola mike

Vice Admiral
Joined
Apr 22, 2009
Messages
5,362
There is no auto part equivalent. Regardless, All parts on a boat must me coast guard approved.
That isn't at all true. Ignition and fuel for the most part, but there are *many* auto parts that can be used on a boat. Op, pretty damn tough to bend a yoke. How do you know yours is bent/how did that happen
 

Grub54891

Admiral
Joined
Jun 17, 2012
Messages
6,073
That isn't at all true. Ignition and fuel for the most part, but there are *many* auto parts that can be used on a boat. Op, pretty damn tough to bend a yoke. How do you know yours is bent/how did that happen
Well yes, ignition related parts have to be approved. The only other thing I can think of right now is the circulating pump should be marine, it has the stainless impeller. I've seen the automotive ones that fail from rusty impeller.
 

Twhjelmgren28

Petty Officer 3rd Class
Joined
May 31, 2016
Messages
85
That isn't at all true. Ignition and fuel for the most part, but there are *many* auto parts that can be used on a boat. Op, pretty damn tough to bend a yoke. How do you know yours is bent/how did that happen
It's very visible bent but i didn't notice until i tried to put the new u joint in. I couldn't get it, then i realized it was bent.

I think it bent while pulling out the old u joints. They were all pretty tough to get out with a press. I'm sure they were original. Then I'm sure i bent them more trying to get the new joints in.
 

Twhjelmgren28

Petty Officer 3rd Class
Joined
May 31, 2016
Messages
85
Thought I'd give you guys an update since you've all been super helpful (and this being my first time doing all this). Here's what I've got done so far:

1. Gimbal bearing and gimble bearing seal installed
2. U-joints installed with new, non-bent yoke
3. Shift shaft bushing and seals installed
4. Bellows installed
5. Exhaust flappers / shutters replaced / installed
6. Lower shift cable mostly installed

I'm currently waiting for a new shift shaft arm, set screw, and plastic washer so I'm not completely done yet.

I do have a couple additional follow-up questions:

1. I'm thinking I may pull the lower shift cable back out at the end of the season and chase the threads where the nut in the bell housing is screwed in. I've never done anything like that but the new lower shift cable went in pretty difficult so I think it's fairly corroded. I found another thread (on the forum) that recommended chasing the threads (on the bell housing) with a tap in order to clean it up. My question is: can I chase the threads with the bell housing on? Is it okay to do it from the aft end of the boat? I'd like to do this before the shift cable nut becomes permanently installed!

2. Aside from the water impeller / gaskets and the above maintenance, the only other things I've done is regular oil changes (motor and sterndrive). I've tried to grease the points with zerks regularly as well. I'm wondering what things I should be looking at to check / change / maintain next. Any suggestions?

3. While replacing the exhaust shutter / flapper, a piece of rubber from the old flapper fell down towards the stern drive. I can't for the life of me get it out of the lower exhaust just inside the boat from the bellows. I also never found the other shutter (both were missing but I only found one). Should I be concerned? I assume the rubber may work itself towards the bellows where I can pull it out at the end of the season. EDIT: I did see another thread where a guy sprayed water down the exhaust pipe with a hose to get stuff out. I'll try that but am still open to other suggestions.
 
Last edited:
Top