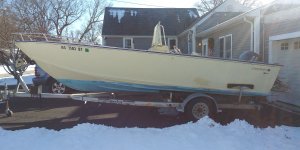
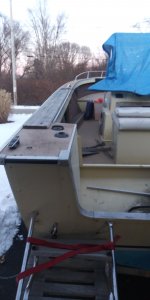
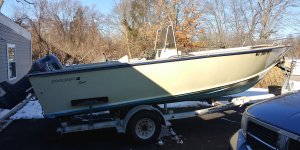
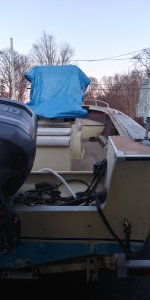
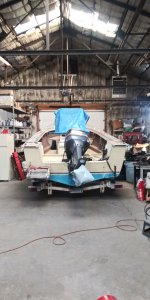
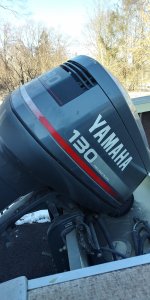
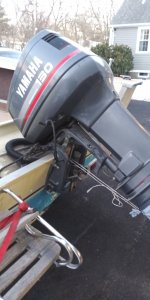
Garage Find 22 Starcraft Sport Center Console in real nice condition. Your thoughts

boatflipperz

Cadet
Joined
Jan 30, 2021
Messages
29
Just picked up an 1986 - 21 to 22 foot Starcraft Spot center console with a 94 Yamaha 130 V4 2 stroke.
Previous owner just installed a new fuel tank and floor. Transom looks super.
According to previous owner this boat spent most of it's life in a warehouse.
He claims theree is less then 100 hrs on the motor and the boat got hardly any use at all since it was new.
The hull is cream colored and looks like new, still super shiny. Quick wash a little polish and the hull should look beautiful. The plexiglass windshield on the center console is crystal clear. It has a Starcraft decal on it that looks like it was just put on there yesterday.
The helm looks like no one has ever placed a cup of coffee.. just clean and shiny on top of the dash/ helm.. amazing.

** If anyone has additional information pertaining to the history on this model boat please let me know your thoughts.

Also if you own or owned one let me know how if performed and what else if anything you liked about it... or disliked for that matter.

Pretty siked over this find.
Can't wait to jump on it in the Spring / get it cleaned up and running again.

Just thought I'd share my find.
I flip a lot of boats but this may be a keeper!
 

Attachments

  • portside.jpg
    portside.jpg
    3.3 MB · Views: 166
  • portsidegunnel.jpg
    portsidegunnel.jpg
    768.5 KB · Views: 67
  • starboardside.jpg
    starboardside.jpg
    3.5 MB · Views: 61
  • starboardsidegunnel.jpg
    starboardsidegunnel.jpg
    835.4 KB · Views: 66
  • stern.jpg
    stern.jpg
    823.2 KB · Views: 67
  • yamaha130.jpg
    yamaha130.jpg
    1.2 MB · Views: 59
  • yamaha130-2.jpg
    yamaha130-2.jpg
    686.8 KB · Views: 57
Last edited:

MNhunter1

Lieutenant Junior Grade
Joined
May 12, 2014
Messages
1,053
Nice find! I wish I could fit something bigger than 18' in my garage. Love the big center consoles.
 

boatflipperz

Cadet
Joined
Jan 30, 2021
Messages
29
Nice find! I wish I could fit something bigger than 18' in my garage. Love the big center consoles.
Time to get a bigger garage.
This boat was being stored in a massive warehouse because the owner was using his 24 ft INFLATABLE most of the time. You can imagine what those cost. He's loaded, didn't even use the Starcraft but 4 times over the past 3 years. Amazing... I got lucky.
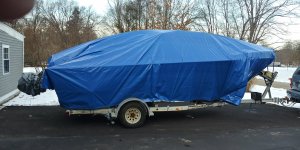
And just so ya know, I don't have a garage big enough to store it either. :) had to cover it till spring.
 

Attachments

  • coveredStarcraft.jpg
    coveredStarcraft.jpg
    3.6 MB · Views: 3

boatflipperz

Cadet
Joined
Jan 30, 2021
Messages
29
I don't have to get inside..
If someone comes to check it out my brother hides on the other side of the boat and makes the motor sounds so the visitor thinks the motor is running.

Cool, but how are you going to sit in it and make motorboat sounds with that cover on it ?
 

64osby

Admiral
Joined
Jul 28, 2009
Messages
6,816
Nice!

The loading winch is a nice plus. I picked one up but have not installed it yet.
 

Watermann

Starmada Splash of the Year 2014
Joined
Jan 12, 2013
Messages
13,787
Great find! (y)
"** If anyone has additional information pertaining to the history on this model boat please let me know your thoughts."

I can say with certainty that is not the original bottom paint or decals for an 86 model year. I have to wonder about the bottom paint and the color? Is that ablative paint?

portside-jpg.333159


The color on the sides seems about right but should have either hockey sticks or this other decal below for the smooth sided model hulls with no laps.

iu
 

boatflipperz

Cadet
Joined
Jan 30, 2021
Messages
29
Yes, it seems to be ablative paint. The owner was using this in salt water.
The color looks like factory beige or cream color and I know nothing about if the decals were installed by the previous owner.


Great find! (y)
"** If anyone has additional information pertaining to the history on this model boat please let me know your thoughts."

I can say with certainty that is not the original bottom paint or decals for an 86 model year. I have to wonder about the bottom paint and the color? Is that ablative paint?

portside-jpg.333159


The color on the sides seems about right but should have either hockey sticks or this other decal below for the smooth sided model hulls with no laps.

iu
 

boatflipperz

Cadet
Joined
Jan 30, 2021
Messages
29
UPDATE on my recent Starcraft find. Info and questions
I'll name this update... "Mystery on the Floor Front"

I wanted to get the motor fired up before doing anything so started in that direction the first day the temps went to 47 degrees here in Rhode Island.

so FIrst, The motor and fuel situation...
Knowing this boat was sitting in a warehouse for 12 years I wanted to re break in the motor carefully..
so, disconnected battery / removed the plugs... squirted fogging oil in cyclinders
Put the boat in gear and rotated the engine 180 degrees by hand at the prop
Squirted in more fogging oil.. turned the engine 360 slowly by hand with boat in gear.. then let the motor sit over night. Give that oil some time to work it's way in there good.
Following morning, spun it over to blast out remaining fogging oil, did a compression test, all was good.
Hooked the fuel line to a portable tank with fresh fuel and gave it a shot.. NO LUCK.
Squirted a little bit of pre-mixed fuel into intake, gave it a spin and she fired, ran for 4 seconds and died so I knew I had spark / must be a fuel issue.
FUEL PUMP TEST: (While still hooked to portable fuel tank)
Removed the fuel line that fed the carbs from the fuel pump / spun the motor over and fuel was shooting out all over the place so knew the fuel pump was good so figured better check out the carbs.
Pulled the drain plugs out of the carb bowls and fuel came out..
Not much but something came out... wasn't pretty either so decided to pull the carbs which is what I did. Cleaned them all out good, blasted them wtih air / thru them back on the motor.
Hooked up to the portable fuel tank again and she fired right up and stayed running. Checked the thermostat housing temps while running and starboard side temp was 15 degrees hotter then the port side. Installed new thermostats / not taking any chances. Restarted engine and temps were now even on both sides. 95 cold to 120 warm. Thumbs up!

Next,
I tried pulling fuel out of the fuel tank for inspection.
I always test fuel tank fuel before actually using that fuel to run a motor when I pick these boats up because 9 out of 10 of them have skunky fuel in the fuel tank.
So I used a regular primer bulb to pull some fuel... just disconnected it where it connects to the motor fuel line, added a piece of hose and pointed it into a clean white plastic bucket.

It wasn't good.. matter of fact it wasn't good at all.
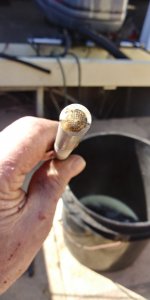
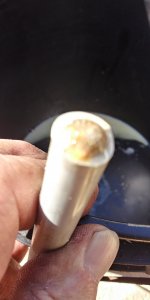
The stuff that came out was a creamy colored liquid and not much came out at all. This stuff looked like liquid tapioca pudding with lumps of tapioca in it. Lost prime on the primer bulb / couldn't get any more fuel. After looking into things I ended up having to locate first then remove the fuel tank pick up tube.
When I say locate pickup tube I mean locate...
As mentioned earlier the previous owner said they installed a new fuel tank and brand new floor..
Only problem was they forgot to make access holes for the pick up tube and fuel sending unit in the new floor. duh? :-(
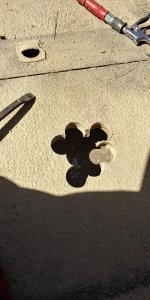
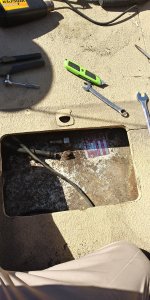
I ended up having to drill a small hole in the plywood near where I figured the pickup tube was. I inserted an inspection camera to locate the pickup tube then cut a large enough access hole in the floor to get the pickup tube out.
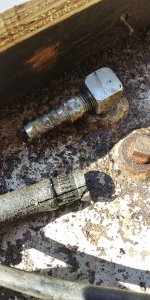
PICKUP TUBE WAS SCREENS WERE CLOGGED SOLID / creamy colored junk hard as a rock / Fuel line was so brittle when I removed it, it actually broke into little pieces. Antisiphon fitting had been 'drilled out' by somebody. Not safe..

Cleaned the pickup tube / installed new anti siphon fitting / all new fuel line from tank to spin on filter at the back / new spin on fuel filter / already inspected and cleaned fuel filter on the side of the motor.

Luckily there was no fuel at all in the fuel tank.
Took the boat up the gas station / dumped some startron fuel conditioner in the tank.. added 30 gallons of fuel and headed back to the house.

TESTED THE FUEL FROM TANK AGAIN just to make sure what was coming out wasn't going to hurt the motor. Primed some into a clean white container and everything looked perfect.
Re connected fuel tank fuel back to motor... fired it up and everything is good to go now.

That's about all I have for now on this project..
What's next?
Hookup new bilge pump.. then start tracing wires that are going no where at both ends of the boat. If you were to look down into the area of where the bilge pump goes... attached to the transom with zip ties looks to be a harness of wires just hanging there connected to nothing. Same thing under the center console.

Transom mystery wires are probably for bilge pump manual switch, washdown pump / livewell pump feeds..
Wires going to lah lah land under center console probably should be extended to go over to a 6 toggle switch panel that only has 1 wire connected to it currently. I'll figure it all out.. I love electrical issues

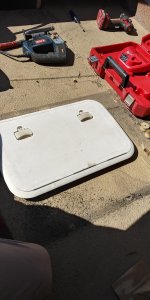
The pictures show the hole I had to cut in the floor to find the pickup tube, then larger hole to fit new access hatch, and the PLUGGED UP pickup tube screen. By the way... this pickup tube had a screen at the TOP of the tube as well as the BOTTOM of the tube. If you run into an issue like this take a good luck to make sure you do or do not have a top screen to clean when you're done doing the bottom one. Most pickup tubes I've seen only have a screen at the bottom. :)

MY QUESTIONS FOR YOU FOLKS
Is my boat a MR21? V5 or what the heck is it? The guys said it was 22 ft. ? Haven't measured it yet but doing that today.
The paint is new, somebody painted it cream, new decals so I have no clue?
 

Attachments

  • starterholes.jpg
    starterholes.jpg
    2.2 MB · Views: 12
  • holeforhatch.jpg
    holeforhatch.jpg
    2.1 MB · Views: 11
  • newaccesshatch.jpg
    newaccesshatch.jpg
    1.4 MB · Views: 11
  • antisiphon.jpg
    antisiphon.jpg
    1.8 MB · Views: 12
  • cloggedpickuptube.jpg
    cloggedpickuptube.jpg
    739.8 KB · Views: 12
  • cloggedtube2.jpg
    cloggedtube2.jpg
    699 KB · Views: 13
Last edited by a moderator:

Watermann

Starmada Splash of the Year 2014
Joined
Jan 12, 2013
Messages
13,787
Good work on the motor, can't be too careful with oldies that have sat for years. Up next for it water pump kit and of course gear oil change? If you have the old gray primer bulb fuel lines that have turned stiff replace it, the liner inside of them comes apart which is probably your tapioca gunk.
No not a V5 model, yours is a few years after they were discontinued but the hull remained the same minus the fuel filler on part side and extended bottom strake.

This is my 78 V5 22' Islander. You can see the differences are subtle.
y4mUpshVToiPjqeBHLQtk-Yk5Y8aoyDXlgBubAt7KduRiCdtRmaBhhGnaL2gnqU0XTAIM5Zq9Y_65gzFuDvOELEwPQ_VpRRGm3-W18SF--cKQ3q_FeZnaE6NqaSOpempE2R5KUiOwW9OP51PpWvcrIa-qgsxL5lnEuH1ekDB2h1GSBbliw_4OuJWM0_OFgIhYgL
 

boatflipperz

Cadet
Joined
Jan 30, 2021
Messages
29
Good work on the motor, can't be too careful with oldies that have sat for years. Up next for it water pump kit and of course gear oil change? If you have the old gray primer bulb fuel lines that have turned stiff replace it, the liner inside of them comes apart which is probably your tapioca gunk.

No not a V5 model, yours is a few years after they were discontinued but the hull remained the same minus the fuel filler on part side and extended bottom strake.

This is my 78 V5 22' Islander. You can see the differences are subtle.
y4mUpshVToiPjqeBHLQtk-Yk5Y8aoyDXlgBubAt7KduRiCdtRmaBhhGnaL2gnqU0XTAIM5Zq9Y_65gzFuDvOELEwPQ_VpRRGm3-W18SF--cKQ3q_FeZnaE6NqaSOpempE2R5KUiOwW9OP51PpWvcrIa-qgsxL5lnEuH1ekDB2h1GSBbliw_4OuJWM0_OFgIhYgL

Nice looking Islander you have there. The bow looks like it would smoothen out the ride in 3 foot seas.. nice!

UPDATE AGAIN: 3/20/21 NEW PICTURES of NEW BATTERY TRAY INSTALL
FUEL LINES
Only gray fuel lines are from the primer bulb to the fuel pump. Checked inside the gray lines.. liner is good. Everything else is brand new from the primer bulb thru the spin on filter over to the fuel tank.
WATER PUMP:
Amazingly this motor was pumping water beautiful, so might not have to do the water pump. I'll be keeping an eye on it.

ENGINE WARNING ALARMS:
I was able to test the low oil alarm and it works.. haven't figured how to test the water temp alarm yet. Haven't looked it up. My engine water temp sensor has 2 wires / have to look it up to see what the test procedure is.
Anybody tested theirs before? ?? ?? ?? my ears are open.

BATTERY TRAY REPLACED TODAY:
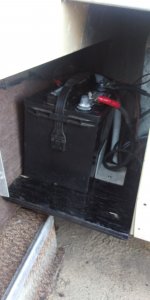
My single battery is mounted in the rear starboard side as well as the spin on filter. It's mounted inside the engine well.

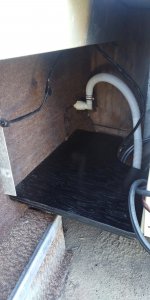
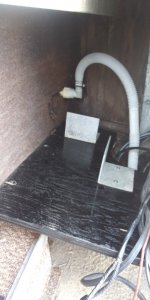
Had to replace the battery shelf the wood was all rotted. Did that today. 5/8 Plywood / painted it to death. See pics

WIRING STUFF:
All of the wiring on this boat is a basket case.. wires hanging not connected to anything at the rear / bilge pump area and under center console. I guess the only thing functioning correctly was the ignition wiring.
So today I Identified which wires go to the Nav lights, anchor light and manual bilge pump. Also ran new wires for a wash down and live well pump should I end up putting one in.

That's about it for now.. No wiring pictures yet but I can take some when I start hooking stuff up to the toggle switch panel.

NEW BATTERY TRAY AND BATTERY SUPPORT BRACKETS INSTALLED TODAY
The panel that hides the battery compartment is missing actually both panels in the rear starboard and port side are missing. Have to fabricate something to cover those 2 compartments later.. one day atta time right
 

Attachments

  • batteryshelfBEFOREbrackets.jpg
    batteryshelfBEFOREbrackets.jpg
    1,006.6 KB · Views: 11
  • batteryshelfbrackets.jpg
    batteryshelfbrackets.jpg
    674.8 KB · Views: 11
  • batteryDONE.jpg
    batteryDONE.jpg
    669.7 KB · Views: 11

boatflipperz

Cadet
Joined
Jan 30, 2021
Messages
29
TRANSOM Questions.....
My transom has a cap that looks like it's part of the splash well as in one piece. I'm thinking about replacing the wood in the transom but has anyone had a starcraft where as the cap that goes over the top of the transom is welded/connected to the splash well? If so that means the entire splash well has to be removed to insert the new marine plywood. That's what it looks like but has anyone run into this? or could heavy paint be hiding a crack meaning the cap going over the top of the transom is NOT connected/welded to the splash well? Your thoughts...?
 

Watermann

Starmada Splash of the Year 2014
Joined
Jan 12, 2013
Messages
13,787
TRANSOM Questions.....
My transom has a cap that looks like it's part of the splash well as in one piece. I'm thinking about replacing the wood in the transom but has anyone had a starcraft where as the cap that goes over the top of the transom is welded/connected to the splash well? If so that means the entire splash well has to be removed to insert the new marine plywood. That's what it looks like but has anyone run into this? or could heavy paint be hiding a crack meaning the cap going over the top of the transom is NOT connected/welded to the splash well? Your thoughts...?

Yeah my SS has a one piece splashwell, no big concern in taking out the spalshwell and it's best to do it anyway so you can clean the inner transom skin of any corrosion. Kind of a wonky pic from the inside overhead perspective but this is how my SW looks. I cut the hole to put in a deck plate for bilge access.

y4mc5N0YvezrICF5KlpJSfQCyNaeQ3Pal_HfHLqKg0Uol1w5Su5nrVVthuSHGmeoFRmGFn9FXovveZkwJYjs_3I8uvbEreQkqLoopN-3ftCOux2VcwwHzCqt7QY8olZDoXhjPI9TKkxV_e1LqTK0GwsDDl80QJfFBpphQ6Lq7FtuHiBg9kpZTUQHN-GBv4t1g2G
 

boatflipperz

Cadet
Joined
Jan 30, 2021
Messages
29
Yes, it seems to be ablative paint. The owner was using this in salt water.
The color looks like factory beige or cream color and I know nothing about if the decals were installed by the previous owner.

After further investigation... This boat was painted that beige color. I found over spray the more I dug into the project.

Could this boat be a

Starcraft Mariner MR 220 V ???​


boatflipperz

Cadet
Joined
Jan 30, 2021
Messages
29
Yeah my SS has a one piece splashwell, no big concern in taking out the spalshwell and it's best to do it anyway so you can clean the inner transom skin of any corrosion. Kind of a wonky pic from the inside overhead perspective but this is how my SW looks. I cut the hole to put in a deck plate for bilge access.

y4mc5N0YvezrICF5KlpJSfQCyNaeQ3Pal_HfHLqKg0Uol1w5Su5nrVVthuSHGmeoFRmGFn9FXovveZkwJYjs_3I8uvbEreQkqLoopN-3ftCOux2VcwwHzCqt7QY8olZDoXhjPI9TKkxV_e1LqTK0GwsDDl80QJfFBpphQ6Lq7FtuHiBg9kpZTUQHN-GBv4t1g2G
Watermann, thanks for that picture. If I'm seeing it right, looks like your picture has shrunk down the splash pan from left to right.. correct? Do you have any others of the transom splash pan removed maybe sitting on the ground or something?
 
Last edited:

Watermann

Starmada Splash of the Year 2014
Joined
Jan 12, 2013
Messages
13,787
Watermann, thanks for that picture. If I'm seeing it right, looks like your picture has shrunk down the splash pan from left to right.. correct? Do you have any others of the transom splash pan removed maybe sitting on the ground or something?
Yeah I have a few SW stern pics, looking back to find some of it outside. The SW is 3 pieces, the center pan and the 2 side 'wings' that attach to the gunnels and transom. I replaced all the solid rivets holding it together and put new sealant in the seams. I'll post some out of the boat pics if I find any in my pic folders

y4mvCjzn6UMmj13bya5hWlgoli5RT5hoh-kPML6P204JEnWmOubaMcIc6i0hZS36MAzLtIrPC96ArPCVRXsbN3SUj-prVE04Vve1QKdJq0Z5nDxWBMYUVaJVdovbPIqhYL6woL_lKNY7dvOAw_Ab5aTGbTm4pgRt3JSz_WhQqzhs5nXBKMQkdvL0Fl9TIxbbava


Yours is most likely the same as my 78 V5 Islander, one piece but mine was sawed up by a savant from 25" transom to a cut out for a 20" motor. :mad:
Anyway I don't have it out but it looks pretty straight forward removing it in one piece.

y4mRmFOU-Ej4sUj9YeGvgz31ZjfygZwos4OSCe4zozo5By04ZeomtxgeuKY1uke2_SoSsVJ7g2TC4vvkzfs1ybwj5yjLKmfIn7VIe7FVGLUt2dyGWW9bF0KYnmafuBvPObMoiVyytBed0ooxYS5IWjA22M8k7d92hexnRKgf8f8cloGaQsgkkNxpCsA2_PqnajK


The inside SW when I was removing all the rusty garbage from the transom before storing the boat.

y4mvk0gLOU5Lc6wCQHYp0Ma89t-esC4xyIXvsKeA8een3MaTPtaZzv9amNvN1Cw06eNiUq41GQDl8nH77x42YFx98yxXcEskvr-CFdMJYHt-X1yWEq3a5tscs0QhKMggXmHqvQXtwI2riw3JDqUohxqHsaf-O8oAjUL5t7YnaJPtGhXi4oVx7iX7QCf7VwsVMvC
 
Last edited:
Top