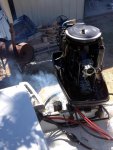
Force 125 1987 - New to me - Iginition issue

Steverino74

Seaman Apprentice
Joined
Jul 29, 2014
Messages
44
I just bought an 87 Bayliner with a 125 Force on it. A friend with cancer sold it to me at what I consider a very reasonable price. It needs TLC here and there, but he told me he took the boat to a mechanic after non-starting and was told "It's an electrical issue". It sat in his shed for a few years after that until I recently pulled it out.

After researching I am seeing these are not the most respected engines for quality? I am worried about parts availability?

I am pretty good with electrical, so with the help of the nice SELOC maintenance manual, I am fairly confident I can figure it out eventually. But I am open to experience on these and advice. I already looked at fuses up front and they are the old glass type, and all looked ok on a quick visual.

The battery is an Interstate Deep Cycle but who knows when it was last charged. So I put my C-Tek 3300 to work on it and crossing my fingers. It has a dual battery switch, but only one battery, so I may have to remedy that in time.

I know I need to replace all rubber and rebuild the carb with the Ethanol in gas these days.

Where's a good place to get parts? On-line works for me, but I am fairly close to Austin, Tx.

Any other advice would be appreciated.

Thanks! Steve
 

Jiggz

Captain
Joined
Oct 23, 2009
Messages
3,909
Since the motor hasn't run in years, here's initial thing to do before the first re-run:
1. Use new gas mix. Dispose off the old one
2. Replace LU gear oil, regardless if it is clear. But if it is not clear, then you will need to investigate what is causing it.
3. Replace water impeller, regardless if the last one used was new or not or doing well.
4. Dismount the carb's bowl and using carb cleaner spray clean the floats, the needles and the inlet port
5. Replace all spark plugs, NGK's BUHX or Champs UL18V
6. Fully charge the battery before starting or replace with a new one.
7. Reset the air/fuel idel mixture screw to 1 turn out from lightly seated
8. Install a clear fuel filter between the fuel pump outlet and the carb's input. A G-2 clear fuel filter from Wmart costs less than $5 and is sufficient for the job.

Prior to turning over the motor for the first time, while replacing spark plugs, squirt one or two into each cylinder fuel oil mix to lube and prep the cylinders. Now the next step is to do the test run. Make sure you follow proper starting procedures.
1. Prime the fuel system with the fuel priming bulb, the bulb should get firm after about 5~6 compresses. If not continue on but if it will not get firm you might have a faulty check valve on the primer bulb. Check the fuel level of the clear fuel filter installed. It should be at least 3/4 full.

2. Place the control lever in fast idle. Either pull the lever towards the driver and push forward or push a center button to do so.
3. Engage choke by pushing in the ignition key and turning (while pushing in) at the same time to start

Do not engage the starter more than 10 secs at a time. Do not engage choke more than 2 times until motor starts.

If motor will not start, use the spray bottle technique. This involves using a spray bottle with fuel oil mix in it and spraying directly into each carb while cranking over. If motor fires or tries to start, it means, you have fuel or carburetor problem. Otherwise, it could be an electrical problem. To diagnose this, you need to buy spark tester and check for sparks.
 

SkiDad

Lieutenant Commander
Joined
Jul 18, 2010
Messages
1,518
I'm betting if you don't get spark on any cylinders it's the stator - but look at http://www.outboardignition.com for troublshooting pdf's - look at the stator tests and the Power pack tests. they are very good and have helped me twice. Get a 10.00 spark tester and check for spark on all 4 cylinders. Do 1 hole at a time, ground the tester and leave the other wires connected so you don't blow anything. Get a 20.00 DVA meter and run the tests on your stator wires if you have no spark on any.

Have your engine hooked to a garden hose in case it starts on you - you don't want to overheat anything.
 

jerryjerry05

Supreme Mariner
Joined
May 7, 2008
Messages
18,037
The parts are everywhere.
This site sells some, Franz Marine and others.
Before you do anything, do a compression test.
No reason to spend $ on an anchor.
 

Steverino74

Seaman Apprentice
Joined
Jul 29, 2014
Messages
44
120 PSI or better on all 4 Cyls !!! 120 was lowest, about 125 at the highest. I put just a little synthetic oil in the cyls after taking the plugs out.

On to electrical testing! Looks like it has 4 coils, each one having a spark plug wire. The wires were located on a corresponding coil. The top coil went to the top plug and continued on down.

There are 2 carbs on this engine. I have a good maintenance manual to guide me. Added some fuel stabilizer to the tank to help with Ethanol issues.Will check the filter after the electrical. Plan on replacing all hoses after I verify the electrical ignition issue I was told about.

Marine Deep Cycle charged up from nothing rather nicely after a couple of days. Turned over the engine just fine.

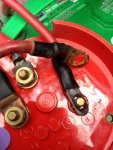
Rectifier checked good, but connections were questionable. Slightly loose and slightly corroded. Cleaned the right way, wire brushed everything, small amount of dielectric grease applied. Tightened connectors back down.

Same with two circuit breakers after re-positioning the lock washer above the terminal and not in between the terminal and bottom connector nut as it was before! Cleaned by wire brushing, slight amount of dielectric grease, tightened down.

Re-seated two BOSCH relay connectors near the solenoid that I need to look up what they do. I will have to look up how to test them.

On to testing the Stator, then Power Pack.
 
Last edited:

Steverino74

Seaman Apprentice
Joined
Jul 29, 2014
Messages
44
No spark on ANY plug according to my new in-line spark plug checker. I need to verify the tool is good yet.

The emergency cutoff switch has been tampered with and who knows who did what. So I have to research that wire and switch.

Anything else (other than emergency cutoff) that could cause no fire on any plug besides the stator?
 

pnwboat

Rear Admiral
Joined
Oct 8, 2007
Messages
4,251
The strip magnet that is glued to the inner circumference of the fly wheel has come loose will also give you a "no spark" symptom.
 

Jiggz

Captain
Joined
Oct 23, 2009
Messages
3,909
No Title

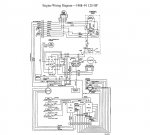
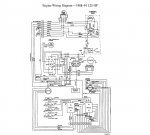
Here's a wiring diagram of the motor and T&T to give you a reference. As for not having sparks, you will need to disconnect the white wire coming off both CD modules from the engine terminal block. This wire is to shunt the CD modules to ground to stop the motor (note on the ignition switch). If the motor starts with the white wire disconnected, the only way to shut if off is to either ground the white wire or suffocate the motor by covering both carbs (which is hard to do with the covers on). So make sure you are ready to re-ground the wire to shut if off.

If the preceding still gives you no spark it is high time to test for the stator output. There are two sets of wires (three including the charging wires going to the rectifier, but this is not a part of the ignition system) Yel/Blu, just make sure they are properly paired and has at least 180VAC (P-P, using a DVA) or approx 120~130 VAC (RMS, using a conventional DVM) cranking output. If not trace all wires and do an ohm reading which is around 680-800 ohms on each pair.

If stator reads good, then check each pair of trigger wires (see diagram) and should have resistance of 48-52 ohms on each pair.
attach8302172.jpg
 

Attachments

  • photo205185.jpg
    photo205185.jpg
    160.2 KB · Views: 1

Steverino74

Seaman Apprentice
Joined
Jul 29, 2014
Messages
44
Here's a wiring diagram of the motor and T&T to give you a reference. As for not having sparks, you will need to disconnect the white wire coming off both CD modules from the engine terminal block. This wire is to shunt the CD modules to ground to stop the motor (note on the ignition switch). If the motor starts with the white wire disconnected, the only way to shut if off is to either ground the white wire or suffocate the motor by covering both carbs (which is hard to do with the covers on). So make sure you are ready to re-ground the wire to shut if off.

If the preceding still gives you no spark it is high time to test for the stator output. There are two sets of wires (three including the charging wires going to the rectifier, but this is not a part of the ignition system) Yel/Blu, just make sure they are properly paired and has at least 180VAC (P-P, using a DVA) or approx 120~130 VAC (RMS, using a conventional DVM) cranking output. If not trace all wires and do an ohm reading which is around 680-800 ohms on each pair.

If stator reads good, then check each pair of trigger wires (see diagram) and should have resistance of 48-52 ohms on each pair.

That it totally awesome! Thank you so much for the good info. I do have a nice Digital Meter and have some electrical/electronic background, but just ignorant on how they designed the ignition system on this thing. I do have a nice book on the engine, but it doesn't cover everything.
 

Jiggz

Captain
Joined
Oct 23, 2009
Messages
3,909
It's a magneto ignition system that is self-sustaining requiring no external electrical power to start and run. However, a starter is used for convenience but in reality, the motor can be pulled start even without the battery. A short gist of its operation: Everything starts with the flywheel and stator winding which generates approx 180 VAC from a fast turning flywheel with permanent magnets and separate set of magnets for the trigger coils. The generated stator power is fed to the CD modules which converts it to VDC to charge a capacitor to build up energy and a gated diode to discharge it to the ignition coil and eventually to the plugs. The gated diode gets its positive signal from the trigger output which are timed to each cylinder, which fires the CDM feeding it to the coils where the energy is stepped up further up to 22K volts.
 

jerryjerry05

Supreme Mariner
Joined
May 7, 2008
Messages
18,037
Prestolite ADI Ignitions 1984-1992
General

  1. Check for broken wires and terminals, especially inside the plastic plug-in connectors. We recommend that you remove the pins from the connectors and visually inspect them.
  2. Check the flywheel for a broken or loose magnet.
  3. Disconnect the kill wires from the CD and connect a DC voltmeter between the kill wires and engine ground, turn the ignition switch on and off several times. If, at any time, you see voltage appearing on the meter, there is a problem in the harness or ignition switch. At NO TIME SHOULD YOU SEE BATTERY VOLTAGE ON A KILL CIRCUIT.
  4. Visually inspect stator for burned or discolored areas. If found, replace the stator. If the areas are on the battery charge windings, it indicated a possible problem with the rectifier.
IF NO FIRE ON ANY CYLINDER:
  1. Disconnect kill wire AT THE PACK.
  2. Check for broken or bare wires on the unit, stator and trigger.
  3. Measure DVA voltage of the stator between the output wire sets. With everything connected, readings should be approximately 180 volts or more. Resistance readings between the stator wire sets range from 680 - 800 ohms.
  4. Disconnect the rectifier. If the engine fires, replace the rectifier.
NO FIRE OR INTERMITTENT ON ONE CYLINDER:
  1. Check stator and trigger resistance, trigger wire sets read approximately 50 ohms between the wire sets (DVA-5V or more), stator reads 680-800 ohms, DVA 180V or more from blue to yellow.
  2. If readings are good, disconnect kill wire from one pack. If the dead cylinder starts firing, the problem is likely the blocking diode in the other pack.
NO FIRE ON TWO CYLINDERS:
  • If two cylinders from the same CD unit will not fire, the problem is usually in the stator. Test per above.
ENGINE WILL NOT KILL:
  • Check kill circuit in the pack by using a jumper wire connected to the kill wire coming out of the pack and shorting it to ground. If this kills the pack, the kill circuit in the harness or on the boat is bad, possibly the ignition switch.
COILS ONLY FIRE WITH THE SPARK PLUGS OUT:
  • Check for dragging starter or low battery causing slow cranking speed. DVA test stator and trigger.
HIGH SPEED MISS:
  1. DVA check stator voltage to each pack at high speed. If it exceeds 400 volts, replace the pack.
  2. Disconnect the rectifier. If the engine fires smoothly, replace the rectifier.
  3. Three and Four Cylinder Engines Using Separate Switch Boxes and Ignition Coils
    IF NO FIRE ON ANY CYLINDER:
    1. Disconnect kill wire AT THE PACK.
    2. Check for broken or bare wires on the unit, stator and trigger.
    3. Measure DVA voltage of the stator between the output wire sets. With everything connected, reading s should be approximately 180 volts or more. Resistance readings between the stator wire sets range from 680 - 800 ohms.
    4. Disconnect the rectifier. If the engine fires, replace the rectifier.
    5. NO FIRE OR INTERMITTENT ON ONE CYLINDER:
      1. Check stator and trigger resistance, trigger wire sets read approximately 50 ohms between the wire sets (DVA-4V or more), stator reads 680-800 ohms (factory) and 200- 300 (CDI/RAPAIR) DVA 180V or more from blue to yellow.
      2. If readings are good, disconnect kill wire from one pack. If the dead cylinder starts firing, the problem is likely the blocking diode in the other pack.
      NO FIRE ON TWO CYLINDERS:
      • If two cylinders from the same CD unit will not fire, the problem is usually in the stator. Test per above.
      ENGINE WILL NOT KILL:
      • Check kill circuit in the pack by using a jumper wire connected to the kill wire coming out of the pack and shorting it to ground. If this kills the pack, the kill circuit in the harness or on the boat is bad, possibly the ignition switch.
      COILS ONLY FIRE WiTH THE SPARK PLUGS OUT:
      • Check for dragging starter or low battery causing slow cranking speed. DVA test stator and trigger.
      HIGH SPEED MISS:
      1. DVA check stator voltage to each pack at high speed. If it exceeds 400 volts, replace the pack.
      2. Disconnect the rectifier. If the engine fires, replace the recfifier
 

Steverino74

Seaman Apprentice
Joined
Jul 29, 2014
Messages
44
You guys are awesome! Now to get on the troubleshooting.

Texas requires you to register your boat and outboard seperate and independant of the trailer. My county doesn't do boats so they sent me to Austin to register the boat and outboard.

The county registers the trailer and requires an inspection by a local facility that works on cars. So I got most of that done yesterday.

It's supposed to be near 100 today and humid. I have a ton of stuff to do. I may wait until weather cools back down, but you guys have me excited that I can troubleshoot and repair this outboard! Thanks!
Steve
 

Steverino74

Seaman Apprentice
Joined
Jul 29, 2014
Messages
44
UPDATE: Disconnected the kill wire at the engine. It was grounded ...measured just a few ohms. Disconnected, and cranked over and seen spark on #1 cyl. That should eliminate (or reduce the chance?) the stator. I need to check for spark on the other plugs yet, but I am feeling good!

I did see the kill switch test bad at first (meter on resistance), but a few times working it open and closed and it started working. I will replace anyway. I have a new igniton switch coming. It seems to be functioning ok, but I just don't trust anything that old.

Purchased new fuel line from the local auto parts store that should handle E85. Drained gas and mixed a fresh batch of gasoline and 2 cycle oil. Also added ethanol treatment.

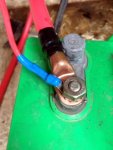
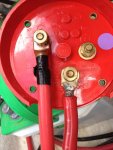
Battery terminals corroded and damaged. I bought a new 1 gauge to go from the battery to the 2 battery switch. Debating on replacing the dual battery lines that go into the engine.

Spark plug wire boots are cracked open. The wire on the coil end is potted in and can't be replaced. Working on buying boots and terminals.

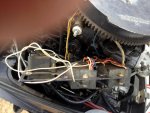
Took one coil out of metal mount and found it's ground wire didn't have a star washer on it. I have new stainless star washers on order. Inspected wires going to the back of the coil and the kill wire has a questionable area where it was rubbing something. I don't see where it was showing bare wire, so will put heat shrink over it and move on. Will be inspecting the other coils next.

Will be wire brushing connections, cleaning, and verifying spark on other plugs. I don't think I am that far from starting?
 

Steverino74

Seaman Apprentice
Joined
Jul 29, 2014
Messages
44
No Title

Repairing old and bad electrical connections. Replacing a battery cable, replacing fuel lines and first stage filter, and checking for problems behind the electronic pack. I cleaned up a lot of bad ground connections while in there. Wire brushed, new stainless star washers, and a small amount of dielectric grease on all connections. Now to replace the spark plug boots and terminals!
 

Attachments

  • photo209245.JPG
    photo209245.JPG
    42.3 KB · Views: 0
  • photo209246.jpg
    photo209246.jpg
    54.4 KB · Views: 0
  • photo209247.jpg
    photo209247.jpg
    45.4 KB · Views: 0
  • photo209248.jpg
    photo209248.jpg
    40.5 KB · Views: 0
  • photo209249.jpg
    photo209249.jpg
    43.5 KB · Views: 0
  • photo209250.jpg
    photo209250.jpg
    28.7 KB · Views: 0

Jiggz

Captain
Joined
Oct 23, 2009
Messages
3,909
I'm not really sure why there is a clear fuel filter right off the fuel tank's pick up tube. There is a primary fuel filter built into the fuel pump. And the reason for the clear fuel filter is for fuel related troubleshooting which should be installed between the output of the fuel pump and inlet of the carbs.
 

Steverino74

Seaman Apprentice
Joined
Jul 29, 2014
Messages
44
No Title

IT LIVES !!! Thanks to you guys giving me info and confidense on being able to fix this, I cleaned up a lot of wires, hoses, cables etc. Today I sprayed some starer fluid into the carbs, pumped up some new gas from the tank, and fired right up! It idled rough so I still have a problem and idle was too high. I am going to buy rebuild kits for the carbs and fuel pump. More electrical connections to clean.

Thanks Jiggs for suggestion. I just may do that? Just worry about leaks in there.
 

Attachments

  • photo209356.JPG
    photo209356.JPG
    168.6 KB · Views: 0
  • photo209357.jpg
    photo209357.jpg
    63.6 KB · Views: 0

Steverino74

Seaman Apprentice
Joined
Jul 29, 2014
Messages
44
No Title

Replaced the water pump today. The old one disintegrated into a million pieces. I knew it was well over 2 years old and probably around 4-5 so plans were to change it anyway. I installed the telltale mode the other day and didn't see any water coming out. So this pic confirms it's working. I caught it at a bad moment as this is misleading. The stream was much more steady than this pic indicates.
 

Attachments

  • photo209776.JPG
    photo209776.JPG
    158.3 KB · Views: 0
  • photo209777.jpg
    photo209777.jpg
    66.6 KB · Views: 0

jerryjerry05

Supreme Mariner
Joined
May 7, 2008
Messages
18,037
Getting the "right" kit can be a problem.
Most times they just need a good cleaning.
I use Dawn and the Purple Power from WM.
The carb soaks can hurt the plastic/rubber in the carbs.
Wash with Dawn and blow dry.
If your not gonna use them right away? Spray with WD.
Initial air screw setting is 1and 1/8th turn out from lightly seated.
Be careful with the bowl gasket.It's probably cork and dry and brittle.
I use a bit of oil on them and let them set overnight.
 
Top